Static Geometry
In Unigine, static geometry is represented by meshes with multiple surfaces and two UV channels per each surface. Meshes of this type are created in third-party 3D editors and then exported into the MESH file format, which is native to Unigine.
Model Creation and Unwrapping
Requirements
The following conditions are necessary:
- A final version of a model should be optimized for usage of a vertex cache. Vertex caching lets adjacent polygons share a vertex, if for all polygons this vertex has the same normal and the same UV coordinates. To achieve that, do the following:
- If you use 3ds Max, arrange all surfaces in smoothing groups. If you use Maya, smoothen normals between polygons that will share a vertex.
- When creating a UV map, make sure that a shared vertex maps to the same coordinate pair regardless of a polygon.
NoticeDon't follow this rule blindly. In some situations properties of a UV map are more important than vertex cache optimization, for example, if a seam is required in a UV map, than create it no matter what. - Check a scale of a model before export. If needed, use the Scale field during export. It is recommended to make one unit be equal to one meter.
- A UV map uses two channels. The first channel can contain an arbitrary mapping. The second channel should contain a unique mapping without overlaps and duplicates because it is used for lighting calculations.
- There should be spaces between separate parts of a UV map, and a recommended distance between UV parts is four pixels. This is required in order to avoid texture filtering artifacts later.
- Keep in mind an orientation of a UV map. This is especially important, if later you are going to use an anisotropic shader, because an anisotropy angle is relative to UV coordinates.
- There should be no overlapping mappings, if a normal map is going to be created. If you have to overlap stuff, move pieces that overlap out of the grid.
- Parts of a UV map corresponding to two polygons forming a beveled edge in a normal map should be separate.
Guidelines and Tips
The following guidelines will ease your hard life as a modeler:
- Make a decision how a model will be divided into materials before you start creating geometry; ideally, it should be done along with creation of a model concept. This is important because it determines how the model will be split into surfaces, what textures and maps should be created and how they can be shared, what shaders will be used, and so on.
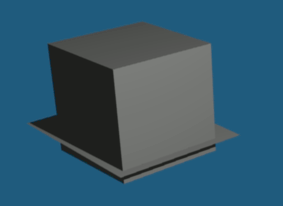
- Unigine does not require a closed geometry of a model, so in order to lower a polygon count, you can "stick" one object into another instead of seaming them tidily (see the picture below). However, keep in mind the following:
- An invisible part of the "stuck" object occupies some space of a UV map, therefore, if this object is rather large, it is better to seam the objects.
- If geometry pieces are not linked by vertices, they might annoyingly flicker.

- Use a reasonable tessellation level:
- Avoid too large polygons: when lit, they might produce visual artifacts.
- Avoid polygons smaller than four pixels. Use normal and parallax mapping to create small details (see also below).
- Use a reasonable number of surfaces. In general, the fewer surfaces, the better, but you'll have to make a trade-off between the number of the surfaces and effective texture layout.
- Minimize overdraws of surfaces belonging to the same mesh.
- If you export from 3ds Max and set Split Multi/Sub, check material identifiers of all surfaces.
- If you will use LODs, the less seams the better.
- When creating a UV map for a symmetric object, first, finish completely one half and only then copy it and join both halves.
- UV values should be restricted in range [0; 1] to prevent loss of precision.
- Avoid too detailed geometry:
- Details that do not add visible features to an object silhouette, should be created in a normal map rather than modeled in geometry. See also: Low Poly Models.
- Use parallax occlusion mapping. It is especially great when used on surfaces like floor or walls. This allows you to make them simply flat.
- In some cases it is better to use alpha testing to create small openings then to model them directly.
- If a feature of a curved object resembles a silhouette of the object, unwrap the object into a strip, don't do planar mapping for it.
- If a light map will be created for an object, adjacent parts of which significantly contrast to each other, it is recommended to separate these parts in a UV map to avoid artifacts after downsizing the light map.
- Create levels of detail.
Low Poly Models
Guidelines and Tips
When working on a low poly model, keep in mind that:
- The smaller is a polygon count, the better.
- Use more polygons for outer edges of a model where a geometry silhouette might be visible and fewer otherwise.
- To create a normal map for a low poly model, you don't have to unwrap a high poly model. See also: NormalMapper.
Levels of Detail
Guidelines and Tips
If you need LODs, remember this:
- A polygon of a current LOD should occupy an area of at least four pixels.
- It is better to export LODs as surfaces of the same mesh.
Last update: 03.07.2017
Помогите сделать статью лучше
Была ли эта статья полезной?
(или выберите слово/фразу и нажмите Ctrl+Enter