Migrating to UNIGINE from Unreal Engine
This section gives a brief overview of UNIGINE from an Unreal Engine user's perspective and provides basic information to help you transfer your Unreal Engine experience to UNIGINE.
Quick Glossary#
This chapter matches common Unreal Engine terms on the left and their UNIGINE equivalents (or rough equivalent) on the right. UNIGINE keywords are linked directly to related articles to provide you with more in-depth information.
| Category | Unreal Engine | UNIGINE |
|---|---|---|
| Editor UI | World Outliner | World Nodes Hierarchy window |
| Details Panel | Parameters window | |
| Content Browser | Asset Browser window | |
| Viewport | Editor Viewport | |
| Scene | Level | World |
| Gameplay Types | Actor, Pawn | Node |
| Blueprint Class | NodeReference + Component System | |
| Meshes | Static Mesh | Static Mesh, Dynamic Mesh |
| Skeletal Mesh | Skinned Mesh | |
| Effects | Effect, Particle, Cascade | Particle System |
| Game UI | UMG (Unreal Motion Graphics) | GUI |
| Materials | Material, Material Editor | Base Material |
| Material Instance | User Material | |
| Programming | C++ | C++ / C# |
| Blueprint | UnigineScript | |
| Physics | Line Trace | getIntersection |
| Primitive Component | Rigid Body | |
| Collision | Shape | |
| Physics Constraint | Joint | |
| Animation | Sequencer | Tracker |
Project and SDK Management#
As an Unreal Engine user, you are accustomed to use Epic Games Launcher — the application that streamlines the way you find, download and manage your projects and installations. In addition to it, you can manage your projects directly via Unreal Editor: create a new project and switch between the existing ones.
UNIGINE SDK Browser is the first step to start working with UNIGINE Engine. This application incorporates all project-related tasks and enables you to manage your projects and installed SDKs, as well as gives you access to the samples and the knowledge base.
UNIGINE provides several programming workflows, to easily adapt your programming experience in Unreal Engine it is recommended for you to use the C++ Component System. Creating a project using this workflow in SDK Browser is done as follows:
- Click Create New in My Projects section;
- Among other options, choose C++ (Visual Studio 2022) project type in the API + IDE field;
- If you want to make the project compatible with supported VR headsets, select the VR option in the Template field. This will enable required plugins and add template assets (more about VR-compatibility);
- Check the Component System feature if it isn't enabled yet.
- Click Create New Project.
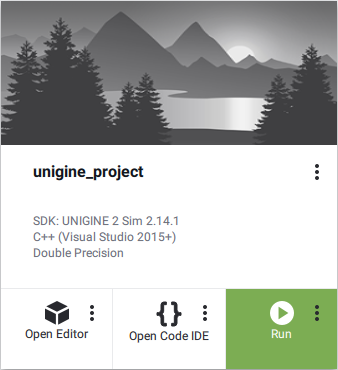
- Upon completion, click Open Editor to run UnigineEditor; click Open Code IDE to open the project's source code via the default IDE.
Editor Interface#
Below you can see interfaces of the Unreal Editor and UnigineEditor. Interface elements in the images are color-coded to indicate common functionality. Each element has a label to show UNIGINE's equivalent. The layout of UnigineEditor is fully customizable by resizing, dragging and dropping the tabbed windows.
To learn more about the UnigineEditor interface, read this article.
Viewports#
Unreal Editor Viewports and Editor Viewports in UnigineEditor are very much alike. You can use as many Editor Viewports as you need.
By default, an Editor Viewport renders its own Editor Camera view, and you can switch to another camera present in the scene and control it the same way as you pilot a CameraActor in UE.
Navigation inside Editor Viewports is pretty much the same as in UE Viewports. However, get familiar with Scene Navigation so as not to miss details.

|

|
|
Unreal Editor Viewport
|
UNIGINE Editor Viewport
|
|
|
|
You can use:
- Camera panel to switch between cameras and configure the current one.
- Rendering Debug to display the contents of rendering buffers the same way as using the Buffer Visualization Mode in UE4.
- Navigation panel to quickly set up and switch between camera speed presets and change the camera position.
- ViewCube to switch between the perspective/orthographic projections and control orientation of the camera.
Also, a set of switchers is available globally in the top toolbar:

- Helpers panel provides quick access to auxiliary visualizers, such as icons, gizmos and wireframes.
- Precompile All Shaders toggle is used for Forced Shaders Compilation
- Animation toggle
- Physics toggle
- Audio toggle
Playing and Simulating#
You are accustomed that Unreal Editor has the Play In Editor (PIE) mode launching the game in the current Viewport and being representative of your final build. You can also play in other modes and use the Simulate In Editor (SIE) mode to preview blueprints logic, animation and physics simulation.

In UNIGINE, you can enable animation and physics simulation using the toggles in the top toolbar. You can open the Engine viewport (menu: Windows -> Engine Viewport) where you can pilot the current Main Player.
To check application logic you will need to run an instance of the current compiled binary of the application via any of the following ways:
-
Via SDK Browser by clicking Run:

You can also run the application with custom settings by clicking an ellipsis under the Run button (e.g. choose the Debug binaries).
-
By using the corresponding launcher created by default in the project folder:
-
 launch_debug — the launcher of the project's debug version.
-
 launch_release — the launcher of the project's release version.
-
- By running the project directly from the IDE used.
By default, the mouse cursor is grabbed when clicked at run time, providing camera movement control, press Esc to free the cursor. There are two ways to setup default Input Bindings (key states and the mouse behaviour):
Output Log#
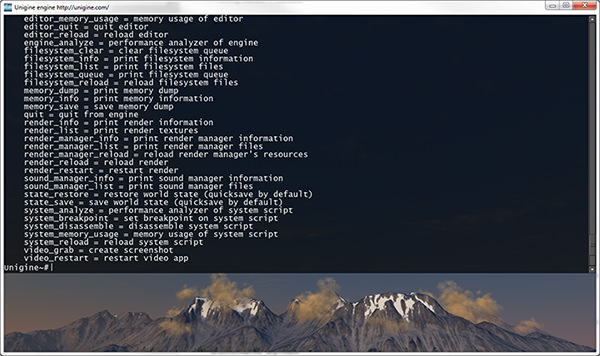
As well as UE4, UNIGINE has the Console used for standard input, output and error logging. A set of console commands is provided.
It is available both in UnigineEditor and a running application. To open the Console window in the Editor, go to Windows -> Console menu:

A built-in console is called by pressing the F1 key:

You can use it to print user messages from code.
Packing a Final Build for Publishing#
In Unreal Engine, you got used to building your projects via the Editor. In UNIGINE, packing a final build is also done via UnigineEditor.
Projects and Files#
Directories and Files#
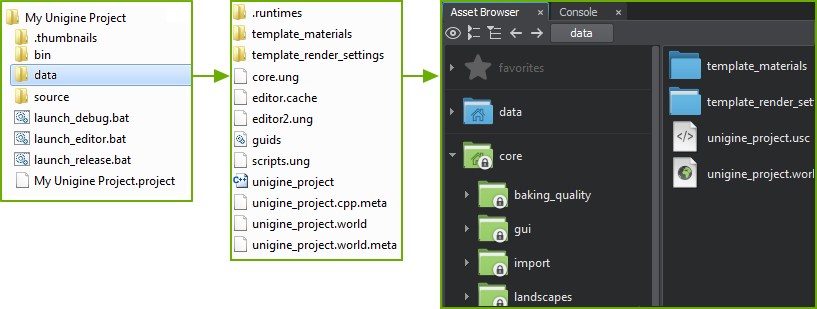
A project in UNIGINE, just like a UE project, is stored in its own folder, project settings are stored in the *.project file. There are various subfolders inside the project's folder, where your content and source files as well as various configuration files and binaries are stored. The most important are the data and source sub-folders.
In UNIGINE, each project has a data folder. Similar to a UE project's Content folder, this is where your project's assets are stored. To import assets into your project, simply drop files into your project's data directory and they will be automatically imported and appear in the Asset Browser. The assets in the editor will update automatically as you make changes to the files using an external program.

The core folder contains the built-in core assets. These assets are read-only and available for every project by default.
Supported File Types#
UNIGINE, like UE, supports the most commonly used file types and some specific ones:
| Asset Types | Supported Formats |
|---|---|
| Geometry | .fbx, .obj, .3ds, .dae, .glb/.gltf, .stp/.step, .igs/.iges, .brep, .stl |
| Textures | .png, .jpeg, .tif, .tga, .rgba, .psd, .hdr, .dds, and more |
| Sound and Video | .wav, .mp3, .oga/.ogg, .ogv |
| Fonts | .ttf |
Bringing Your Assets from Unreal Engine#
Unreal Engine assets (.uasset) are not supported for import by UNIGINE. Use the source content files you have used in your UE projects or export assets in one of formats supported by UNIGINE.
Meshes
You can import assets you used in UE to UNIGINE: export your mesh as an FBX model and import it to UNIGINE checking the required import options depending on the model.
Materials
Similar to other engines, UNIGINE works with PBR materials. Moreover, UNIGINE supports both Metalness and Specular workflows and has a rich out-of-the-box library of materials that can be used to create almost any material. Therefore, materials created for the model in UE can be re-created in UNIGINE using mesh_base material, the base material in UNIGINE used for physically based materials.
Textures
Textures can be imported as a part of a model or separately and then applied to a mesh. To import textures, you might have to do some adjustments in advance. For example, the Shading texture in UNIGINE stores the metalness, roughness, specular, and microfiber maps in its corresponding channels (RGBA), so you need to modify the texture using third-party software, such as GIMP or Photoshop, and then import it to UNIGINE.
Normal texture used in UE is compatible with UNIGINE, therefore you can import your normal textures to UNIGINE without any changes.
Animations
If you want to import a bone-animated model, export it from UE as an FBX file and enable the Import Animations option during the import to UNIGINE. You will also have additional options to finetune the import.
For more details, see import recommendations.
Levels#
The concept of 3D scene in both engines is the same. However, Unreal Engine and UNIGINE use different coordinate systems.
| Unreal Engine | UNIGINE |
|---|---|
|
Separate 3D scenes are called Levels (also referred to as Maps). UE uses a left-handed coordinate system where the vertical direction is usually represented by the +Z axis. Axes and Directions:
Positive rotation angle sets the rotation clockwise. File format: *.umap |
Separate 3D scenes are called Worlds. UNIGINE uses a right-handed coordinate system where the vertical direction is usually represented by the +Z axis. Axes and Directions:
Positive rotation angle sets the rotation counterclockwise. File format: *.world |
To change the starting map of your project in UE4, you open Project Settings -> Maps & Modes and specify the default map for game and editor. In UNIGINE you specify the Default World of the project when creating a build (File -> Create Build). As for UnigineEditor and development builds, you can override the default world explicitly by running the project or the editor with custom settings:
- In SDK Browser, click an ellipsis under the Run or Open Editor button;
-
In the Customize Run Options form that opens, specify the following startup command-line option in the Arguments field:
Shell commands
-console_command "world_load your_world_name"
Scene Objects#
This section gives a brief description of basic scene objects in both engines as well as their basic similarities and differences.
| Unreal Engine | UNIGINE |
|---|---|
|
World Outliner
Basic scene object — Actor. It is the base object that can be placed in or spawned into the world. Actors can be organized into a hierarchy (parent-child relation). Actor is a container for Components that define its functionality. The Actor's position, rotation and scale are stored in a Scene Component. Usually Actors have a root component, which can be any subclass of Scene Component, by default. Programmers can inherit from the default UActorComponent to create a custom component using C++ or Blueprint Script. |
World Hierarchy window
Node is a basic type from which all types of scene objects are inherited. Some of them appear visually: Objects, Decals, and Effects — they all have surfaces to represent their geometry (mesh), while others (Light Sources, Players, etc.) are invisible. Nodes can be organized into a hierarchy (parent-child relation). Basic functionality of a node is determined by its type. Additional functionality can be added using properties and the component system. Each node has a transformation matrix, which encodes its position, rotation, and scale in the world. Notice
All scene objects added to the scene regardless of their type are called nodes. |
Blueprint Classes#
The workflow in UE is based on Blueprint Classes. It is usual for you to build a complex object (Actor) from components, select it, and click the Blueprint / Add Script button (in the Details panel). Then you choose a place to save your Blueprint Class and click Create Blueprint to save your new Blueprint Class.
In UNIGINE, you build the desired hierarchy from nodes of different types, assign the required materials and properties to them. You can use Dummy nodes to group multiple nodes.
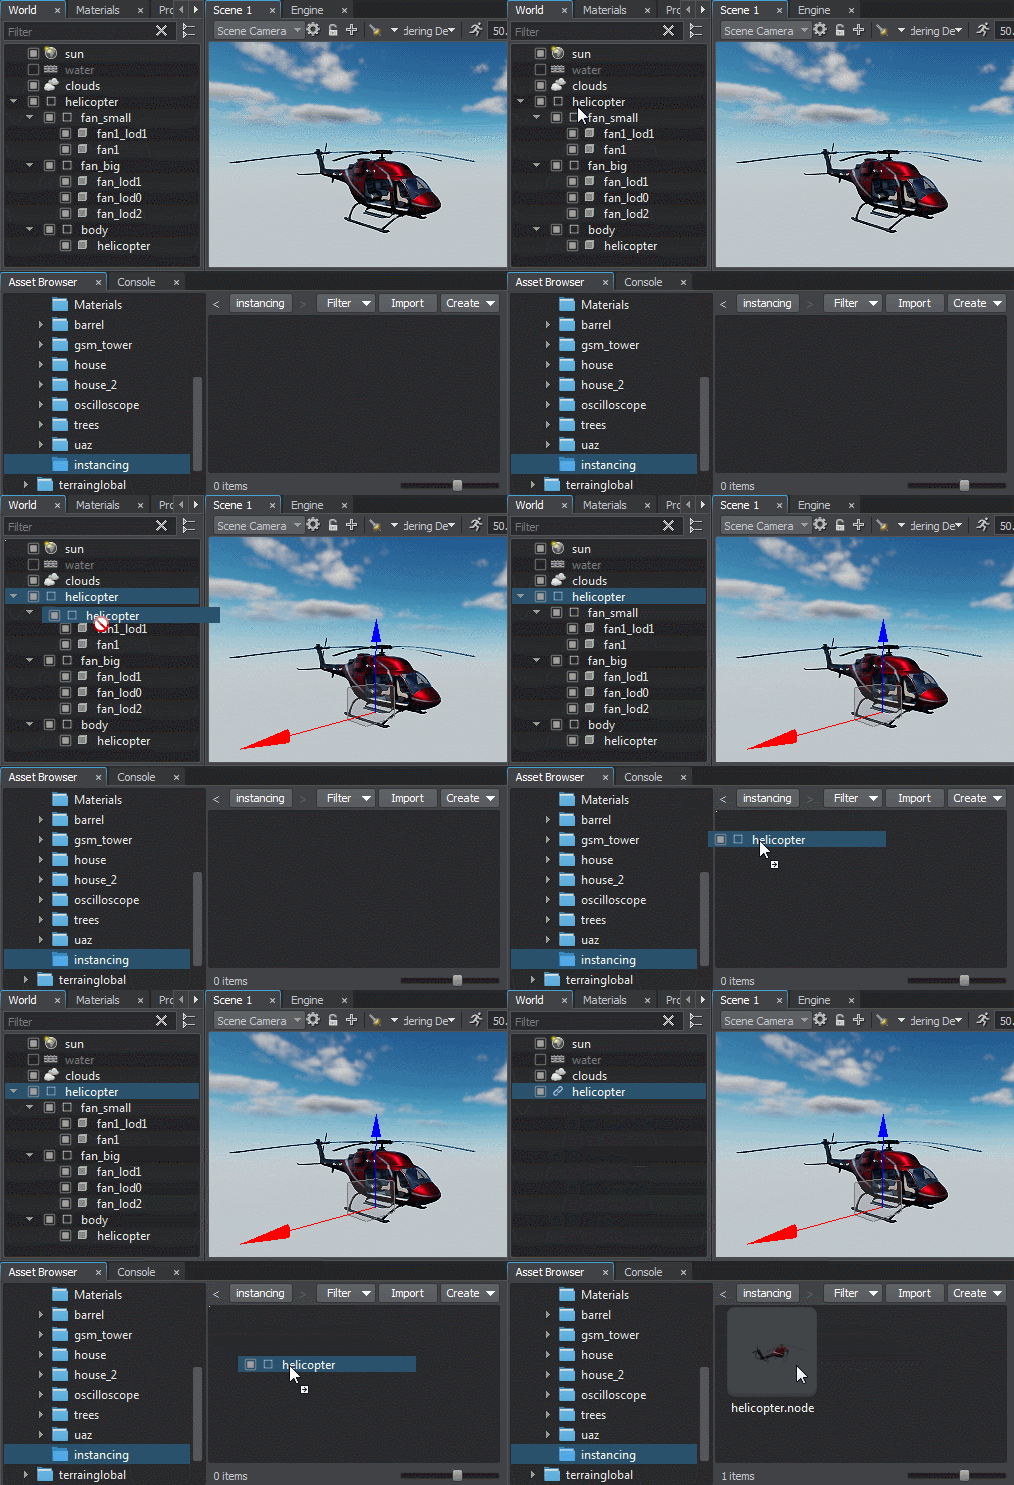
In order to make a complex object to be instanced in your world, you save the node or the hierarchy of nodes as a Node Reference, which can be instantiated and edited in the Editor or at run time afterwards as many times as necessary.

To learn more about creating Node References and managing them please follow the link below:
- Instancing Nodes.
- Video tutorial: Instancing Nodes
How to Collaborate?#
Unreal Editor provides the Source Control feature out of the box. Also, its Multi-User Editing workflow is built on a server-client model, supporting a number of sessions inside a shared environment for collaborative work.
In UNIGINE, all native file formats are text-based by default, so you can use any VCS you are used to and merge worlds, nodes and other assets. You can extend the file system to keep the shared assets by using Mount Points. Also, a normal workflow is to split work of different team members using separate Node Layers, so there will be no need to match the conflicted files when merging the project modifications.
Check out the related article for more details:
- Configuring Version Control
Cameras#
Cameras, the entities essential for rendering, are treated slightly differently in both engines.
In UE4, the CameraComponent is responsible for capturing a view and sending it to render. You usually set a Pawn actor with a CameraComponent attached as a default character by specifying it in a GameMode settings.
In UNIGINE, the Camera is a rendering-related object and implemented by the Player nodes in the world. There are several player types with different behaviour provided in order to simplify creation of the most commonly used cameras controlled via the input devices (keyboard, mouse, joystick):
- Dummy is a simple camera wrapper. You can use it for static cameras or enhance with custom logic.
- Spectator is a free flying camera.
- Persecutor is a flying camera that has the target and orbits it at the specified distance. It is a ready-to-use simple solution for a third-person camera.
- Actor is a player that is capable of providing physical interaction with scenery. It has a rigid physical body, which is approximated with a capsule shape. It is a ready-to-use simple solution for a first-person character.
Only one player can be rendered into the viewport at a moment. To switch between cameras in the Editor Viewport of the UnigineEditor, use the Camera panel:

By checking the Main Player flag of a player you set the default player, which will be rendered in the Editor's Engine viewport and on world startup when running the application.
Project Settings#
Overall project settings adjustment in Unreal Editor is usually done via the Project Settings window. The Audio, Rendering, Physics, Input levels and other settings affect the whole project. Also, the World Settings panel provides settings for the current Level.
In UNIGINE, the Common Settings and Preferences are available via Windows -> Settings menu at the Runtime section. The World settings are set for each world separately.
Saved Configurations#
You use Export and Import buttons in the project settings of the Unreal Editor to save the values of the settings to an external configuration file (.ini) and load them when necessary.

In UNIGINE, you can save and load general physics, sound and render settings the same way. The presets are stored as assets with the *.physics, *.sound and *.render extensions respectively. Use Load and Save .* asset buttons of the Settings window to work with presets of the corresponding settings section.

Saved assets appear in the Asset Browser. You can load the render settings by double-clicking the required .render asset.

Presets are not an Editor-only feature in UNIGINE. You can use Physics, Sound and Render classes to manage presets for corresponding settings, for example, to switch between quality levels at run time.
Graphics#
In UE4, settings for graphics quality are mostly gathered in the Engine - Rendering section.
In UNIGINE, the rendering settings of the world can be found in the Render section of the Settings window. You can also toggle on and off the most common render features by using the Rendering menu:

There is no platform-dependent quiality adjustments in UNIGINE, you should write your own logic to control the quality levels. You can use Render Presets for this purpose.
Deferred and Forward Shading#
By default, Unreal Engine uses a Deferred Renderer. You can switch to Forward Shading Renderer, which would provide better performance in some cases, in the Project Setting -> Rendering section.
UNIGINE has the fixed Rendering Sequence represented by a combination of a full deferred renderer with forward rendering techniques:
- All opaque (non-transparent) geometry is rendered in the deferred pass.
- Transparent geometry is rendered in the forward pass.
You can reduce computational load by skipping certain rendering stages. Watch the dedicated video tutorial on using the Microprofile tool to optimize rendering:
- Video tutorial: Microprofile for Artists
Post Processing#
Unreal Engine uses PostProcessVolume to define the volumes where post-processing parameters and effects are locally (or globally) overridden, parameters are blended using linear interpolation. In UNIGINE, you will have to write your own logic to smoothly interpolate between settings at different spaces (if such a requirement appears).
This section lists all common UE4 post-processing techniques that can be achieved in UNIGINE as well.
| Unreal Engine | UNIGINE |
|---|---|
Anti-aliasing methods:
|
Anti-aliasing methods: |
| Eye Adaptation (Auto-Exposure) | Camera Effects: |
| Bloom | |
| Filmic Tonemapper | |
| White Balance | |
| Dirt Mask | |
| Lens Flare | |
| Color Grading LUT (Lookup Texture) | |
| Depth of Field | Depth of Field |
| Post Process Materials | Postprocess Materials |
| Chromatic Aberration | The post_color_correction postprocess material |
| Film Grain | |
| Screen Space Reflections | SSR |
| Screen-Space Ambient Occlusion | Screen-Space Ambient Occlusion |
| Screen Space Global Illumination | SSRTGI |
| Contact Shadows | Screen Space Shadows |
| Motion Blur | Motion Blur |
| Screen Percentage | Supersampling |
What's Next?#
Where to go from here?
Make sure you don't miss the subtopics of this guide:
Thank you for reading the guide! You can proceed to the following sections for further learning:
The information on this page is valid for UNIGINE 2.19 SDK.


