Навигационный меш (Navigation Mesh)
The Navigation Mesh is a navigation area which is arranged above the surface of an arbitrary mesh. In fact, the Navigation Mesh is an area of the specified height above the mesh polygons, which is available for pathfinding.Navigation Mesh - это область навигации, которая расположена над поверхностью произвольной геометрии (меша). Фактически, Navigation Mesh - это область указанной высоты над полигонами меша, доступная для поиска пути.
In contrast to navigation sectors, the Navigation Mesh enables the following:В отличие от сектора навигации , Navigation Mesh позволяет следующее:
- Only 2D routes can be calculated within the Navigation Mesh.В пределах Navigation Mesh могут быть рассчитаны только 2D-маршруты.
Pathfinding can be performed within 1 Navigation Mesh only. Pathfinding within the following areas is not supported:Поиск пути может выполняться только в пределах одного Navigation Mesh. Поиск пути в следующих областях не поддерживается:
- Within several intersecting Navigation MeshesВ пределах нескольких пересекающихся Navigation Meshe
- Within the intersecting Navigation Mesh and sectorВнутри пересекающихся Navigation Mesh и сектора
See alsoСмотрите также#
- The NavigationMesh class to manage navigation meshes via APIКласс NavigationMesh для управления навигационными мешами через API
- The article on Creating Routes to learn how to create routes inside the navigation meshСтатья Создание маршрутов чтобы узнать, как создавать маршруты внутри навигационного меша
- A set of samples located in the <UnigineSDK>/data/samples/paths folder:
- mesh_00
- route_03
- route_04
- mesh_00
- route_03
- route_04
Creating Navigation MeshСоздание навигационного меша#
Before adding a Navigation Mesh, you should prepare a mesh, on which this Navigation Mesh will be based. Such mesh is created separately and should meet the following requirements:Перед добавлением Navigation Mesh вы должны подготовить меш, который будет использоваться в качестве основы. Такой меш создается отдельно и должен отвечать следующим требованиям:
- Any polygon of the mesh must not share its edge with more than 2 other polygons; otherwise, an error will occur.Любой многоугольник меша не должен иметь общий край с более чем 2 другими многоугольниками; в противном случае произойдет ошибка.
- Mesh polygons should be as wide as possible (ideally, they should be equilateral). Too narrow and high polygons may reduce accuracy of path calculation.Полигоны меша должны быть максимально широкими (в идеале они должны быть равносторонними). Слишком узкие и высокие многоугольники могут снизить точность расчета пути.
- The mesh should be optimized: it should not contain a large number of polygons.Меш должна быть оптимизирован: он не должен содержать большого количества полигонов.
When a mesh is prepared, you can add the Navigation Mesh to the scene via UnigineEditor:После подготовки меша, вы можете добавить Navigation Mesh в сцену через UnigineEditor:
- Run UnigineEditor.Запустите UnigineEditor.
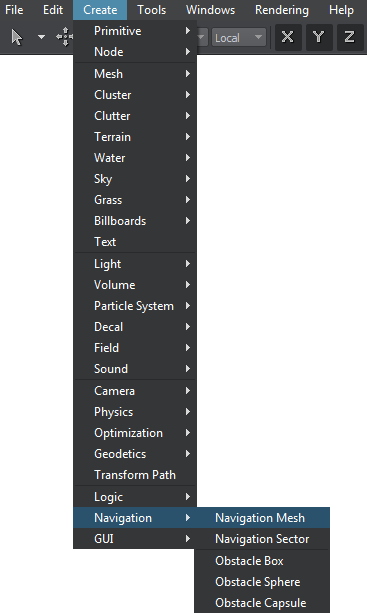
On the Menu bar, click Create -> Navigation -> Navigation Mesh.В меню выберите Create -> Navigation -> Navigation Mesh.

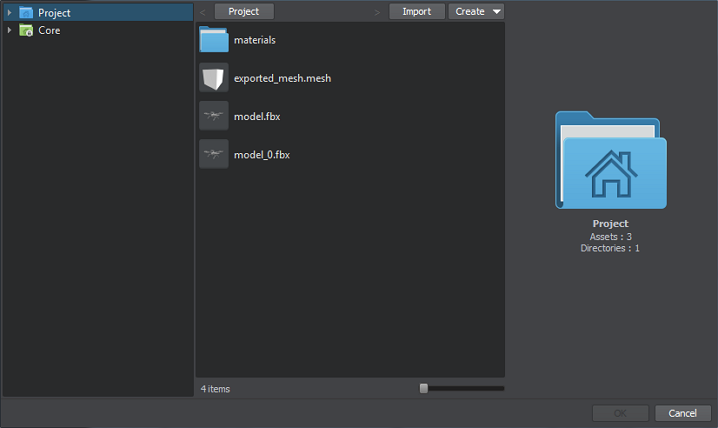
In the file dialog window that opens, choose the required mesh to be used as a base for the new navigation area and click OK.В открывшемся диалоговом окне файла выберите необходимый меш, который будет использоваться в качестве основы для новой области навигации, и нажмите OK.
- Click somewhere in the world to place the Navigation Mesh. A new Navigation Mesh is added to UnigineEditor and you can edit it via the Parameters window.Щелкните где-нибудь в мире, чтобы разместить файл Navigation Mesh. В UnigineEditor добавляется новый Navigation Mesh, и вы можете редактировать его через окно Parameters.
ExampleПример#
If you have a scene with different objects and need to calculate a 2D route among them, add the Navigation Mesh to this scene as follows:Если у вас есть сцена с разными объектами и вам нужно рассчитать 2D-маршрут между ними, добавьте к этой сцене Navigation Mesh следующим образом:
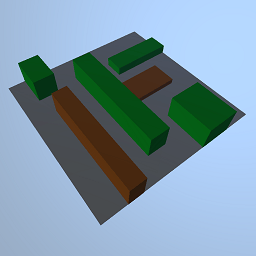
Create a flat mesh with holes in places where the objects are positioned.Создайте плоский меш с отверстиями в местах расположения объектов.

 The sceneСценаThe mesh created for the Navigation MeshМеш, созданный для Navigation Mesh
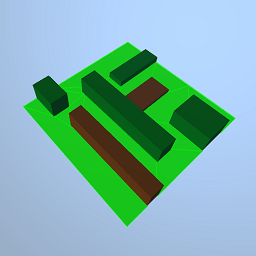
Specify this mesh as a base for a Navigation Mesh within which the route is calculated, and add the Navigation Mesh to the world. It will be highlighted in green:Укажите этот меш как основу для Navigation Mesh, в пределах которой рассчитывается маршрут, и добавьте Navigation Mesh в мир. Он будет выделен зеленым цветом:
A Navigation Mesh based on the flat meshNavigation Mesh на основе плоского мешаPlace the Navigation Mesh above the scene.Поместите Navigation Mesh над сценой.
The Navigation Mesh positioned above the sceneNavigation Mesh расположенный над сценой
Editing Navigation MeshРедактирование навигационного меша#
In the Node tab of the Parameters window, you can adjust the following parameters of the Navigation Mesh:На вкладке Node окна Parameters вы можете настроить следующие параметры Navigation Mesh:

Loading a New MeshЗагрузка нового меша#
To load a new mesh on which the navigation area is based:Чтобы загрузить новый меш, который будет использоваться в качестве основы для области навигации:
- On the Navigation tab, press
 .На вкладке Navigation нажмите
  .
. - In the file dialog window that opens, choose the required mesh and press OK.В открывшемся диалоговом окне файла выберите нужный меш и нажмите OK.
Saving the Current MeshСохранение текущего меша#
To save the current mesh on which the navigation area is based:Чтобы сохранить текущий меш, который используется в качестве основы для области навигации:
- On the Navigation tab, press
 .На вкладке Navigation нажмите
  .
. - In the file dialog window that opens, specify a name for the mesh and press OK.В открывшемся диалоговом окне файла укажите имя меша и нажмите OK.


