Creating a Terrain
In Sandworm, the terrain is generated based on georeferenced data (both offline and online). If you want to create a terrain using non-georeferenced data or sculpt it from scratch with brushes, you can do that right in UnigineEditor; the Sandworm tool is not required.
1. Specifying Data Source Type#
To generate the terrain surface in its basic form, you need to add the following types of source data:
- Elevation / Height — data used to generate terrain geometry.
- Imagery / Color — data used to generate textures for the terrain surface.
2. Specifying Data Source Parameters#
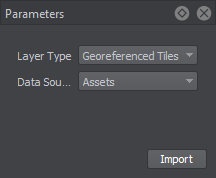
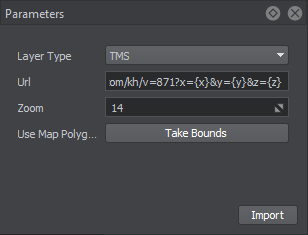
When you select a data source, you can see its parameters in the Parameters panel. The contents of this panel differ depending on the layer type:
- Georeferenced Tiles — for adding offline data stored on the PC.
- TMS — for using online data by adding the link.
Offline Data Sources#
If you upload data stored on the PC, use the Georeferenced Tiles layer type.

-
-
Assets — files that are added to the file system and represent a part of the project. Depending on the size of assets, they can be stored in the /data directory or added as a mount. This approach is recommended for teamwork.
NoticeWe recommend importing image files as Unchanged, in order to avoid creating the unnecessary runtime files. - External Files, which are not a part of the file system. This type of data source may be helpful if the file extension is unknown to the file system. However, keep in mind that if you share this project, the path to the external file has to be updated accordingly.
-
-
Click Import. The dialog window will open to set the path to the data source. If the data source consists of several files/assets, select them all, and they will be added as separate layers.
NoticeThe preview generation process may take much time for heavy source files, therefore you can cancel it, and generate later, if that is required.
For the imported offline source layers, the following parameters are available:

 |
Encloses the area visible in the Preview window in the bounds. The data will be uploaded for the area within these bounds. You can move the points defining the bounds to adjust the area as necessary. |
|---|---|
 |
Removes the bounds for the selected layer. If the bounds are not set, all data available in the layer and within the Export Area will be uploaded. |
 |
Sets the bounds to enclose all data available in the layer. The data will be uploaded for the area within these bounds. You can move the points defining the bounds to adjust the area as necessary. |
Using this toolset, you can define which data should be taken from every layer without uploading unnecessary or corrupted data.
Online Data Sources#
The TMS layer type is designed for using Tile Map Services for terrain generation. This option is available for the Elevation and Imagery data types.

| URL |
A URL of the online data source. The scope of data is defined by the bounds.
For example:
For sources that require tokens, the link should be arranged in the following way: https://api.mapbox.com/v4/mapbox.terrain-rgb/{z}/{x}/{y}.pngraw?access_token=your_token Notice
The sources that require login and password input are currently not supported. |
|---|---|
| Zoom | Zoom level that specifies the scale of the area map to be downloaded. Data providers have their own zoom levels defined; therefore, this value depends on the source. For example, OSM has the following zoom levels. |
| Take Bounds | Encloses the area visible in the Preview window in the boundaries (green frame). The data will be uploaded for the area within these boundaries. The position of the tags defining the boundaries can be modified as required. |
After the data parameters are set, click Import, and the data preview will be displayed. In case of heavy data, the display of the preview may take some time.
3. Adding vegetation#
At this step, you can determine which natural features of the terrain are to be generated.
-
The Mask data source type allows using Grass and Mesh Clutter to generate and place vegetation or other objects in specific areas of the terrain according to filtered landcover data.
Workflow: Generating Vegetation.
-
Terrain details — the data filtered from landcover data sources to identify areas for terrain details to be added.
Workflow: Generating Details.
4. Setting Up Cultural Layer#
The Vector data source type is used to generate cultural features of the terrain: roads, communications, fences, pipes, buildings, landmarks, etc.
Objects of the cultural layer are divided into three groups depending on the type of vector data used for their generation:
-
Vector (Roads) — objects of this type are generated and placed along vectors.
Workflow: Generating Roads.
-
Point (Buildings, Landmarks, etc.) — objects of this type are generated and placed at specific points.
Workflow: Generating Point Objects.
Buildings — objects of this type are generated on the basis of Open Street Maps (OSM).
Workflow: Generating Buildings.
5. Generating a Terrain#
To generate a terrain, you need to define the output settings, such as the type of object that will be used for the terrain and the world that will store this object.
Then you can generate the terrain by clicking the Generate button.
A terrain fragment will be generated based on the input data and specified output settings in the world that we set as the output one.