抽象材质
To simplify shaders programming and hide the implementation complexity of various features, Abstract Materials were added. Like abstract classes in object-oriented programming, they serve as a template definition of certain parameters and functionality.为了简化着色器编程并隐藏各种功能的实现复杂性,添加了抽象材质。与面向对象编程中的抽象类一样,它们用作某些参数和功能的模板定义。
An abstract material itself cannot be assigned to objects, it is used to inherit other abstract and base materials from it, extending its functionality, which gives you a lot of flexibility.抽象材质本身不能分配给对象,它用于从它继承其他抽象和基础材质,扩展其功能,这为您提供了很大的灵活性。
You can create your own custom abstract material or use the ones provided "out of the box" Mesh / Mesh Transparent / Mesh Unlit / Decal with or without tessellation to create a custom base material.您可以创建自己的自定义抽象材质,也可以使用“开箱即用”提供的 Mesh / Mesh Transparent / Mesh Unlit / Decal 使用或不使用镶嵌来创建自定义基础材质。
Inheritance and Override继承和覆盖#
By inheriting from an abstract material you can override any values and add some other components to the child material:通过从抽象材质继承,您可以覆盖任何值并向子材质添加一些其他组件:
AbstractMaterial A
{
		Slider t = 0.5
}

BaseMaterial B <parent = A>
{
		Slider t = 1.0
		Slider t2 = 2.0
}When the child material implements the shader with the same name, the source code of the parent and the child shader is merged (the parent shader code precedes the child one):当子材质实现同名着色器时,父子着色器的源代码合并(父着色器代码在子着色器之前):
AbstractMaterial A
{
		Shader example =
		#{
				// A_fragment
		}#
}

AbstractMaterial B <parent = A>
{
		Shader example =
		#{
				// B_fragment
		}#
}

// the result example shader for the abstract material B will look like this:
Shader example =
#{
		// A_fragment
		// B_fragment
#}
You can expand and include the code of another shader by using inheritance and the marker #shader shader_name.您可以使用继承和标记 #shader shader_name 扩展和包含另一个着色器的代码。
AbstractMaterial A
{
		// including the different shader code
		Shader a =
		#{
				// shader code A
				#shader b
		}#

		Shader b =
		#{
				// shader code B1
		}#
}

AbstractMaterial B <parent = A>
{
		// expanding the parent shader code
		Shader b =
		#{
				// shader code B2
		}#
}

// the resulting example shader for the abstract material B will look like this:
Shader a =
#{
		// shader code A
		// shader code B1
		// shader code B2
#}
The same rules apply to the Script code (use #script script_name as a marker).相同的规则适用于脚本代码(使用 #script script_name 作为标记)。
Elements in parent and child materials' Groups with the same name can be merged. Both groups should have the merge_group argument set to true. The first group entry defines the place in the Editor’s UI where all the elements of this group are positioned (parent and child):父子材质中的元素团体可以合并同名的。两个组都应将 merge_group 参数设置为 true。第一个组条目定义了编辑器 UI 中该组的所有元素(父元素和子元素)所在的位置:
AbstractMaterial A
{
		Group A1
		{
				Slider T1

				Group example <merge_group=true>
				{
					   Slider T2
				}
		}
}

BaseMaterial B <parent = A>
{
		Group B1
		{
				Slider T3

				Group example <merge_group=true>
				{
					   Slider T4
				}
		}
}

// the result grouping for the BaseMaterial B will look like this ("example" in the BaseMaterial B is merged with the parent example group):
Group A1
{
		Slider T1

		Group example
		{
			   Slider T2
			   Slider T4
		}
}

Group B1
{
		Slider T3
}Comparison with Traditional Base Material logic与传统基础材质逻辑的比较#
Abstract materials generalize internal logic and provide the simplified input and output interface for derived base materials. The traditional approach involves a lot of repetitive work to create materials with different shading for the same types of objects. Therefore it is recommended to use the abstract and base material mix. See the following examples that help achieve the same modified SSAO effect.抽象材质概括了内部逻辑,并为派生的基础材质提供了简化的输入和输出接口。传统方法涉及大量重复工作,为相同类型的对象创建具有不同阴影的材质。因此建议使用抽象和基础材质混合。请参阅以下示例,这些示例有助于实现相同的修改后的 SSAO 效果。
Combination of Abstract and Base Material抽象与基础材质的结合#
This example demonstrates how the Abstract and the Base Material are combined.此示例演示了如何组合抽象和基础材质。
my_abstract.abstmat
AbstractMaterial <preview_hidden=true var_prefix=var texture_prefix=tex>
{
	Texture2D color <source=procedural>

	Shader common=
	#{
	#}

	Shader base_shader=
	#{
		#include <core/materials/shaders/render/common.h>

		STRUCT_FRAG_BEGIN
			INIT_COLOR(float4)
		STRUCT_FRAG_END

		#shader common

		MAIN_FRAG_BEGIN(FRAGMENT_IN)
			#shader fragment
		MAIN_FRAG_END
	#}

	Pass post
	{
		Fragment=base_shader
	}

	Expression RENDER_CALLBACK_END_POST_MATERIALS=
	#{
		Texture source = engine.render.getTemporaryTexture(engine.render_state.getScreenColorTexture());

		source.copy(engine.render_state.getScreenColorTexture());
		setTexture("color", source);
		renderPassToTexture("post", engine.render_state.getScreenColorTexture());

		engine.render.releaseTemporaryTexture(source);
	#}
}
my_base.basemat
BaseMaterial <parent=my_abstract>
{
	Texture2D normal <source=gbuffer_normal>
	Texture2D scene_depth <source=current_depth>
	Texture2D modulation = "core/textures/common/checker_d.dds"
	Texture2D <source=ssao>

	Slider global_scale = 2

	Shader common=
	#{
		float3 triplanar_sample(float2 uv, float depth_in)
		{
			float3 normal_ws = mul3(s_imodelview, unpackGBufferNormal(TEXTURE(tex_normal, uv).rgb));
			float3 position_ws = s_camera_position + mul3(s_imodelview, nativeDepthToPositionVS(depth_in, uv));

			float4 texcoord = position_ws.xyyz * var_global_scale;
			float3 weight = triplanarWeightFast(normal_ws, 0.5f);

			return TEXTURE_TRIPLANAR(tex_modulation, texcoord, weight).rgb;
		}

		float4 final(float2 uv, float depth_in)
		{
			float4 base = TEXTURE(tex_color, uv);
			float ssao = TEXTURE(tex_ssao, uv).r;

			float3 effect = triplanar_sample(uv, depth_in);
			return float4(lerp(base.rgb * effect, base.rgb, ssao), base.a);
		}
	#}

	Shader fragment=
	#{
		float depth = TEXTURE(tex_scene_depth, IN_UV).r;
		if (depth == 0.0f || depth == 1.0f)
			discard;

		OUT_COLOR = final(IN_UV, depth);
	#}
}
Only Base Material仅基础材质#
This example demonstrates the same use case as above but using Base Material only.这个例子演示了相同的用例更多但仅使用基础材质。
my_single_base.basemat
BaseMaterial <preview_hidden=true var_prefix=var texture_prefix=tex>
{
	Texture2D color <source=procedural>
	Texture2D normal <source=gbuffer_normal>
	Texture2D scene_depth <source=current_depth>
	Texture2D modulation = "core/textures/common/checker_d.dds"
	Texture2D <source=ssao>

	Slider global_scale = 2

	Shader base_shader=
	#{
		#include <core/materials/shaders/render/common.h>

		STRUCT_FRAG_BEGIN
			INIT_COLOR(float4)
		STRUCT_FRAG_END

		float3 triplanar_sample(float2 uv, float depth_in)
		{
			float3 normal_ws = mul3(s_imodelview, unpackGBufferNormal(TEXTURE(tex_normal, uv).rgb));
			float3 position_ws = s_camera_position + mul3(s_imodelview, nativeDepthToPositionVS(depth_in, uv));

			float4 texcoord = position_ws.xyyz * var_global_scale;
			float3 weight = triplanarWeightFast(normal_ws, 0.5f);

			return TEXTURE_TRIPLANAR(tex_modulation, texcoord, weight).rgb;
		}

		float4 final(float2 uv, float depth_in)
		{
			float4 base = TEXTURE(tex_color, uv);
			float ssao = TEXTURE(tex_ssao, uv).r;

			float3 effect = triplanar_sample(uv, depth_in);
			return float4(lerp(effect, base.rgb, ssao), base.a);
		}

		MAIN_FRAG_BEGIN(FRAGMENT_IN)
			float depth = TEXTURE(tex_scene_depth, IN_UV).r;
			if (depth == 0.0f || depth == 1.0f)
				discard;

			OUT_COLOR = final(IN_UV, depth);
		MAIN_FRAG_END
	#}

	Pass post
	{
		Fragment=base_shader
	}

	Expression RENDER_CALLBACK_END_POST_MATERIALS=
	#{
		Texture source = engine.render.getTemporaryTexture(engine.render_state.getScreenColorTexture());

		source.copy(engine.render_state.getScreenColorTexture());
		setTexture("color", source);
		renderPassToTexture("post", engine.render_state.getScreenColorTexture());

		engine.render.releaseTemporaryTexture(source);
	#}
}
Creating And Using Your Own Material创建和使用您自己的材质#
Let's create a material from scratch. For this example, we will go with a basic abstract material for post process effects.让我们从头开始创建一个材质。对于这个例子,我们将使用基本的抽象材质来制作后期处理效果。
1. Creating a Parent Abstract Material1. 创建父抽象材质#
Create a new text file with the *.abstmat extension. The file name is used as material name, let's call it my_abstract.创建一个扩展名为 *.abstmat 的新文本文件。文件名作为材质名,我们称之为my_abstract。
The abstract material contains all basic parameters that are inherited by all child materials, as well as basic shader code. These basic things are declared as follows:抽象材质包含所有子材质继承的所有基本参数,以及基本着色器代码。这些基本的东西声明如下:
AbstractMaterial <preview_hidden=true var_prefix=var texture_prefix=tex>
{

	// Let's add a screen texture, we will use it later in BaseMaterial
	Texture2D color <source=procedural>

	Shader common=
	#{
	#}

	// Here comes the core of our fragment shader:
	Shader base_shader= // Declare the shader node for further use
	#{
		#include <core/materials/shaders/render/common.h> //Base UUSL include

		// We render to a single texture with 4 channels
		STRUCT_FRAG_BEGIN
			INIT_COLOR(float4)
		STRUCT_FRAG_END

		// Here we'll add code from inherited materials
		#shader common

		// Declare the main fragment function
		MAIN_FRAG_BEGIN(FRAGMENT_IN)
			// Here we'll add code from inherited materials
			#shader fragment
		MAIN_FRAG_END
	#}
}
Now we need to add a rendering pass because a single shader doesn't render anything by itself. As we're implementing a post-effect material, we should add the post pass and specify shaders to be used for it (we'll use our base_shader as a fragment shader).现在我们需要添加一个渲染通道,因为单个着色器本身不会渲染任何东西。由于我们正在实现后期效果材质,我们应该添加 post 通道并指定要用于它的着色器(我们将使用我们的 base_shader 作为片段着色器)。
Pass post
{
	Fragment=base_shader
}
UNIGINE supports the Scriptable Materials functionality enabling you to execute expressions (fragments of code) at certain stages of the rendering sequence, and we are going to use it.UNIGINE 支持可编写脚本的材质使您能够在特定阶段执行表达式(代码片段)的功能渲染顺序,我们将使用它。
// Let's subscribe our USC expression to render callback after all Engine's post-effects
Expression RENDER_CALLBACK_END_POST_MATERIALS=
#{
	// Make a copy of the screen texture
	Texture source = engine.render.getTemporaryTexture(engine.render_state.getScreenColorTexture());
	source.copy(engine.render_state.getScreenColorTexture());

	// Set it as the source texture for the post-effect
	setTexture("color", source);

	// Render the pass "post" directly to the screen
	renderPassToTexture("post", engine.render_state.getScreenColorTexture());

	// Since we won't use a newly requested texture, we can tell the engine that anyone else can use it.
	engine.render.releaseTemporaryTexture(source);
#}
Putting it all together we get the complete code of our abstract material that you can copy and paste to your text editor and save it as my_abstract.abstmat file to your project's data folder:综上所述,我们得到了抽象材质的完整代码,您可以将其复制并粘贴到文本编辑器中,并将其作为 my_abstract.abstmat 文件保存到项目的 data 文件夹中:
my_abstract_base1.basemat
AbstractMaterial <preview_hidden=true var_prefix=var texture_prefix=tex>
{

	// Let's add a screen texture, we will use it later in BaseMaterial
	Texture2D color <source=procedural>

	Shader common=
	#{
	#}

	// Here comes the core of our fragment shader:
	Shader base_shader= // Declare the shader node for further use
	#{
		#include <core/materials/shaders/render/common.h> //Base UUSL include

		// We render to a single texture with 4 channels
		STRUCT_FRAG_BEGIN
			INIT_COLOR(float4)
		STRUCT_FRAG_END

		// Here we'll add code from inherited materials
		#shader common

		// Declare the main fragment function
		MAIN_FRAG_BEGIN(FRAGMENT_IN)
			// Here we'll add code from inherited materials
			#shader fragment
		MAIN_FRAG_END
	#}

	// Adding a post pass to render our effect
	Pass post
	{
		Fragment=base_shader
	}

	// Let's subscribe our USC expression to render callback after all Engine's post-effects
	Expression RENDER_CALLBACK_END_POST_MATERIALS=
	#{
		// Make a copy of the screen texture
		Texture source = engine.render.getTemporaryTexture(engine.render_state.getScreenColorTexture());
		source.copy(engine.render_state.getScreenColorTexture());

		// Set it as the source texture for the post-effect
		setTexture("color", source);

		// Render the pass "post" directly to the screen
		renderPassToTexture("post", engine.render_state.getScreenColorTexture());

		// Since we won't use a newly requested texture, we can tell the engine that anyone else can use it.
		engine.render.releaseTemporaryTexture(source);
	#}
}
2. Inheriting a Base Material from the Abstract One2.从抽象继承基础材质#
Now we are going to inherit a base material from the created abstract one (my_abstract.abstmat) to extend its functionality.现在我们将从创建的抽象 (my_abstract.abstmat) 继承基础材质以扩展其功能。
To begin with, we'll implement a simple color filter post-effect.首先,我们将实现一个简单的滤色器后期效果。
Create a new file with the *.basemat extension. Again, the file name is used as the base material name.创建一个扩展名为 *.basemat 的新文件。同样,文件名用作基础材质名称。
Describe the base material specify that it has the abstract material my_abstract as a parent:描述基础材质,指定它具有抽象材质 my_abstract 作为父级:
BaseMaterial <parent=my_abstract>
{

	// Add the color parameter that will define the optical filter color
	Color my_color = [0.5 0.5 0.5 1]

	// All shader variables that are defined in the material should have a prefix to be referred to in shaders
	// For sliders, colors, and other basic parameters, it is defined with var_prefix currently set as 'var'
	// For textures, it is texture_prefix currently set as 'tex'
	Shader fragment=
	#{
		// Sample screen texture
		float4 sample = TEXTURE(tex_color, IN_UV);

		// Multiply the screen texture by specified color
		OUT_COLOR = sample * var_my_color;
	#}
}All shader variables defined in the material should have a prefix so that they can be referred to in shaders:材质中定义的所有着色器变量都应该有一个前缀,以便它们可以在着色器中引用:
- The prefix for slider, color, and other basic parameters is set using the var_prefix argument.slider, color 的前缀和其他基本参数是使用 var_prefix 参数设置的。
- The prefix for textures is set using the texture_prefix argument.纹理的前缀是使用 texture_prefix 参数设置的。
For example:例如:
// Setting prefixes
AbstractMaterial <preview_hidden=true var_prefix=var texture_prefix=tex>

/*...*/

// Adding the parameter
Color my_color = [0.5 0.5 0.5 1]

/*...*/

// Refering to a variable
OUT_COLOR = sample * var_my_color;
Save your base material as my_abstract_base1.basemat to your project's data folder.将基础材质作为 my_abstract_base1.basemat 保存到项目的 data 文件夹中。
That's it. What we have written is enough to create a simple post-processing effect.而已。我们编写的内容足以创建一个简单的后处理效果。
3. Adding Another Derived Material3. 添加另一个衍生材质#
Now we are going to derive another, more complex material, from our abstract one.现在我们将从我们的抽象材质中推导出另一种更复杂的材质。
This material shall use triplanar mapping to apply a specified modulation texture with the specified intensity in the occluded areas (according to SSAO map)此材质应使用三平面映射在遮挡区域应用指定的 modulation 纹理和指定的 intensity(根据 SSAO 贴图)
Let's create a new base material file and set the same abstract material (my_abstract.abstmat) as its parent.让我们创建一个新的基础材质文件并将相同的抽象材质 (my_abstract.abstmat) 设置为其父级。
Here is the complete code of our second base material (save it as my_abstract_base2.basemat to your project's data folder):这是我们第二个基础材质的完整代码(将其保存为 my_abstract_base2.basemat 到您项目的 data 文件夹):
my_abstract_base2.basemat
BaseMaterial <parent=my_abstract>
{
	// For this example more scene textures are required
	Texture2D normal <source=gbuffer_normal>
	Texture2D scene_depth <source=current_depth>
	Texture2D <source=ssao>

	// Modulation texture, UV scale, and effect intensity
	Texture2D modulation = "core/textures/common/checker_d.dds"
	Slider global_scale = 2
	Slider power = 10 <min=0 max=3>

	Shader common=
	#{
		float3 triplanar_sample(float2 uv, float depth_in)
		{
			float3 normal_ws = mul3(s_imodelview, unpackGBufferNormal(TEXTURE(tex_normal, uv).rgb));
			float3 position_ws = s_camera_position + mul3(s_imodelview, nativeDepthToPositionVS(depth_in, uv));

			float4 texcoord = position_ws.xyyz * var_global_scale;
			float3 weight = triplanarWeightFast(normal_ws, 0.5f);

			return TEXTURE_TRIPLANAR(tex_modulation, texcoord, weight).rgb;
		}

		float4 final(float2 uv, float depth_in)
		{
			float4 base = TEXTURE(tex_color, uv);
			float ssao = TEXTURE(tex_ssao, uv).r;

			float3 effect = triplanar_sample(uv, depth_in);
			return float4(lerp(base.rgb * effect * var_power, base.rgb, ssao), base.a);
		}
	#}

	Shader fragment=
	#{
		// Sample depth texture
		float depth = TEXTURE(tex_scene_depth, IN_UV).r;
		if (depth == 0.0f || depth == 1.0f)
		   discard;

		OUT_COLOR = final(IN_UV, depth);
	#}
}
4. Inheriting User Materials from Base Ones and Using Them4. 从基础材质继承用户材质并使用它们#
The values of parameters declared in base materials can be modified in real time only in inherited user materials. Therefore, you need to inherit user materials from base materials for your projects and adjust them as required (assign and change parameter values, etc.).基础材质中声明的参数值只能在继承的用户材质中实时修改。因此,您需要从项目的基础材质中继承用户材质并根据需要进行调整(分配和更改参数值等)。
In order to test our first post-effect do the following:为了测试我们的第一个后期效果,请执行以下操作:
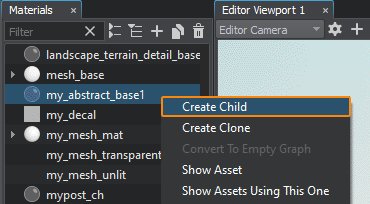
- Find the my_abstract_base1.basemat in the Materials window, right-click it, choose Create Child, and rename your new material as my_color_filter.
找到 my_abstract_base1.basemat 在Materials窗口,右键单击它,选择 Create Child,然后将新材质重命名为 my_color_filter.

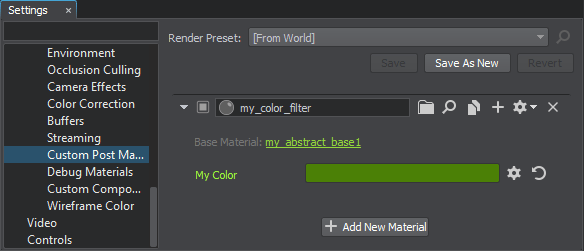
- As it is a post-effect, to apply the material globally we should open the Settings -> Render -> Custom Post Materials因为它是后期效果,所以要全局应用材质,我们应该打开 Settings -> Render -> Scriptable Materials
- Click Add New Material and specify the my_color_filter material. After shis you can change the filter color.
单击 Add New Scriptable Material 并指定 my_color_filter 材质。在 shis 之后,您可以更改过滤器颜色。

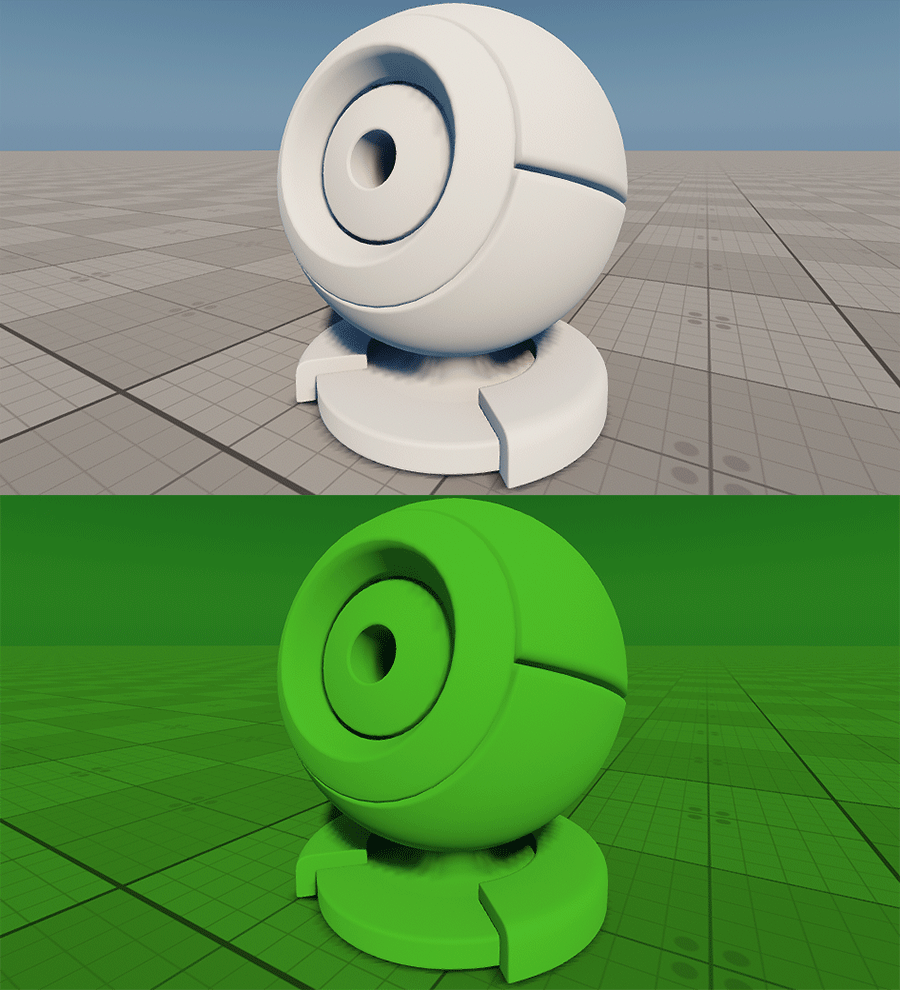
Here is the final image with our first post-material applied.这是应用了我们的第一个后期材质的最终图像。

Repeat the steps above for the my_abstract_base2.basemat base material to test the second post-effect. Here is what it may look like:对 my_abstract_base2.basemat 基础材质重复上述步骤以测试第二个后效。下面是它的样子:

本页面上的信息适用于 UNIGINE 2.18.1 SDK.
