This page has been translated automatically.
Video Tutorials
Interface
Essentials
Advanced
How To
Professional (SIM)
UnigineEditor
Interface Overview
Assets Workflow
Settings and Preferences
Working With Projects
Adjusting Node Parameters
Setting Up Materials
Setting Up Properties
Lighting
Sandworm
Using Editor Tools for Specific Tasks
Extending Editor Functionality
Built-in Node Types
Nodes
Objects
Effects
Decals
Light Sources
Geodetics
World Nodes
Sound Objects
Pathfinding Objects
Players
Programming
Fundamentals
Setting Up Development Environment
Usage Examples
C++
C#
UnigineScript
UUSL (Unified UNIGINE Shader Language)
Plugins
File Formats
Materials and Shaders
Rebuilding the Engine Tools
GUI
Double Precision Coordinates
API
Containers
Common Functionality
Controls-Related Classes
Engine-Related Classes
Filesystem Functionality
GUI-Related Classes
Math Functionality
Node-Related Classes
Objects-Related Classes
Networking Functionality
Pathfinding-Related Classes
Physics-Related Classes
Plugins-Related Classes
IG Plugin
CIGIConnector Plugin
Rendering-Related Classes
Content Creation
Content Optimization
Materials
Material Nodes Library
Miscellaneous
Input
Math
Matrix
Textures
Art Samples
Tutorials
Warning! This version of documentation is OUTDATED, as it describes an older SDK version! Please switch to the documentation for the latest SDK version.
Warning! This version of documentation describes an old SDK version which is no longer supported! Please upgrade to the latest SDK version.

Packing a Final Build for Publishing

Before your project can be distributed to users, it must be properly built. To build a C++ Component System project, all components should be compiled successfully.

Step 1. Build the Game#

Packing a final build ensures that all content and code, including all necessary libraries, is up to date, in the proper format, and placed to a proper location to run on the desired target platform.

  1. In your IDE set the configuration of the solution to Release and compile the executable for the project.

  2. Switch to the UnigineEditor. To assemble the project, choose File->Create Build. The Create Build window will open.
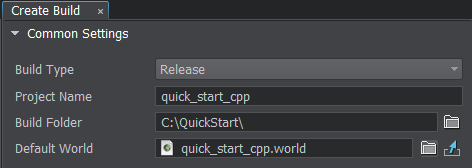
  3. In the Create Build window, set the Build Type to Release. Set the name to be quick_start_cpp and specify the output folder in the Build Folder field. Make sure the Default World is set to your game world.
  4. In the Release App field of the Launcher Default Settings section, set the path to the executable you have just compiled (the default output path in Visual Studio is set to <my_project>/bin/<my_app>_x64).

  5. Click the green Create Build button at the bottom of the Create Build window. The assembling progress bar will appear indicating the status of the build process.

Notice
If a project fails to build, check the UnigineEditor console for more details.

Step 2. Launch the Game#

  1. Upon completion of the build process, the output folder will be automatically opened. To play the game, launch quick_start_cpp.exe.
  2. In the Unigine launcher, specify the resolution and the window mode.

  3. Click Run to launch the standalone application and play the game.

Congratulations, you've made your first project! You may now expand upon it and implement more features.

Last update: 2022-12-14
Build: ()