Generating Vegetation
Vegetation is generated on the basis of landcover data available. The basic workflow is as follows:
1. Preparing a Basic Object
First, we create a basic object that will be used as a building block for generation of vegetation (e.g., grass, trees etc.). The following types of basic objects are supported:
- Grass object
- Mesh Clutter object
- World Clutter object
-
Create a basic object of the desired type.
-
Specify parameters of the basic object.
NoticeIntersections with parent object must be enabled for all types of basic objects! The intersection flag can be found on the tab of the Nodes window corresponding to the type of the object.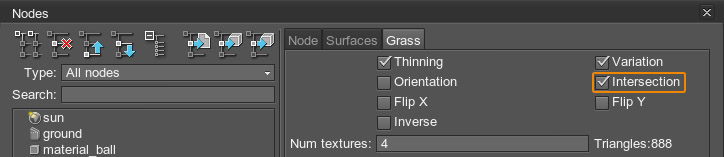
-
Inherit a material, set all necessary textures and parameters and assign it to the basic object.
-
Export your mesh to a node file (e.g. grass.node) by clicking the following button in the Nodes window. And delete the node.

-
Now our basic object for grass (grass.node) is ready to use and you can delete it from the scene.
2. Adding a Landcover Data Source and Specifying Tags
Now, we add a landcover data source to be used for generation. If the data source is already added, you may skip to step 3.
-
Open the Landscape Tool window, for this purpose on the Menu bar, click Windows -> Landscape.
-
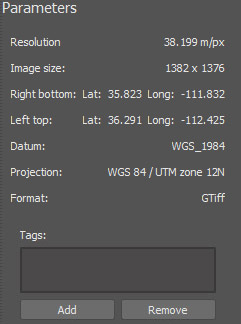
In the Data Sources panel, add necessary landcover data sources (see Specifying Data Sources section).
NoticeR8 and RGB8 mask textures are supported. -
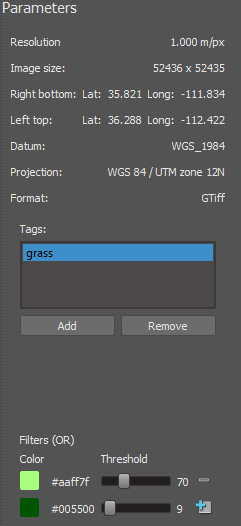
Select each landcover data source from the ones you added in the Data Sources panel and specify parameters in the Parameters panel.
-
Add tags for each type of landcover objects you are going to generate by clicking Add button at the bottom of the Parameters panel and specifying a tag name. To remove a tag use Remove button.
NoticeYou can't add tags named "height" and "mask" as these names are reserved for procedural refinement. -
For each tag you can specify a set of filters (OR) to select certain data from the landcover data source. You can add as many filters as necessary. This can be done as follows depending on the type of the landcover data source:
- For an R8 texture data source - by setting the range of bits (from value, to value) to be treated as a certain type of vegetation.
- For an RGB8 texture data source - by selecting a base color and setting threshold value for a color gradient to be treated as a certain type of vegetation.
NoticeUse "+" (plus) button to add a filter, or "-" (minus) to remove one.1-channel R8 texture. 3-channel RGB8 texture. 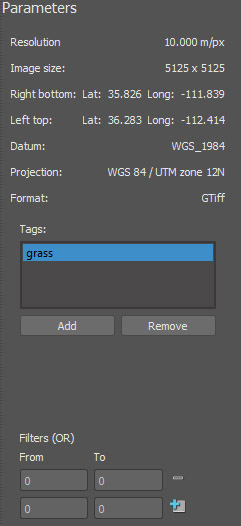
-
Now all necessary tags and filters are added and you can proceed to the next step.
3. Specifying Vegetation Parameters
Now, we must specify basic objects created at the first step and bind them to the tags.
-
In the Natural Layer panel, select Vegetation and the following settings will be displayed in the Parameters panel.

-
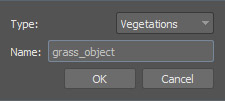
Add a basic object for generation by clicking Add button and specify object's type and name. You can add as many objects as nesessary.
-
For each basic object specify the following parameters:
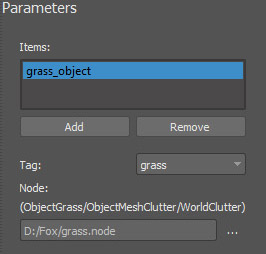
Node The path to the basic mesh object's *.node file. Tag The tag for the selected landcover object from the list of tags specified at the second step. -
Now all necessary basic objects are specified and bound to tags.
NoticeIf the terrain is already generated and you want to add only vegetation - proceed to Step 4.
Otherwise - return back to setting other parameters of terrain generation.
4. Generating Vegetation
Now you can generate vegetation by clicking Generate button and selecting Landcover objects option in the Generation Steps window, in this case only vector objects will be generated.
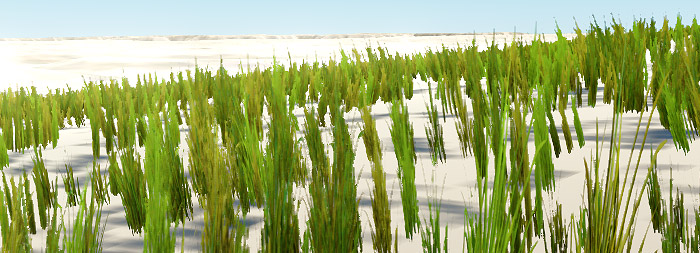
Here is a terrain fragment with grass generated on the basis of landcover data using the basic grass object created.