This page has been translated automatically.
Программирование
Fundamentals
Setting Up Development Environment
Usage Examples
UnigineScript
C#
UUSL (Unified UNIGINE Shader Language)
File Formats
Rebuilding the Engine and Tools
GUI
Double Precision Coordinates
API
Containers
Common Functionality
Controls-Related Classes
Engine-Related Classes
Filesystem Functionality
GUI-Related Classes
Math Functionality
Node-Related Classes
Networking Functionality
Pathfinding-Related Classes
Physics-Related Classes
Plugins-Related Classes
CIGI Client Plugin
Rendering-Related Classes
Внимание! Эта версия документация УСТАРЕЛА, поскольку относится к более ранней версии SDK! Пожалуйста, переключитесь на самую актуальную документацию для последней версии SDK.
Внимание! Эта версия документации описывает устаревшую версию SDK, которая больше не поддерживается! Пожалуйста, обновитесь до последней версии SDK.

Configuring Projections

Syncker provides the projection setup mode that allows you to create any setup for your project by adding and adjusting views to be displayed by the master and slaves. For each view you can use a display or a projector. After creating views you can set up required image warping and edge blending parameters for each of them. All changes will be transferred over the network and applied automatically.

To enable the setup mode, run the syncker_setup console command from the master or a slave as follows:
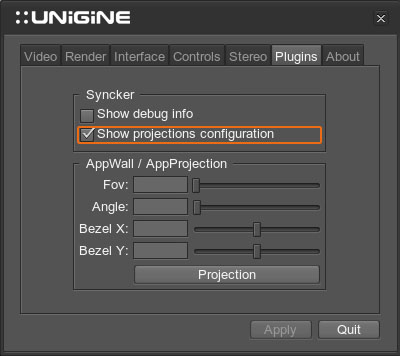
Source code
syncker_setup 1
The setup mode can also be enabled via the System Menu:
  1. Open the System Menu by pressing Esc.
  2. Go to the Plugins tab and enable the Show projection configuration option in the Syncker group:

The setup mode will become available:

Configuration Setup Mode

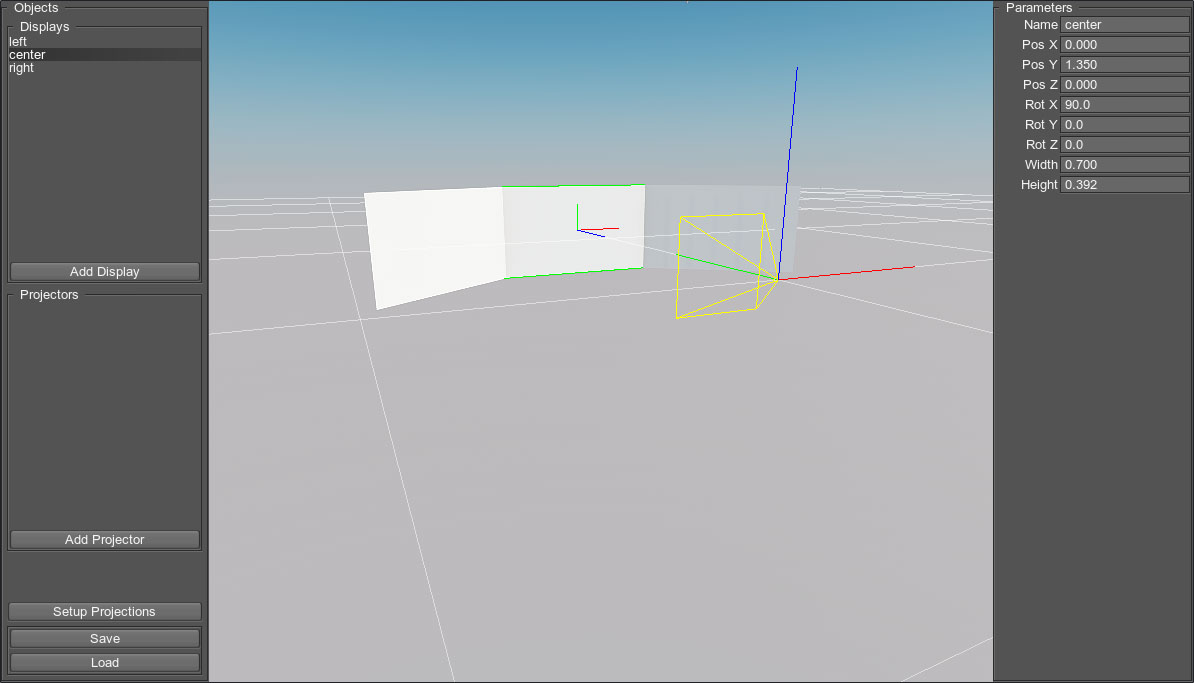
The viewer is positioned in the center of the scene and corresponds to the main master camera.

Notice
Coordinate system of the configuration is expressed in meters.

To set up a projection configuration, you should perform the following steps:

  1. Add the required number of displays and/or projectors.
  2. Form the projection setup by adjusting the required parameters of the displays and/or projectors.
  3. Click Setup Projections and adjust the required projections.
Notice
The projection configuration may include both the displays and the projectors at a time.

Configuration Requirements

Screen/projection configuration for the Syncker should meet the following requirements:

  • Each display/projector in the configuration should correspond to one of the monitors/projectors.
  • Position and orientation of each display/projector must be relative to the main master camera. The closer the monitor is to the viewer, the higher the FOV value.

Configuring Displays

If you are going to use a multi-monitor setup, you will need to add the required number of displays and adjust its transformation and size.

To add a new display, press the Add Display button on the Objects panel. The default display named display will be added. Each display corresponds to one of the monitors.

To configure the added display, adjust parameters on the Parameters panel:

Name Name of the display.
Pos X Position of the display along the X axis relative to the viewer.
  • If a positive value is specified, the display is moved to the right relative to the viewer.
  • If a negative value is specified, the display is moved to the left.
Pos Y Position of the display along the Y axis relative to the viewer.
  • If a positive value is specified, the display is moved forward relative to the viewer.
  • If a negative value is specified, the display is moved backward.
Pos Z Position of the display along the Z axis relative to the viewer.
  • If a positive value is specified, the display is moved up relative to the viewer.
  • If a negative value is specified, the display is moved down.
Rot X Rotation of the display about the X axis.
Rot Y Rotation of the display about the Y axis.
Rot Z Rotation of the display about the Z axis.
Width Width of the display.
Height Height of the display.

Notice
Any changes in these parameters are immediately applied to the selected display.

To delete a display, press Delete.

Configuring Projectors

If you are going to use a multi-projector setup, you will need to add the required number of projectors and adjust its transformation and size.

To add a new projector, press the Add Projector button on the Objects panel. The default projector named projector will be added.

To configure the added projector, adjust parameters on the Parameters panel:

Name Name of the projector.
Pos X Position of the projector along the X axis relative to the viewer.
  • If a positive value is specified, the projector is moved to the right relative to the viewer.
  • If a negative value is specified, the projector is moved to the left.
Pos Y Position of the projector along the Y axis relative to the viewer.
  • If a positive value is specified, the projector is moved forward relative to the viewer.
  • If a negative value is specified, the projector is moved backward.
Pos Z Position of the projector along the Z axis relative to the viewer.
  • If a positive value is specified, the projector is moved up relative to the viewer.
  • If a negative value is specified, the projector is moved down.
Rot X Rotation of the projector about the X axis (a pitch angle).
Rot Y Rotation of the projector about the Y axis (a yaw (heading) angle).
Rot Z Rotation of the projector about the Z axis (a roll angle).
Aspect Ratio Ratio of the width to the height of the projected image.
Throw Ratio Distance from the projector to the projection screen divided to the width of the projected image.
Resolution Upscale Resolution upscale factor.
Horizontal Offset Horizontal offset of the projector's lens.
Vertical Offset Vertical offset of the projector's lens.

Notice
Any changes in these parameters are immediately applied to the selected projection.

To delete a projector, press Delete.

Setting Up Projections

A projection for both the display and projector is adjusted via the Projection Configurator window that is opened by pressing the Setup Projections button on the Objects panel:

Projection Configurator

Notice
Any changes made via this interface are immediately applied to the specified projection.

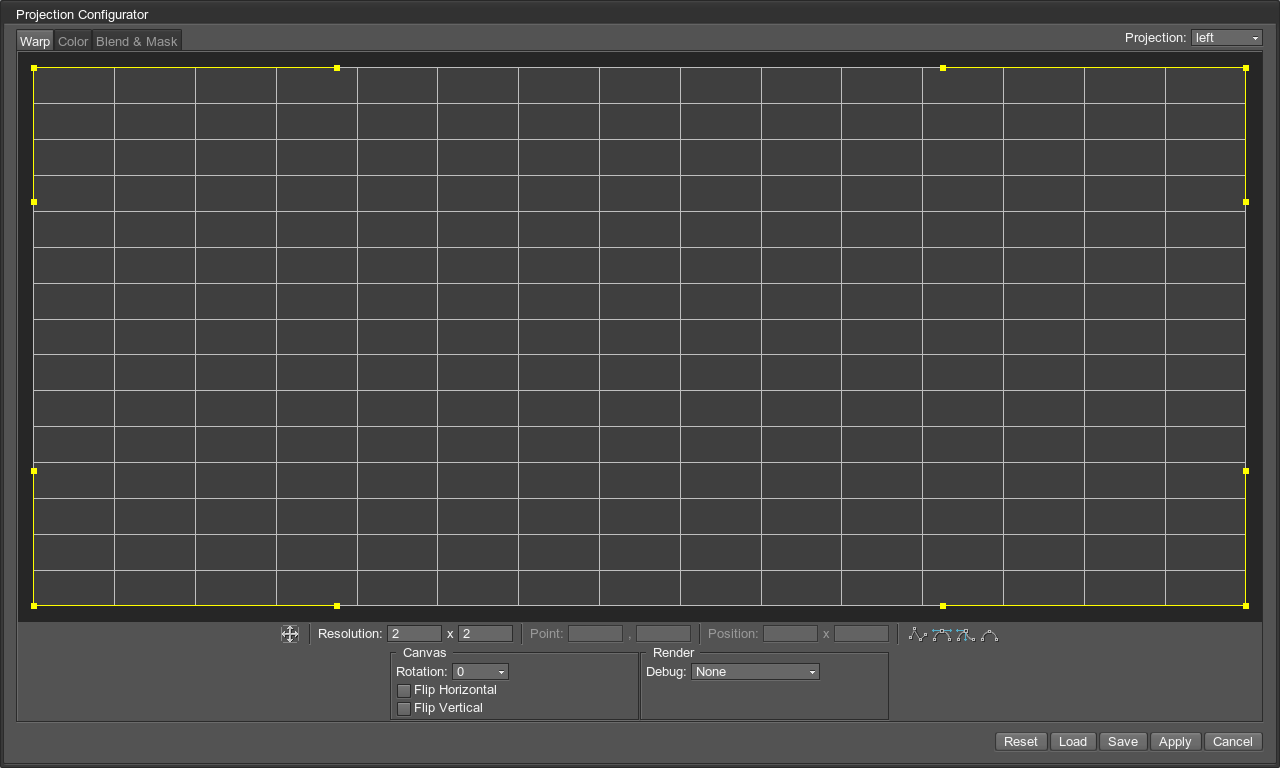
  • For displays, the projection is set up relative to the viewer's position (as it is fixed).
  • For projectors, the projection is set up as if the viewer's position coincides with the projector's position. The projectors may be used, for example, as auxiliary cameras.

A projection can be saved to the .proj file: each file stores a single projection. All projections used in the configuration are saved to the .sync file.

Saving and Loading Configurations

After the screen/projection configuration is set up, it can be saved into a .sync file to be loaded at any time:

  • To save the configuration, press the Save button on the Objects panel.
  • To load the configuration for editing, press the Load button on the Objects panel.
Last update: 21.12.2017
Build: ()