C#组件系统
Component System enables you to implement your application's logic via a set of building blocks — components, and assign these blocks to nodes, giving them additional functionality. By combining these small and simple blocks you can create a very sophisticated logic system. 组件系统使您可以通过一组构建块(组件)实现应用程序的逻辑,并将这些块分配给节点,从而为它们提供附加功能。通过组合这些小块和简单块,您可以创建一个非常复杂的逻辑系统。
A logic component integrates a node and a C# class, containing logic implementation (actions to be performed), defining a set of additional parameters to be used.逻辑组件集成了 node 和C#类,其中包含逻辑实现(要执行的动作),定义了要使用的一组其他参数。

Components give you more flexibility in implementing your logic, enabling you to:组件为您提供了实现逻辑的更多灵活性,使您能够:
- Control which parts of code (implemented as component methods) are to be executed, and which of them are not.控制要执行的代码部分(实现为组件方法),而不要执行。
- Control execution order of these parts of code.控制这些代码部分的执行顺序。
- Repeatedly use parts of code, written once, for as many objects as you need, with no modifications required. If you want to change your code, you modify a single source (similar to NodeReferences, if we talk about content).重复使用一次编写的代码部分,以实现所需的任意数量的对象,而无需进行任何修改。如果要更改代码,则可以修改单个源(如果我们谈论内容,则类似于 NodeReferences )。
- Combine certain parts of code to be executed for certain nodes. Build a very sophisticated system from numerous small and simple blocks (like you would use a NodeReference to build a large complex structure using many simple nodes).合并要为某些节点执行的代码的某些部分。从许多小的块中构建一个非常复杂的系统(就像您将使用 NodeReference 来使用许多简单的节点构建一个大型的复杂结构一样)。
Before starting coding, you should install required software.开始编码之前,您应该安装必需的软件。
See Also也可以看看#
- Debugging C# Components for more details on debugging the code of your C# components. 调试C#组件有关调试C#组件代码的更多详细信息。
- C# Component Samples demo package that demonstrates various ways of using C# components. C#组件示例演示程序包,演示了使用C#组件的各种方法。
- C# Third Person Platformer demo illustrating performance and flexibility of the logic system using familiar concepts of a simple third-person shooter game. C#第三人称平台游戏演示,它使用简单的第三人称射击游戏的熟悉概念说明了逻辑系统的性能和灵活性。
- C# Component System API for more details on managing components via C# API. C#组件系统API 有关通过C#API管理组件的更多详细信息。
- C# Component System Usage Example for more details on implementing logic using the C# Component System. C#组件系统使用示例,以获取有关使用C#组件系统实现逻辑的更多详细信息。
Requirements要求#
Proper workflow for programming and building .NET-based projects implies a set of requirements:正确的编程和构建基于.NET的项目的工作流意味着一系列要求:
- .NET 5 SDK (for both Windows and Linux) .NET 5 SDK (for both Windows and Linux)
- an IDE or a text editor. Compatibility of different IDEs with the following .NET versions is checked:
IDE Supported .NET version MS Visual Studio Code MS Visual Studio Code 5.0.x 5.0.x MS Visual Studio 2019 MS Visual Studio 2019 5.0.x 5.0.x 注意MS Visual Studio Code 5.0.x MS Visual Studio 2019 5.0.x Visual Studio Code is the recommended option.IDE或文本编辑器。检查了不同IDE与以下.NET 版本的兼容性:Visual Studio Code is the recommended option.Visual Studio Code is the recommended option.IDE Supported .NET version MS Visual Studio Code MS Visual Studio Code 5.0.x 5.0.x MS Visual Studio 2019 MS Visual Studio 2019 5.0.x 5.0.x 注意Visual Studio Code is the recommended option.推荐使用Visual Studio Code。
If you work with MS Visual Studio Code, install the C# extension for Visual Studio Code powered by OmniSharp when first opening the component.如果使用MS Visual Studio Code,请在首次打开组件时为OmniSharp驱动的Visual Studio Code安装C#扩展。
In case of any issues with .NET, check the Troubleshooting section on .NET issues.如果.NET 出现任何问题,请查看 .NET 问题上的“疑难解答”部分。
Creating a Component创建一个组件#
Components are created using the Editor. Open the Asset Browser and choose Create -> Create C# Component.组件是使用 Editor 创建的。打开资产浏览器,然后选择Create -> Create C# Component。
Specify a name for the component in the prompt dialog, after which a C# script asset file with the corresponding name will be created in the current directory of the Asset Browser.在提示对话框中为组件指定名称,然后将在Asset Browser的当前目录中创建具有相应名称的C#脚本资产文件。

Double-click the new script asset to edit the component logic in the default IDE.双击新脚本资产以在默认IDE中编辑组件逻辑。
Renaming Components重命名组件#
Ideally, you name things properly from the start. The name should be clean and reflective of what it does. But, sometimes things do change, and suddenly you realize that your component's name has to be changed. Since 2.11 it's not a big deal. Actually, there are two ways you can do it:理想情况下,您应该从头开始正确命名。名称应简洁明了,能反映其作用。但是,有时情况确实会发生变化,突然您意识到必须更改组件的名称。从2.11开始,这没什么大不了的。实际上,有两种方法可以做到:
- Renaming your cs-asset in the Asset Browser. Component class and associated property will be renamed automatically. The only thing you have to do in this case is to replace all references to your component class in your source code with new ones in your preferred IDE via Find&Replace.在资产浏览器中重命名CS资产。组件类和关联的属性将自动重命名。在这种情况下,您唯一需要做的就是通过Find&Replace将源代码中对组件类的所有引用替换为首选IDE中的新引用。
- Using refactoring tools of your IDE (e.g., Rename symbol in VS Code or Edit -> Refactor -> Rename in Visual Studio). After renaming simply open UnigineEditor - the corresponding cs-asset and associated property will be renamed automatically keeping all references. Please be aware that in this case the name of the cs-file containing implementation of your component will change and the file will be removed from the project by your IDE as a missing one. So, you'll have to add the renamed file back to the project in the IDE.使用IDE的重构工具(例如,VS Code中的Rename symbol或Visual StudioEdit -> Refactor -> Rename中的)。重命名后,只需打开UnigineEditor-对应的cs-asset和关联的属性将自动重命名,并保留所有引用。请注意,在这种情况下,包含您的组件实现的cs文件的名称将更改,并且IDE会将文件从项目中删除该文件作为丢失的文件。因此,您必须将重命名的文件添加回IDE中的项目中。
Structure of a Component组件的结构#
Essentially components are C# classes inherited from the base Component class.本质上来说,组件是从基数Component继承的C#类。
The work of the C# Component System is based on properties. When you create a new component, it is automatically registered in the Component System and an internal runtime property is created and associated with the component via a GUID. The following Component class attribute is required for proper work of the component. C#组件系统的工作基于 属性 。 创建新组件时,它会自动注册到 Component System 中,并创建一个内部 runtime 属性并通过GUID与该组件关联。以下Component类属性是组件正常工作所必需的。
[Component(PropertyGuid = "2ae011355ed7f110a202912faa000cc22276e539")]C# components are listed in the Properties hierarchy, initially they are inherited from the base C# Components property. C#组件在Properties层次结构中列出,最初它们是从基本C# Components属性继承的。

Simple Inheritance简单继承#
Suppose you have a component implementing certain functionality, and you need a certain number of subcomponents having exactly the same functionality, but different parameter values. This situation is typical when implementing quality presets or configurations of controls. Just inherit a property from the basiс component in the UnigineEditor for each preset and tweak necessary parameter values. After that you can assign these inherited properties to nodes, thus attaching to them the logic of the basic component with parameter values taken from inherited properties. No excessive copy-pasting, no redundant code.假设您有一个实现某些功能的组件,并且需要一定数量的具有完全相同的功能但参数值不同的子组件。在实施质量预设或控件配置时,通常会出现这种情况。只需从UnigineEditor中的basiс组件继承每个预设的属性,然后调整必要的参数值即可。之后,您可以将这些继承的属性分配给节点,从而使用从继承的属性中获取的参数值将基本组件的逻辑附加到它们上。没有过多的复制粘贴,没有多余的代码。
Logic逻辑#
Logic of components is implemented via a set of methods, that are called by the corresponding functions of the world script:组件的逻辑是通过一组方法实现的,这些方法由 world脚本的相应功能调用:
- Init() — create and initialize all necessary resources. Init() —创建和初始化所有必需的资源。
- UpdateAsyncThread() — specify all logic functions you want to be called every frame independent of the rendering thread.
注意This method does not have protection locks, so it is not recommended to modify other components inside this method, unless you are absolutely sure, that these components won't be modified or removed elsewhere.UpdateAsyncThread()-指定要在独立于渲染线程的每一帧调用的所有逻辑功能。This method does not have protection locks, so it is not recommended to modify other components inside this method, unless you are absolutely sure, that these components won't be modified or removed elsewhere.This method does not have protection locks, so it is not recommended to modify other components inside this method, unless you are absolutely sure, that these components won't be modified or removed elsewhere.注意This method does not have protection locks, so it is not recommended to modify other components inside this method, unless you are absolutely sure, that these components won't be modified or removed elsewhere.此方法没有保护锁,因此,除非您完全确定不会在其他位置修改或删除这些组件,否则不建议在此方法内修改其他组件。
- UpdateSyncThread() — specify all parallel logic functions you want to be executed before the Update(). This method can be used to perform some heavy resource-consuming calculations such as pathfinding, generation of procedural textures and so on.
注意This method should be used to call only the API methods related to the current node: the node itself, its materials and properties.UpdateSyncThread() —指定要在Update()之前执行的所有并行逻辑函数。此方法可用于执行一些消耗大量资源的计算,例如寻路,过程纹理的生成等。This method should be used to call only the API methods related to the current node: the node itself, its materials and properties.This method should be used to call only the API methods related to the current node: the node itself, its materials and properties.注意This method should be used to call only the API methods related to the current node: the node itself, its materials and properties.此方法应仅用于调用与当前节点相关的API方法:节点本身,其材料和属性。
- Update() — specify all logic functions you want to be called every frame. Update() —指定每帧要调用的所有逻辑功能。
- PostUpdate() — correct behavior according to the updated node states in the same frame. PostUpdate() —根据同一帧中更新的节点状态纠正行为。
- UpdatePhysics() — simulate physics: perform continuous operations (pushing a car forward depending on current motor's RPM, simulating a wind blowing constantly, perform immediate collision response, etc.). UpdatePhysics() —模拟物理:执行连续操作(根据当前电动机的RPM向前推动汽车,不断模拟风向,执行即时碰撞响应等)。
- Swap() — operate with the results of the updateAsyncThread() method — all other methods (threads) have already been performed and are idle. After this function, only two actions occur:
- All objects that are queued for deletion are deleted.All objects that are queued for deletion are deleted.
- Profiler is updated.Profiler is updated.
- All objects that are queued for deletion are deleted.删除所有排队等待删除的对象。
- Profiler is updated. Profiler已更新.
- Shutdown() — perform cleanup on component shutdown. Shutdown() —执行组件关闭的清除。
Parameters参量#
Components can have parameters that are editable in the Parameters window.组件可以具有在Parameters窗口中可编辑的参数。

The following entities have auto-generated UI in the Editor based on the data type and the set of attributes:以下实体在编辑器中根据数据类型和属性集自动生成了UI:
- public fields of the component class组件类的public字段
- any private and protected fields with the [ShowInEditor] option带有private and private和[ShowInEditor] option
public int public_field;

private int private_field;

[ShowInEditor]
private float private_editable_field;

[HideInEditor]
public float public_hidden_field;
Parameters and their attributes can be declared for editor widgets.可以为编辑器小部件声明参数及其属性。

Refer to the Component class for more details on supported parameter types and attributes.有关支持的参数类型和属性的更多详细信息,请参考Component类。
Applying Component Logic to a Node将组件逻辑应用于节点#
Logic implementation described in a component is active at run time only if the component is assigned to a node and both node and component are enabled. 组件中描述的逻辑实现只有在将组件分配给节点并且同时启用了节点和组件的情况下,才在运行时处于活动状态。
There are several ways of applying a component to a node:有几种将组件应用于节点的方法:
-
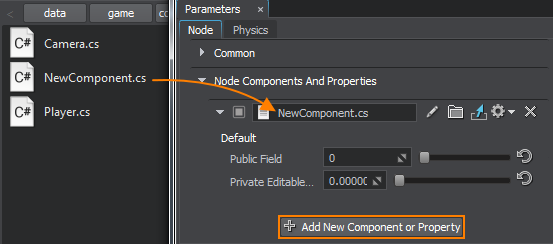
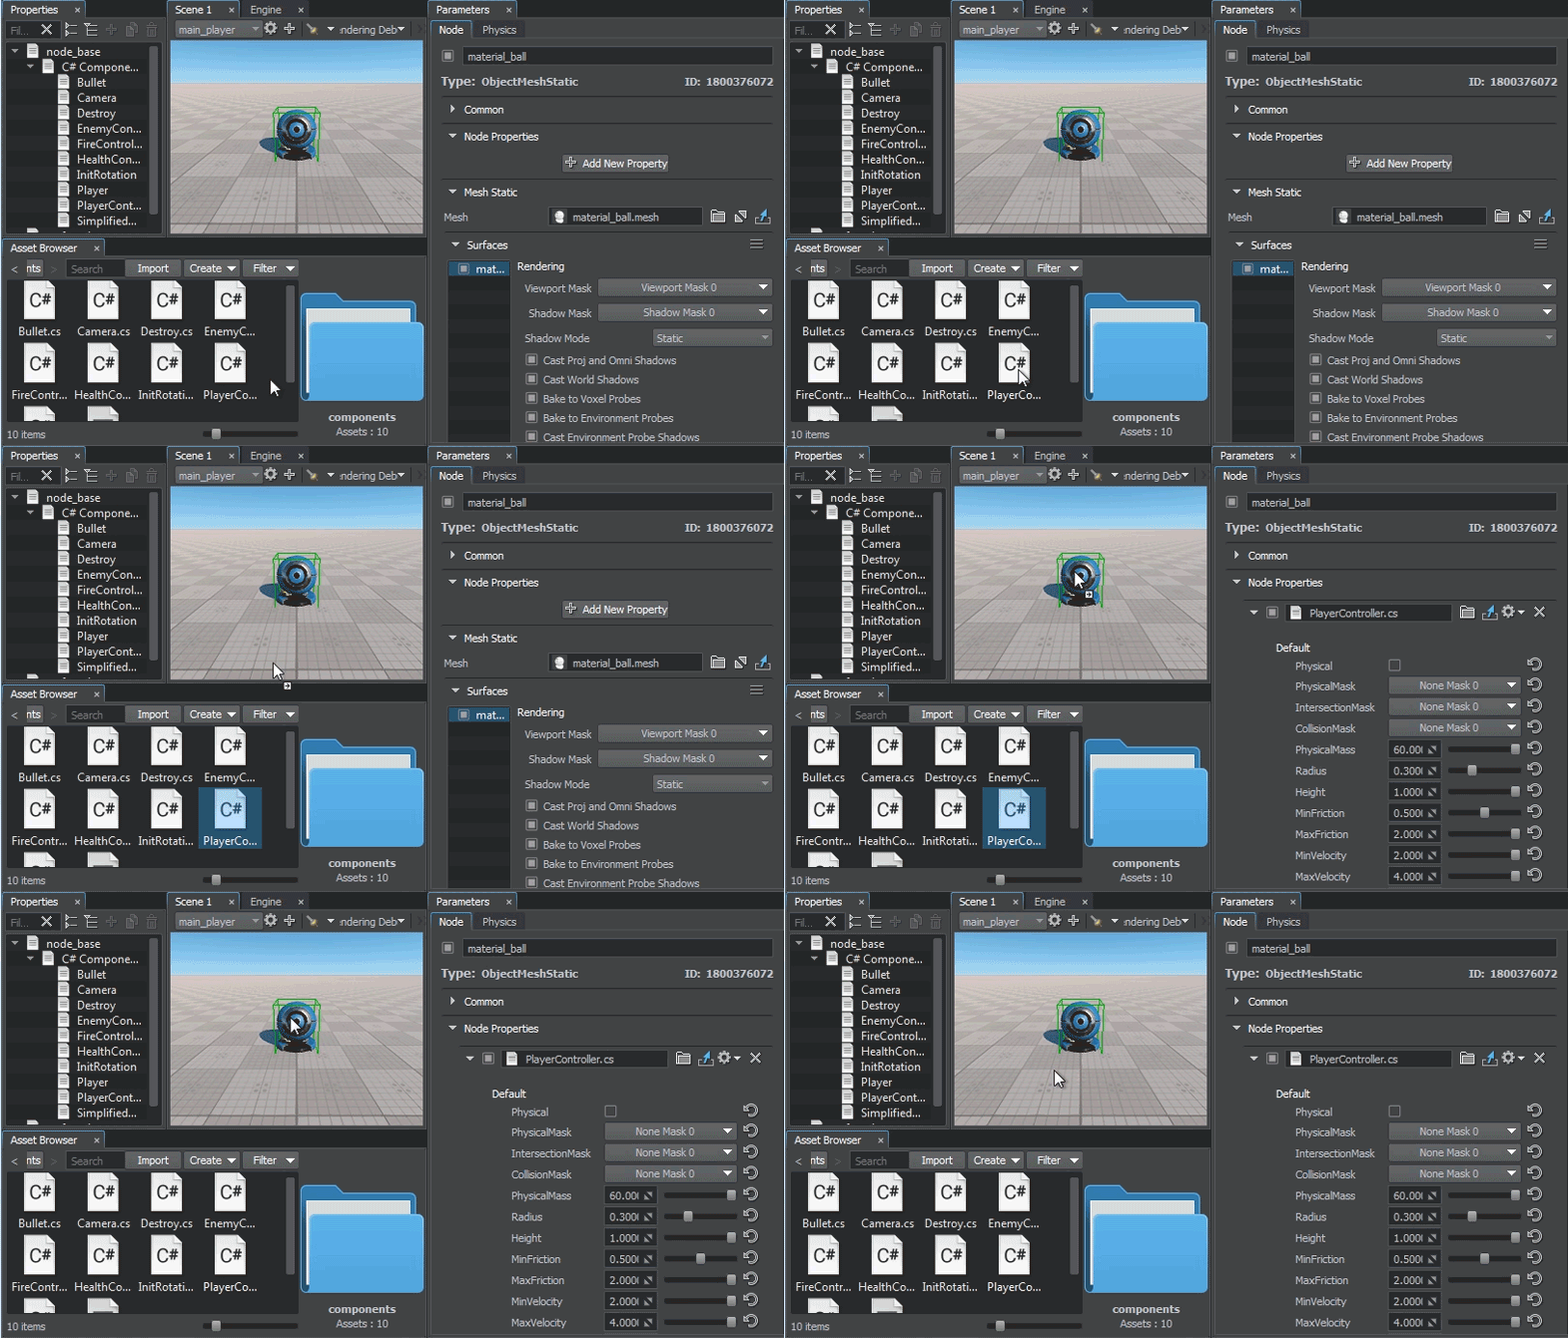
Select a node, click Add New Property and type the name of a *.cs asset in the Node Properties section of the Node tab. You can do it by dragging the *.cs asset there from the Asset Browser window as well.

Dragging to the node in the Editor Viewport is also supported.Dragging to the node in the Editor Viewport is also supported.
Dragging to the node in the Editor Viewport is also supported. 选择节点,单击Add New Property,然后在*.cs asset in the Node Properties部分中键入Node tab. You can do it by dragging the *.cs资产拖到那里来完成此操作。

Dragging to the node in the Editor Viewport is also supported.还支持拖动到编辑器视口中的节点。

- Add a component to a node via code by using the AddComponent<T>(Node node) and Node's AddComponent<T>() functions. 通过使用AddComponent<T>(Node node)和Node的AddComponent<T>()函数通过代码将组件添加到节点。
NewComponent component = AddComponent<NewComponent>(node);

NewComponent component = node.AddComponent<NewComponent>();
The logic of a certain component is active only when the component and the corresponding node are enabled. Thus, you can enable/disable logic of each particular component at run time when necessary.仅当启用组件和相应的节点时,某个组件的逻辑才处于活动状态。因此,您可以在运行时在必要时启用/禁用每个特定组件的逻辑。
You can assign several components to a single node. The sequence, in which the logic of components is executed, is determined by the order value specified for the corresponding methods (if order values are the same or not specified, the sequence is indeterminable).您可以将多个组件分配给单个节点。执行组件逻辑的顺序由为相应方法指定的order值确定(如果order值相同或未指定,则该顺序是不确定的)。
Components can interact with other components and nodes.组件可以与其他组件和节点进行交互。
Running a Project运行项目#
To run a project, click the Play button on the toolbar. This will run an instance of the application in a separate window. 要运行项目,请单击工具栏上的Play按钮。这将在单独的窗口中运行应用程序的实例。

For error messages to be displayed correctly on Windows, the language for non-Unicode programs should be the same as the current system locale.您将在编译成功时看到绿色的通知,而红色的则表示已发现错误。单击红色消息将在控制台中显示详细信息。 所有C#编译和运行时错误都显示在控制台中。
要使错误消息在Windows上正确显示,非Unicode程序的语言应与当前语言相同。系统区域设置。
Presets of custom run options are available in the list. By default, there is a single Default (Debug) preset with the default run options. Click the gear icon to configure the current selected preset of custom run options.列表中提供了自定义运行选项的预设。默认情况下,只有一个带有默认运行选项的Default (Debug)预设。单击齿轮图标以配置当前选择的自定义运行选项预设。
In the window that opens the following run options are available:在打开的窗口中,以下运行选项可用:
| Configuration | UNIGINE Engine build to be used UNIGINE要使用的引擎版本 |
|---|---|
| Video API |
Graphics API to be used for rendering:
|
| Resolution | Screen size 屏幕尺寸 |
| Fullscreen | Run the instance either in Fullscreen or windowed mode 以全屏或窗口模式运行实例 |
| VR Mode |
Enable compatibility with one of supported VR headsets:
|
| Video Debug |
Enables the debug context of OpenGL or DirectX:
|
| Materials Loading Mode |
Selects the materials loading mode to be used:
|
| Run Current World | Run the current world opened in the Editor regardless of the default world set by logic. 运行在编辑器中打开的当前世界,而不管逻辑设置的默认世界如何。 |
| Arguments | A set of startup command-line options. 一组启动命令行选项。 |
On changing any custom run option and closing the window, the following actions will be performed depending on the preset selected:更改任何自定义运行选项并关闭窗口时,将根据所选的预设执行以下操作:
- If the Default (Debug) preset is selected in the list, a new *.launch asset file containing the custom run options will be created in the current folder of the Asset Browser. The corresponding preset will be available in the list of presets.如果在列表中选择了Default (Debug)预设,则将在资产浏览器的当前文件夹中创建一个新的 *.launch 包含自定义运行选项的资产文件。相应的预设将在预设列表中提供。
- If another preset is selected, changes will be applied to it.如果选择了另一个预设,则会对其进行更改。
Debugging Your C# Components调试C#组件#
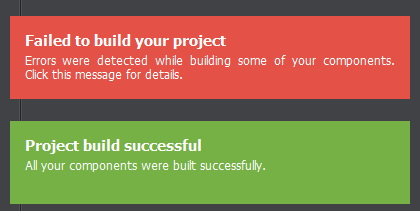
UnigineEditor automatically re-compiles your C# components as you make code modifications, save them and get back to the Editor. You will see a green notification on successful compilation, while the red one signalizes that errors were found. Clicking the red message displays the details in the Console.在进行代码修改时,UnigineEditor会自动重新编译C#组件,将其保存并返回到编辑器。成功编译后,您将看到绿色的通知,而红色的则表示已发现错误。单击红色消息将在控制台中显示详细信息。

You can inspect the source code of your C# components while your application is running regardless of whether the application is launched via the Play button right in the UnigineEditor, or built and launched from an IDE.您可以在应用程序运行时检查C#组件的源代码,而不管该应用程序是通过UnigineEditor中的Play按钮启动还是通过IDE构建和启动。
See the Debugging C# Components article for details.有关详细信息,请参见调试C#组件文章。
Building the Application构建应用程序#
To create a debug or release build of your C# application, use the File -> Create Build option available in UnigineEditor.要创建C#应用程序的调试版本或发行版本,请使用UnigineEditor中提供的File -> Create Build选项。
See the Building a Project article for details.有关详细信息,请参见构建项目文章。
Usage用法#
As an example, you can use components to implement logic of enemies chasing the player in your game: regardless of their size, shape, speed, all of them will check player's position, and try to find a path to move closer to it as fast as they can. The code will be basically the same, it'll just use different parameters (speed, mesh, or sounds maybe), so you can put all these parameters to a component (to be able to change them at any time) and the code to the corresponding component class (e.g. place enemies in the world in the Init() and chase the player in the Update() method). 例如,您可以使用组件来实现敌人在游戏中追逐玩家的逻辑:无论其大小,形状,速度如何,它们都会检查玩家的位置,并尝试找到一条尽可能快地靠近它的路径。代码基本上是相同的,只是使用不同的参数(可能是速度,网格或声音),因此您可以将所有这些参数放入组件(以便随时更改它们),并使用相应的组件类(例如,将敌人放置在Init()中并使用Update()方法追逐玩家)。
Then you should simply assign the component to all enemy objects and set up parameters (define meshes, sounds, etc.). The Component System will do the rest: execute your code at the corresponding stages of the Engine's main loop for all enemy objects using their specific parameters. Should you decide to modify your code later, you can do that in a single source — component class.然后,您只需将组件分配给所有敌对对象并设置参数(定义网格,声音等)。组件系统将完成其余工作:在引擎的主循环的相应阶段,使用所有敌人的特定参数执行代码。如果您以后决定修改代码,则可以在一个单一的源代码中完成此操作-组件类。
Integration with the Microprofile tool, enables you to monitor overall performance of the Component System, as well as to add profiling information for your custom components.与Microprofile工具集成,使您可以监视组件系统的总体性能,并为自定义组件添加性能分析信息。
