VR入门
本文适用于希望开始在UNIGINE中开发虚拟现实项目的任何人,强烈建议所有新用户使用。我们将研究0_igt演示,以了解其中的内容,并学习如何使用它来创建我们自己的VR项目。我们还将考虑一些简单的示例,这些示例可以进行修改和扩展此示例的基本功能。VR Sample演示可查看其中的内容,并学习如何使用它来创建我们自己的VR项目。 我们还将考虑一些简单的示例,这些示例可以进行修改和扩展此示例的基本功能。
那么,让我们开始吧!
VR Sample#
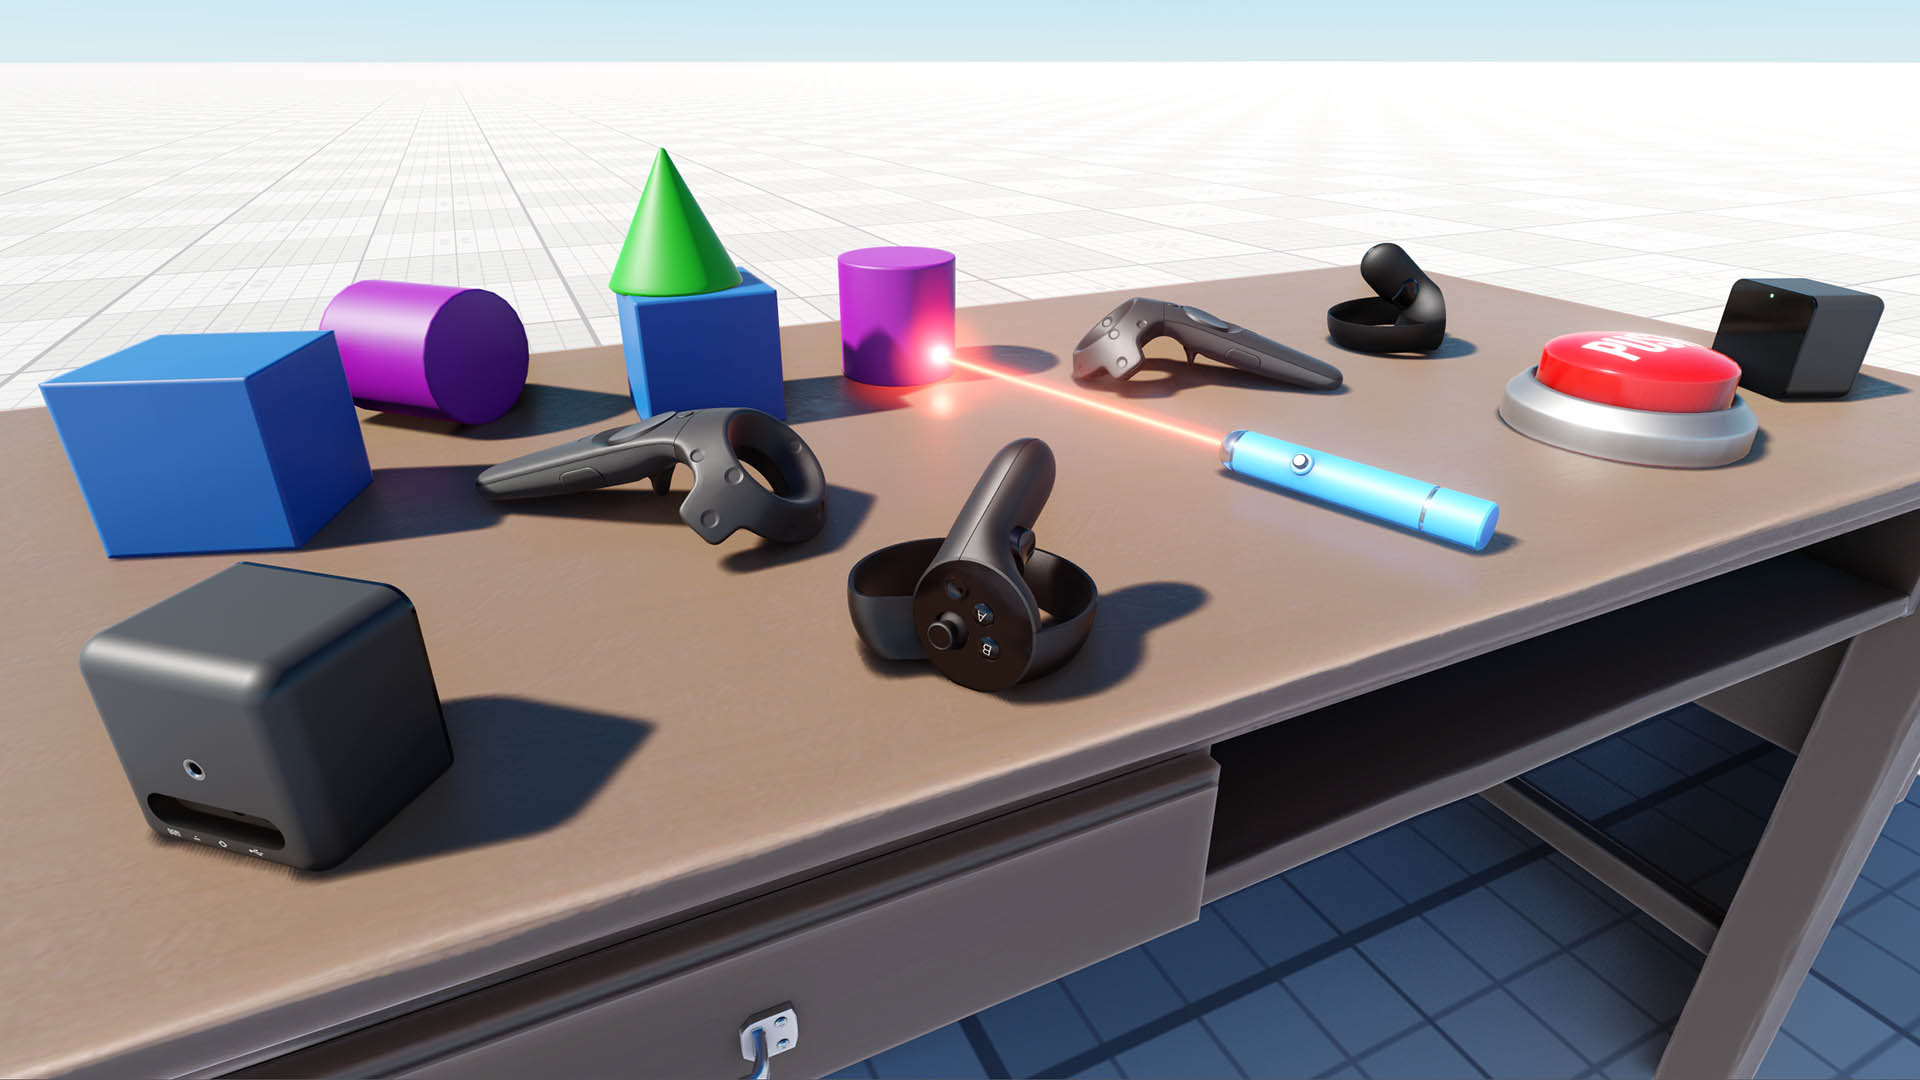
考虑到VR开发人员,我们创建了VR Sample演示,使您可以直接进入并开始创建自己的项目。它支持开箱即用的Oculus Rift, HTC Vive / Vive Pro。

我们建议将此演示用作您的VR项目的基础。在这里,您将找到所有流行的VR控制器的3D模型集,以及诸如抓取和拖拽对象,按下按钮,打开/关闭抽屉等基本机制的实现。
示例项目是使用 Component System 创建的,因此每个对象的功能都由附加的组件决定。
您可以简单地通过向对象添加更多组件来扩展其功能。例如,激光指示器对象具有以下组件:
- ObjMovable-能够抓取并扔出一个物体
- ObjLaserPointer-使物体投射光线

1.制作模板项目#
好吧,我们有一个很酷的演示,里面有一些东西,但是我们如何将其用作模板呢?很简单-只需打开SDK浏览器,转到样本标签,然后选择 Demos 。
在VR Sample in the Available section and click Install。安装后,该演示将出现在Installed部分,您可以单击Copy as Project根据此示例创建一个项目。

在打开的Create New Project窗口中,在相应的字段中输入新VR项目的名称,然后单击Create New Project。

2.设置设备和配置项目#
假设您已成功安装了所选的头戴式显示器(HMD)(如果没有,请访问 Oculus Rift设置或 HTC Vive设置)。如果您在使用HTC Vive时遇到困难,此故障排除指南可能会有所帮助。
支持现成的主要VR设备,因此您唯一要做的就是确保为HMD加载了正确的插件。
| HTC Vive | Oculus Rift |
|---|---|
 |
 |
|
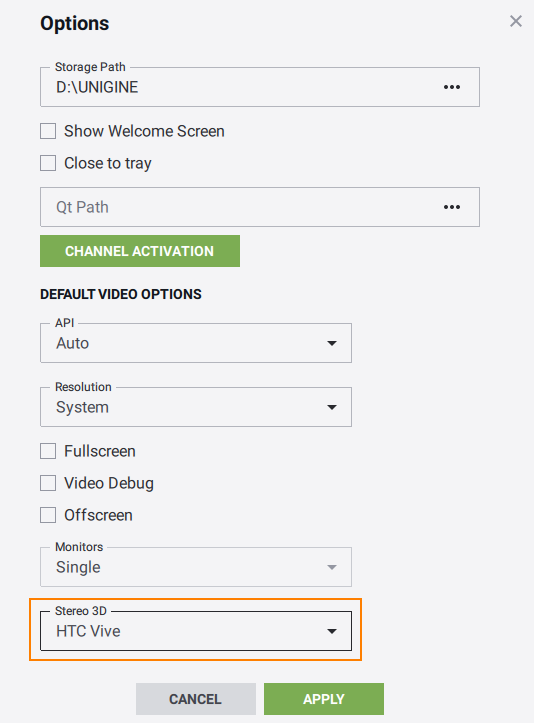
如果通过UNIGINE SDK浏览器运行应用程序,请在Global Options选项卡中将HTC Vive在Global Options选项卡中,然后单击Apply:
要启动插件,请指定extern_plugin应用程序启动时的命令行选项: 命令行
|
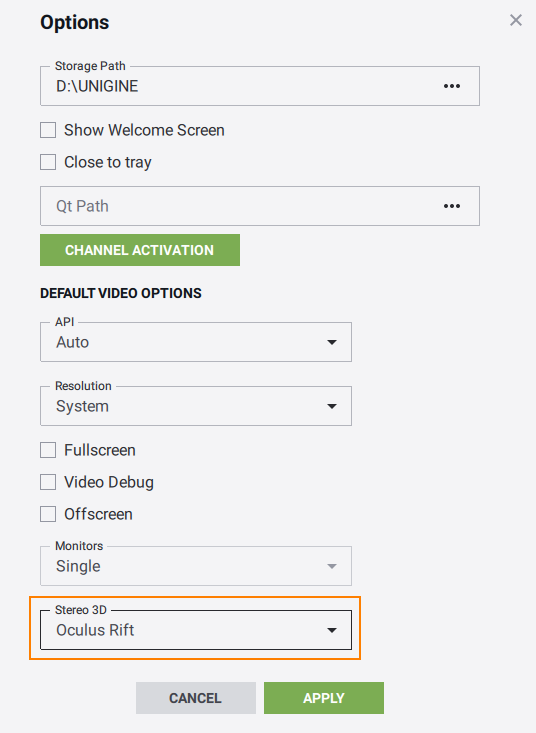
如果通过UNIGINE SDK浏览器运行应用程序,请在Global Options选项卡中将Oculus Rift在Global Options选项卡中,然后单击Apply:
要启动插件,请指定extern_plugin应用程序启动时的命令行选项: 命令行
|
3.打开项目源#
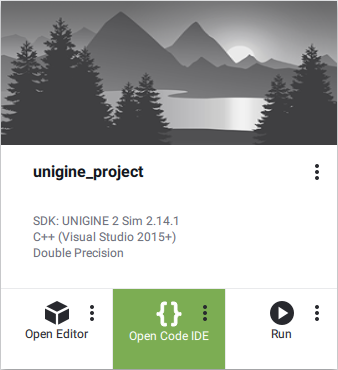
要在IDE中打开您的VR项目,请在UNIGINE SDK浏览器的Projects选项卡上将其选中,然后单击Open Code IDE。

打开IDE时,您可以看到该项目包含许多不同的类。 这个简短的概述将向您提示它们的全部含义。
在Visual Studio中编译代码之前,请不要忘记为项目设置适当的平台和配置设置。

现在,我们可以尝试首次构建我们的应用程序。
在Visual Studio(BUILD -> Build Solution)或其他版本中构建应用程序,然后通过在UNIGINE SDK浏览器的Projects选项卡上选择项目并单击Run来启动它。
在通过UNIGINE SDK浏览器运行应用程序之前,请确保通过单击Run按钮下的省略号来选择适当的Customize Run Options(在我们的示例中为Debug版本和x64体系结构)。

4.将对象附加到HMD#
有时可能需要在HMD上附加一些物体以跟随它(例如帽子)。所有可移动对象(已分配movable.prop属性)都有一个启用此选项的开关。
例如,如果要使表上的圆柱可附加到HMD,只需在World Hierarchy中选择名为“cylinder”的相应节点,单击Reference部分中的Edit并启用Can Attach to Head选项。

然后选择父节点引用,然后单击Apply。
可以在运行时通过代码完成相同的事情:
// retrieving a NodeReference named "cylinder" and getting its reference node
NodePtr node = checked_ptr_cast<NodeReference>(World::getNodeByName("cylinder"))->getReference();

// checking if this node is a movable object by trying to get its ObjMovable component
ObjMovable *obj = ComponentSystem::get()->getComponent<ObjMovable>(node);
if (obj != nullptr)
{
	// making the object attachable to the HMD
	obj->can_attach_to_head = 1;
}5.添加新的交互#
假设我们要在项目中扩展激光笔的功能,我们可以抓取,投掷和使用(打开),现在可以通过添加替代使用动作(在按下某些按钮时更改所指向对象的材质)。

因此,我们将为该新动作向类添加一个新的altUseIt()VRInteractable方法,并将其映射到某个控制器按钮的状态。
VRInteractable.h
#pragma once
#include <UnigineNode.h>
#include <UniginePhysics.h>
#include "../Framework/ComponentSystem.h"
#include "Players/VRPlayer.h"

using namespace Unigine;
using namespace Math;

class VRPlayer;

class VRInteractable : public ComponentBase
{
public:
	// ...

	// interact methods
	virtual void grabIt(VRPlayer* player, int hand_num) {}
	virtual void holdIt(VRPlayer* player, int hand_num) {}
	virtual void useIt(VRPlayer* player, int hand_num) {}
	virtual void altuseIt(VRPlayer* player, int hand_num) {} //<-- method for new alternative use action
	virtual void throwIt(VRPlayer* player, int hand_num) {}
};分别为altUseIt() method for our laser pointer in the ObjLaserPointer.cpp文件中的激光指示器声明并实现对ObjLaserPointer.cpp files respectively:
ObjLaserPointer.h
#pragma once
#include <UnigineWorld.h>
#include "../VRInteractable.h"

class ObjLaserPointer : public VRInteractable
{
public:
	// ...

	// interact methods
	// ...
	// alternative use method override
	void altuseIt(VRPlayer* player, int hand_num) override;

	// ...

private:
	// ...
	int change_material;	//<-- "change material" state

	// ...
};
ObjLaserPointer.cpp
// ...

void ObjLaserPointer::init()
{
  	// setting the "change material" state to 0
	change_material = 0;

    // ...
}

void ObjLaserPointer::update()
{
	if (laser->isEnabled())
	{
      	// ...
      		// show text

		if (hit_obj && hit_obj->getProperty() && grabbed)
		{
			//---------CODE TO BE ADDED TO PERFORM MATERIAL SWITCHING--------------------
			if (change_material)// if "alternative use" button was pressed
			{
				// change object's material to mesh_base
				hit_obj->setMaterial("mesh_base", "*");
			}
			//---------------------------------------------------------------------------
			// ...
		}
		else
			obj_text->setEnabled(0);
	}
	// unsetting the "change material" state
	change_material = 0;
}

// ...

// alternative use method override
void ObjLaserPointer::altuseIt(VRPlayer* player, int hand_num)
{
	// setting the "change material" state
	change_material = 1;
}

// ...
现在,我们将把该动作映射到 YB 控制器按钮的状态。为此,我们应该通过将以下代码添加到其postUpdate()VRPlayer方法中来修改类(它是所有VR播放器的基类):
VRPlayer.cpp
// ...

void VRPlayer::postUpdate()
{
	for (int i = 0; i < getNumHands(); i++)
	{
		int hand_state = getHandState(i);
		if (hand_state != HAND_FREE)
		{
			auto &components = getGrabComponents(i);

            // ...
            //-------------CODE TO BE ADDED--------------------------
			// alternative use of the grabbed object
			if (getControllerButtonDown(i, BUTTON::YB))
			{
				for (int j = 0; j < components.size(); j++)
					components[j]->altuseIt(this, i);
				// add callback processing if necessary
			}
            //--------------------------------------------------------
		}
	}
	update_button_states();
}

// ...6.更改VR控制器的默认外观#
在您的VR应用程序中,您可能希望显示指针而不是示例中包含的标准控制器(例如HTC Vive)。

这很简单-只需执行以下步骤:
- 在UnigineEditor中打开世界
- 在VR -> spawn_point (a Dummy Player node with the VRPlayerSpawner组件的节点),然后在Parameters窗口中选择Node Properties部分。
注意可以通过VRPlayerSpawner组件或相应的vr_player_spawner.prop属性的字段来自定义VR播放器的基本设置(控制器和传送点的外观,传送射线的颜色,用于物理交互的手动倍增器,生成点的位置等)。
- 将每只手的所需节点从World Nodes层次结构窗口或Editor Viewport拖动到vr_player_spawner.prop属性的相应字段。
例如,我们可以使Vive控制器看起来像Oculus Touch通过将oculus_touch_left和oculus_touch_right节点拖动到Vive Left Controller和Vive Right Controller字段。

- 拯救世界并启动您的VR应用程序,您的Vive控制器在VR中将看起来像Oculus Touch。
可以在运行时通过代码完成相同的事情:
// AppWorldLogic.cpp

NodeReferencePtr left_hand_node; // node reference to be used for the left controller
NodeReferencePtr right_hand_node; // node reference to be used for the right controller

// ...

int AppWorldLogic::init()
{

	// getting the "spawn_point" node
	NodePtr player_node = World::getNodeByName("spawn_point");

	// creating nodes to replace default Vive controllers (you can use custom *.node files for left and right hand)
	left_hand_node = NodeReference::create("/vr_template/oculus/oculus_touch_left.node");
	right_hand_node = NodeReference::create("/vr_template/oculus/oculus_touch_right.node");


	// checking if this node is a spawn point by trying to get its VRPlayerSpawner component
	VRPlayerSpawner *player_spawner = ComponentSystem::get()->getComponent<VRPlayerSpawner>(player_node);
	if (player_spawner != nullptr)
	{
		// setting new nodes to visualize Vive controllers
		player_spawner->vive_controller_0 = left_hand_node->getNode();
		player_spawner->vive_controller_1 = right_hand_node->getNode();
	}

// ...

}7.添加一个新的可交互对象#
扩展VR Sample功能的下一步是添加一个新的可交互对象。
让我们添加一种新型的可交互对象,我们可以使用其他功能来抓取,握住和抛出该对象:当抓取对象时,对象将更改其形式(更改为某个预设),并在释放时将其还原。如果启用了相应的选项,它还将在控制台中显示某些文本。

因此,我们将使用以下组件:
- ObjMovable-启用基本的抓取和投掷功能
- 新的ObjTransformer组件可启用表单更改和日志消息打印功能
将执行以下步骤:
- 添加一个新的ObjTransformer类,该类继承自VRInteractable。在Visual Studio我们可以选择Project → Add Class在主菜单中,单击Add,在打开的窗口中指定类名称和基类,然后单击Finish:

- 在抓取时实现转换到指定节点的功能,并在释放节点时恢复以前的形式
在下面,您将找到我们新的ObjTransformer类的头文件和实现文件:
ObjTransformer.h
源代码 (C++)#pragma once #include <UnigineNode.h> #include "Components/VRInteractable.h" #include "Framework/Utils.h" class ObjTransformer : public VRInteractable { public: ObjTransformer(const NodePtr &node, int num) : VRInteractable(node, num) {} virtual ~ObjTransformer() {} // property name UNIGINE_INLINE static const char* getPropertyName() { return "transformer"; } // parameters PROPERTY_PARAMETER(Toggle, show_text, 1); // Flag indicating if messages are to be printed to the console PROPERTY_PARAMETER(String, text, "TRANSFORMATION"); // Text to be printed to the console when grabbing or releasing the node PROPERTY_PARAMETER(Node, target_object); // Node to be displayed instead of the transformer-node, when it is grabbed // interact methods void grabIt(VRPlayer* player, int hand_num) override; // override grab action handler void throwIt(VRPlayer* player, int hand_num) override; // override trow action handler void holdIt(VRPlayer* player, int hand_num) override; // override hold action handler protected: void init() override; };ObjTransformer.cpp
源代码 (C++)#include "ObjTransformer.h" REGISTER_COMPONENT( ObjTransformer ); // macro for component registration by the Component System // initialization void ObjTransformer::init(){ // hiding the target object (if any) if (target_object){ target_object->setEnabled(0); } } // grab action handler void ObjTransformer::grabIt(VRPlayer* player, int hand_num) { // if a target object is assigned, showing it, hiding the original object and displaying a message in the log if (target_object){ target_object->setEnabled(1); // hide original object's surfaces without disabling components ObjectPtr obj = checked_ptr_cast<Object>(node); for (int i = 0; i < obj->getNumSurfaces(); i++) obj->setEnabled(0, i); if (show_text) Log::message("\n Transformer's message: %s", text.get()); } } // throw action handler void ObjTransformer::throwIt(VRPlayer* player, int hand_num) { // if a target object is assigned, hiding it, and showing back the original object if (target_object){ target_object->setEnabled(0); // show original object's surfaces back ObjectPtr obj = checked_ptr_cast<Object>(node); for (int i = 0; i < obj->getNumSurfaces(); i++) obj->setEnabled(1, i); } } // hold action handler void ObjTransformer::holdIt(VRPlayer* player, int hand_num) { // changing the position of the target object target_object->setWorldPosition(player->getHandNode(hand_num)->getWorldPosition()); } - 像以前 一样构建您的应用程序并启动它,将为我们的新组件生成一个新的属性文件(transformer.prop)。
- 在 UnigineEditor 中打开世界,创建一个新的框图元(Create -> Primitive -> Box),然后将其放置在桌子附近,创建一个球体图元(Create -> Primitive -> Box)用于转换。
-
要将组件添加到框对象中,请选择它,然后在Node Properties部分中单击Add New Property,然后将movable.prop属性拖动到出现的新的空字段中。 对transformer.prop属性重复相同的操作,然后将球体从World Hierarchy窗口拖动到Target Object字段。

- 拯救世界并关闭UnigineEditor。
- 启动您的应用程序。
8.限制传送#
默认情况下,可以传送到场景中的任何点。为了避免VR中的用户交互错误(例如,将其传送到墙壁或天花板上),您可以将传送限制在特定区域。为此,请执行以下操作:
- 创建一个网格,定义要限制用户隐形传送的区域;
- 设置一个intersection mask在UnigineEditor中或使用setIntersectionMask()方法:
源代码 (C++)
// defining the teleportation mask as a hexadecimal value (e.g. with only the last bit enabled) int teleport_mask = 0x80000000; // setting the teleportation mask to the MyAreaMesh object's surface with the num index MyAreaMesh->setIntersectionMask(num, teleport_mask); - 使用以下方法为传送射线设置相同的相交蒙版:VRPlayerVR::setTeleportationMask(teleport_mask)。
从这往哪儿走#
恭喜!现在,您知道了如何在VR Sample演示的基础上创建自己的VR项目并扩展其功能。因此,您可以继续自己开发。有一些建议可能对您有用:
- 尝试进一步分析该示例的源代码并弄清楚其工作原理,并用它编写自己的示例。
- 阅读 虚拟现实最佳实践 文章,以获取有关为VR准备内容并改善用户体验的更多信息和有用提示。
- 阅读 组件系统 文章,以获取有关使用组件系统的更多信息。
- 查看 组件系统使用示例 ,以获取有关使用组件系统实现逻辑的更多详细信息。


