Environment Probe
Environment Probe is a light source which also provides reflections on an object inside the probe by using a cubemap (pre-baked or dynamically changing each frame). In Unigine, Environment Probes have two types of projections:
- Box projection - works better for indoor scenes (when the room has a 3D box shape) or box-shaped outdoor scenes (back alley between buildings).
- Spherical projection - works better for all other cases (reflections on car, spherical room, etc.).
With Environment Probes you can create reflections instead of creating reflection materials.
See Also
- The Light Sources Parameters article.
- The LightEnvironmentProbe Class.
Overview
Environment Probe is a great thing to increase performance, decrease the number of materials and make the life of content designers easier.
Environment probes use cubemaps that were baked (or grabbed with a special tool). This cubemap will play the role of the reflection and the light simulation. Here is an example:
We have two houses with different color of the interior and put same objects (with reflection material, for example, metal) into these houses. What will happen?
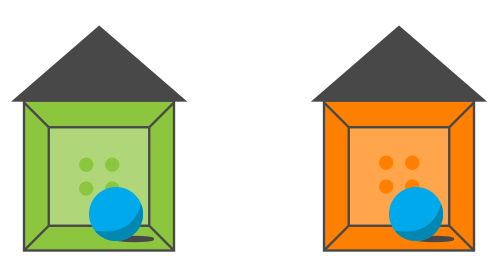
If we don't speak about the dynamic reflections, you'll need to reflect the interior on each object. But interiors have different ambient color, and that is why you'll need to create 2 different materials for them. Not optimized at all.
Environment probes remove this flaw. Once you added an object, you don't think about the reflection material for it. The environment probe will map the cubemap to the object.

There is a difference in mapping cubemaps to transparent and non-transparent objects:
- If an object is transparent, the environment probe will map the cubemap only if the entire object is inside the radius of the environment probe. Otherwise, the object won't be affected by the environment probe at all.
- If an object is non-transparent, the environment probe will map the cubemap to any part of the object which is inside the radius of the probe.
Transparent object illuminated by environment probe |
Non-transparent object illuminated by environment probe |
If you put several environment probes that illuminate a non-transparent object (rendered in the deferred pass) their cubemaps will be blended smoothly. Here is an example, a long corridor which has walls painted in different colors.
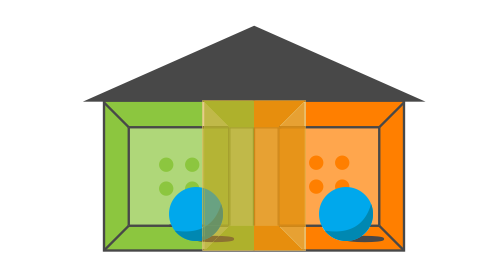
We put two environment probes and both of them affect the object (when the object will be in the intercrossing area). When you have large locations, you should use several environment probes instead of one to make the final image more realistic.
The SSR (Screen Space Reflections) effect makes the final image more realistic, because it appends reflections that cannot be baked into cubemaps. Using environment probes and SSR is a great method for pretty fast imitation of reflections with dynamic lighting.
Multiple Environment Probes for Transparent Objects
The Multiple Environment Probes option set for a transparent object (rendered in the forward pass) allows several environment probes illuminate the object and map their cubemaps to it.
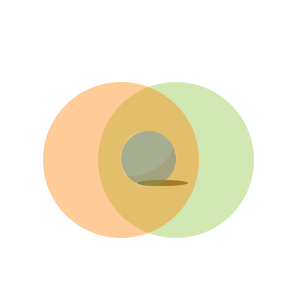
- When the option is disabled, only the last set environment probe will illuminate the object. At that the entire object must be inside the radius of the environment probe. Otherwise, it won't be affected by the enviroment probe at all.
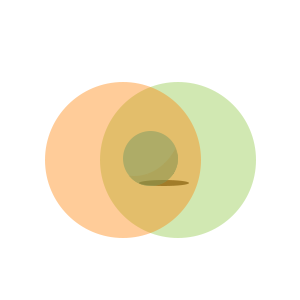
- When the option is enabled, the object will be lit by all of the environment probes: each probe will affect the part of the object, which is inside the probe. Cubemaps of the environment probes will be blended in the intercrossing areas.
 |
 |
Multiple Environment Probes is off: only the left cubemap is mapped to the object |
Multiple Environment Probes is on: both cubemaps are mapped and blended |
Adding Environment Probe
To add an Environment Probe object to the scene via UnigineEditor, do the following:
- Run the project with UnigineEditor.
- On the Menu bar, click Create -> Light -> Environment Probe.
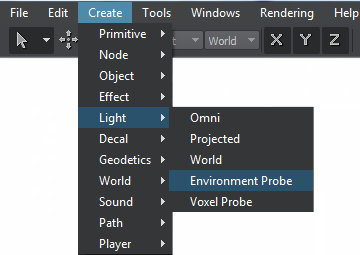
- Place the environment probe.
- Grab the cubemap texture for the environment probe. You can grab it in the Environment Probe tab of the Parameters window or you can bake lighting.
- Adjust the environment probe settings.
Environment Probe Settings
The environment probe settings can be found in the Environment Probe tab of the Parameters window. This tab includes both the common parameters and the parameters specific for the environment probe. The specific ones are described below.
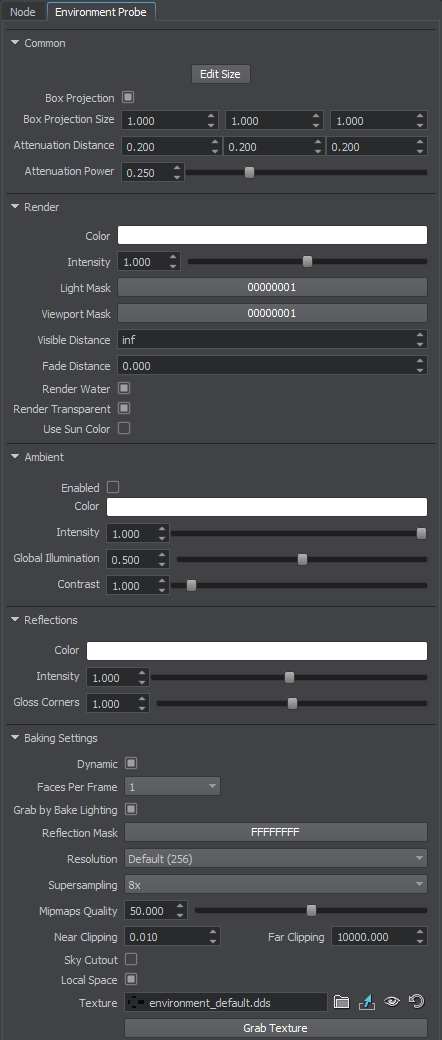
Common Parameters
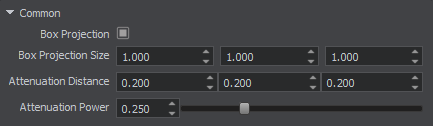
| Box Projection | Enables box projection mode for the Environment Probe. |
|---|---|
| Box Projection Size | Specifies the size of the box projection. |
| Attenuation Power | Sets the attenuation power for the light. |
| Attenuation Distance | Sets the attenuation distance for the light. |
Render Parameters

| Color | Sets the light color in the RGBA format. The color defines both the plausibility of virtual representation and its aesthetic component. |
|---|---|
| Intensity | Sets the light color multiplier, which provides fine control over color intensity of the emitted light:
|
| Light Mask | Sets the shadow mask. |
| Viewport Mask | Sets the viewport mask for the light. |
| Visibility Distance | Distance from the camera, in units, up to which the environment probe will be rendered. |
| Fade Distance | Distance from the camera, in units, starting from which the environment probe starts to fade out gradually. |
| Water | Renders the environment probes on water. |
| Transparent | Renders the environment probes on transparent object. |
| Use Sun Color | Enables the influence of sun light color on the environment probe. Notice When enabled, this option makes the environment probe color black at night, or orange at sunset. |
Ambient Parameters
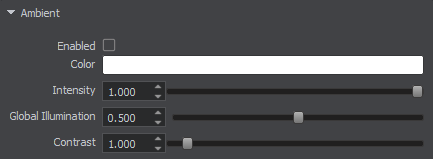
| Enabled | Enables ambient ligting for the Environment Probe. By default Environment Probes are used for reflections only, as for lighting, it is recommended to simulate it using Voxel Probes. This approach ensures the best result, however you can still use Environment Probe for ambient lighting by enabling this option. |
|---|---|
| Color | Sets the color of ambient lighting. |
| Intensity | Sets the intensity of ambient lighting. Notice This parameter is used for manual adjustment in case if resulting intensity is too high or insufficient. |
| Global Illumination | Enables the global illumination simulation. Environment probe generates fake GI by using given cubemap. |
| Contrast | Sets the contrast of ambient lighting. |
Reflection Parameters
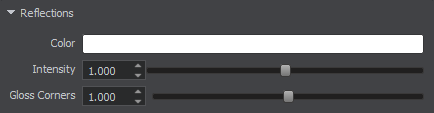
| Color | Sets the color of environment probe's reflection. |
|---|---|
| Intensity | Sets the intensity of environment probe's reflection. 0 value means no reflection. Notice This parameter is used for manual adjustment in case if resulting intensity is too high or insufficient. |
| Gloss Corners | Sets the intensity of reflection gloss near the box projection corners. |
Baking Settings
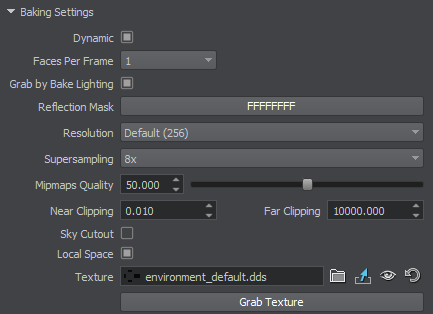
| Dynamic | Specifies if the reflection is dynamic. Notice The Dynamic Reflections option should be enabled: Rendering -> Features -> Dynamic Reflections. |
|---|---|
| Faces Per Frame | Specifies the cubemap update interval. Notice
Available for dynamic mode only.
|
| Grab by Bake Lighting | Specifies if the cubemap texture is to be modified by the Bake Lighting Tool. |
| Reflection mask | Mask specifying materials to reflect. |
| Resolution | Sets the resolution of the reflection in pixels. Notice Setting too high resolution on a low-performance GPU with low memory capacity may cause engine crash. |
| Supersampling | Sets the number of samples per pixel used for image grabbing supersampling. |
| Mipmaps Quality | Set the quality of mipmaps. Notice Setting too quality on a low-performance GPU with low memory capacity may cause engine crash. |
| Near Clipping | Sets distance to near clipping plane for image grabbing. Notice Recommended value for rooms is 0.01. |
| Far Clipping | Sets distance to far clipping plane for image grabbing. Notice Recommended value for rooms is 1000. |
| Sky Cutout | Cuts out sky rendering in the environment probe and renders dynamic reflection instead of the sky. Notice This parameter can be used to render changes of the sky gradient in a window, when the time of the day changes. |
| Local Space | Sets local space (local coordinates) for environment probes. Can be used for scenes with moving objects. Notice It is recommended to use this parameter, if you plan to rotate the environment probe after baking. |
| Texture | Sets the cubemap texture for reflection.
Notice
Every bake lighting procedure makes changes to the asset which is set for this parameter when the Grab by Bake Lighting mode is enabled. You can leave the field empty to avoid losing content. In this case a new generated lighting texture will be set for this parameter after the bake lighting procedure. Generated textures are stored in the data/bake_lighting folder. |