Migrating to Unigine from Unity
This section gives a brief overview of UNIGINE from a Unity user's perspective and provides basic information to help you transfer your Unity experience to UNIGINE.
Editor Interface#
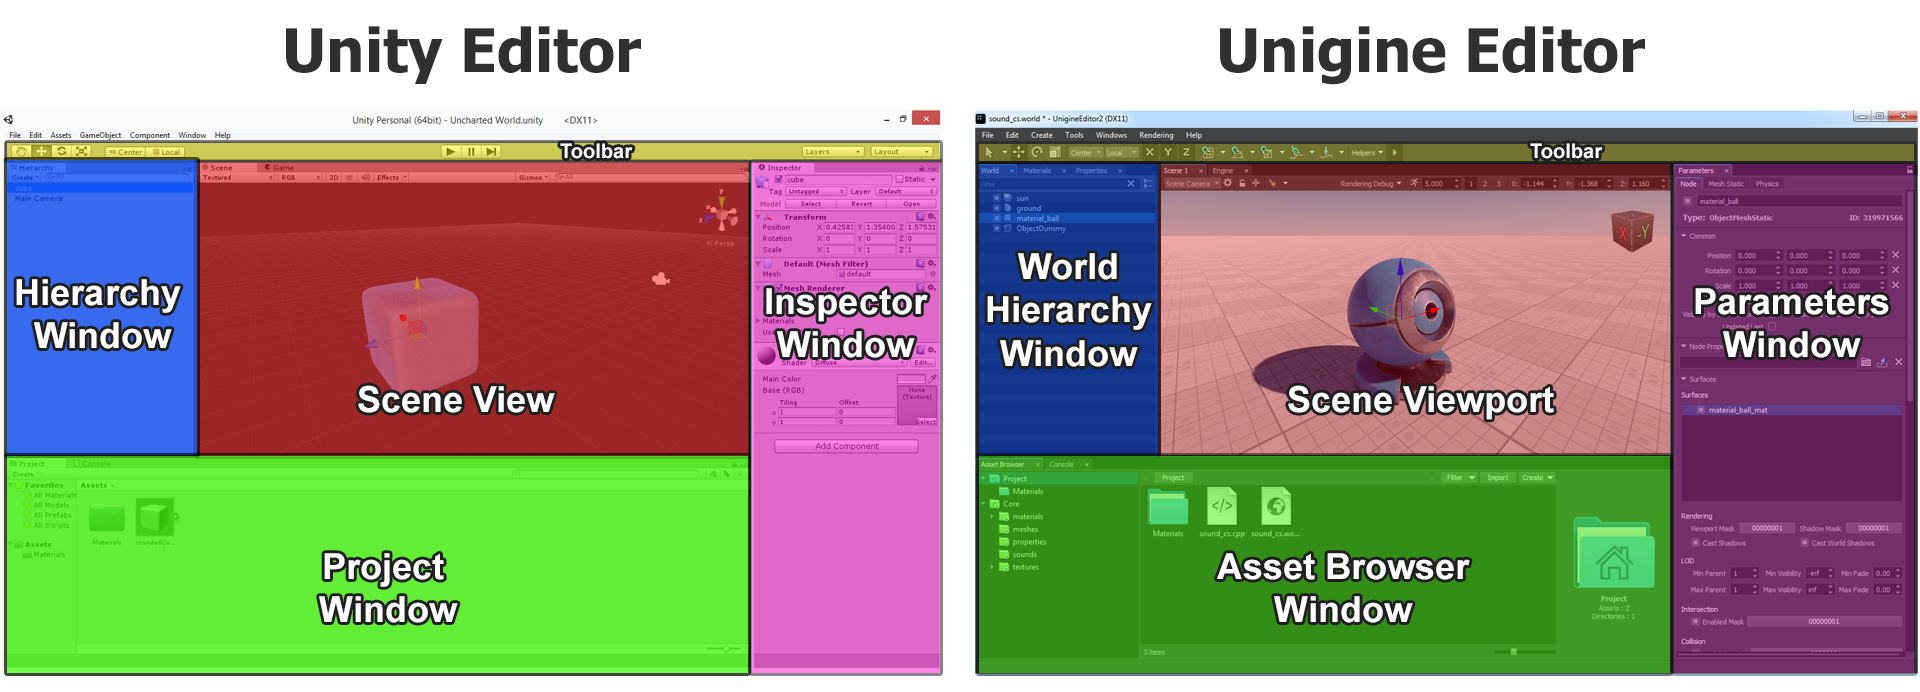
Below you can see interfaces of the Unity Editor and UnigineEditor. Interface elements in the images are color-coded to indicate common functionality. Each element has a label to show UNIGINE's equivalent. The layout of UnigineEditor is fully customizable by resizing, dragging and dropping the tabbed windows.
To learn more about the UnigineEditor interface, read this article.
Scene#
The concept of the Scene in both engines is the same. However, Unity3D and UNIGINE use different coordinate systems.
| Unity | UNIGINE |
|---|---|
|
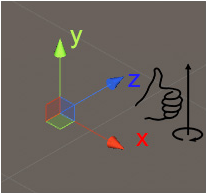
Unity uses a left-handed coordinate system where the vertical direction is usually represented by the +Y axis. Axes and Directions:
Positive rotation angle sets the rotation clockwise. File format: *.scene |
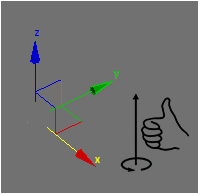
UNIGINE uses a right-handed coordinate system where the vertical direction is usually represented by the +Z axis. Axes and Directions:
Positive rotation angle sets the rotation counterclockwise. File format: *.world |
Loading a Scene#
- In Unity you would use:
Source code
SceneManager.LoadScene("YourSceneName",LoadSceneMode.Single); - In UNIGINE you should use:
Source code (C++)
World::loadWorld("YourSceneName");
Scene Objects#
This section gives a brief description of basic scene objects in both engines as well as their basic similarities and differences.
| Unity | UNIGINE |
|---|---|
|
Basic scene object — GameObject. GameObjects are containers for all other Components. Components add functionality to the GameObject. Every GameObject has the Transform component by default. GameObjects can be organized into a hierarchy (parent-child relation). |
Node is a basic type from which all types of scene objects are inherited. Some of them appear visually: Objects, Decals, and Effects — they all have surfaces to represent their geometry (mesh), while others (Light Sources, Players, etc.) are invisible. Basic functionality of a node is determined by its type. Additional functionality can be added using properties and a component system. Each node has a transformation matrix, which encodes its position, rotation, and scale in the world. Nodes can be organized into a hierarchy (parent-child relation). Notice
All scene objects added to the scene regardless of their type are called nodes. |
Quick Glossary#
This chapter matches common Unity terms on the left and their UNIGINE equivalents (or rough equivalent) on the right. UNIGINE keywords are linked directly to related articles to provide you with more in-depth information.
| Category | Unity | UNIGINE |
|---|---|---|
| Editor UI | Hierarchy Panel | World Hierarchy window |
| Inspector | Parameters window | |
| Project Browser | Asset Browser window | |
| Scene View | Scene Viewport | |
| Scene | Scene | World |
| Gameplay Types | Component | Component System (Properties + Code) |
| GameObject | Node | |
| Prefab | NodeReference | |
| Meshes | Mesh | Static Mesh, Dynamic Mesh |
| Skinned Mesh | Skinned Mesh | |
| Effects | Particles Effect | Particle System |
| Game UI | UI | GUI |
| Materials | Shader | Base Material |
| Material | User Material | |
| Programming | C# | C++ / C# |
| Script | UnigineScript | |
| Physics | Raycast | getIntersection |
| Rigid Body | Rigid Body | |
| Collider | Shape | |
| Joint | Joint | |
| Animation | Timeline | Tracker |
Projects and Files#
Directories and Files#
A project in UNIGINE, just like a Unity project, is stored in its own folder, project settings are stored in the *.project file. There are various subfolders inside the project's folder, where your content and source files as well as various configuration files and binaries are stored. The most important are the data and source sub-folders.
In UNIGINE, each project has a data folder. Similar to a Unity project's Assets folder, this is where your project's assets are stored. To import assets into your project, simply drop files into your project's data directory and they will be automatically imported and appear in the Asset Browser. The assets in the editor will update automatically as you make changes to the files using an external program.
Bringing Your Assets from Unity#
Meshes
You can import an asset you used in Unity to Unigine if you have it as an FBX model. While importing the FBX model to Unigine, check the required import options depending on the model.
Materials
Similar to other engines, Unigine works with PBR materials. Moreover, Unigine supports both Metalness and Specular workflows and has a rich out-of-the-box library of materials that can be used to create almost any material. Therefore, materials created for the model in Unity can be re-created in Unigine using mesh_base material, the base material in Unigine used for physically based materials.
Textures
Textures can be imported as a part of a model or separately and then applied to a mesh. To import textures, you might have to do some adjustments in advance. For example, the shading texture in Unigine stores the metalness, roughness, specular, and microfiber maps in its corresponding channels, so you need to modify the texture using third-party software, such as GIMP or Photoshop, and then import it to Unigine.
To import the normal texture, you should invert the G channel. This can be done while importing the texture (or even later) by using the Invert G Channel setting.
Animations
You can import an animated model you used in Unity to Unigine if you have it as an FBX model. While importing the FBX model, enable the Import Animations option and finetune the import using additional options.
For more details, see import recommendations.
Supported File Types#
Unity supports a wide range of file formats, while UNIGINE supports the ones most commonly used.
Building a Project#
In Unity you got used to building your projects via the editor. In UNIGINE, building a project is also done via UnigineEditor.
Key Concepts#
Game Logic#
Game logic in a Unity project is implemented via Script components. You got used to determine GameObject's behavior by writing event functions like Start(), Update(), etc.
UNIGINE has quite a similar concept, which can be easily adopted — C# Component System, which is safe and secure and ensures high performance. Logic is written in C# components that can be assigned to any node in the scene. Each component has a set of functions (Init(), Update(), etc.), that are called by the corresponding functions of the Engine's main loop.
Programming in UNIGINE using C# is not much different from programming in Unity. For example, let's compare how rotation is performed in Unity:
using UnityEngine;

public class Rotator : MonoBehaviour
{
    public float speed = 90.0f;

    void Update()
    {
        transform.Rotate(0, speed * Time.deltaTime, 0, Space.Self);
    }
}
and in UNIGINE:
using Unigine;

public class Rotator : Component
{
	public float speed = 90.0f;

	void Update()
	{
		node.Rotate(0, 0, speed * Game.IFps);
	}
}
The Run button is available in the Editor to run an instance of the application in a separate window. Along with the button, there are settings available to fine-tune run options.

That's how we'll make the wheel rotate using C# Component System and run an instance to immediately check it:
Moreover in UNIGINE, you can also write code in the AppWorldLogic.cs file to implement logic for the whole application.
To learn more about the execution sequence and how to build components, follow the links below:
For those who prefer C++, UNIGINE allows creating C++ applications using C++ API and, if required, C++ Component System.
Prefabs#
The workflow in Unity is based on prefabs. It is usual for you to assemble a complex object from GameObjects with certain components and properties and create a prefab from such object. Prefabs can then be placed in your world via Editor, or instantiated at run time.
UNIGINE's workflow is based on Node References that are very similar to prefabs. In order to make a complex object to be instanced in your world, you just build the desired hierarchy from nodes, assign materials and properties to them, and save it as a Node Reference. Then you can use this node reference as many times as necessary and, just like with the prefabs, modify the node reference by changing any of its instances.
To learn more about creating Node References and managing them, please follow the link below:


