Basics
So, as we have already said, logic (or program code) is what breathes life into the content and makes it perform the task at hand.
To implement the project logic in UNIGINE, you can use C# or C++ (if you need the best performance and effective integration with the existing source code). In most cases C# is the optimal option, as it is more widespread and provides the best ratio of speed and ease of use. If you want, you can combine programming languages (for example, you can use C++ for performance consuming operations as a plugin and then access it from C# code).
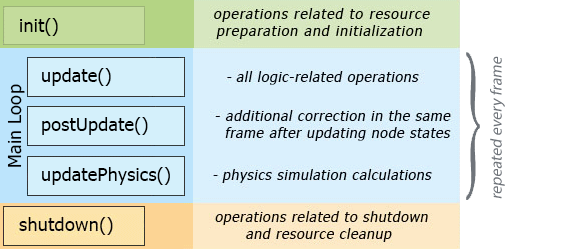
Every UNIGINE-based application has its life cycle, that consists of certain stages, some of them are performed once, others are repeated each frame. In short, these stages are as follows:
UNIGINE has three main logic components, each of them has a set of functions (named init(), update(), render(), etc.) that contain actions to be performed at corresponding stages of the Engine's working cycle. These components are:
-
System Logic is the code that is run during the whole application life cycle (its scope exists even when switching between worlds).
- For applications that use C++ AppSystemLogic.cpp is created, and for C# applications — AppSystemLogic.cs. This file is stored in the source/ folder of your project. It has implemented methods to put your logic code inside.
-
World Logic is the logic of the virtual world. The logic takes effect only when the world is loaded.
- For applications that use C++ AppWorldLogic.cpp is created, and for C# applications — AppWorldLogic.cs. This file is stored in the source/ folder of your project and stays loaded during the whole engine runtime. It has implemented methods to put your logic code inside.
- Editor Logic. This component is to be used in case you need to implement your own Editor. It has more implemented methods providing you with clear understanding of the current Engine events (a node has been created, a property has been deleted, a material has been changed, etc.).
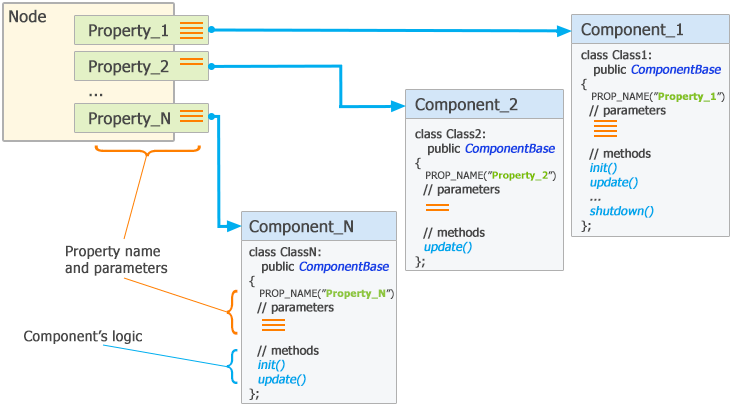
The files described above are useful for writing code referring to the application itself (for example, if you need to perform some actions before starting the main loop or when switching between worlds) or to a world (for example, selecting the loading screen depending on which world is being loaded), but the most common approach is to bind logic to objects. For this purpose, UNIGINE has the Component System, which allows you to implement the application logic using a set of building blocks — components, and assign these components to nodes, thus extending their basic functionality (for example, an ordinary static mesh can be made interactive — reacting to a mouse click in a certain way). By combining these small and simple blocks, you can create a very complex logical system.
A logic component integrates a node, a C++ class, containing logic implementation (actions to be performed), and a property, defining a set of additional parameters to be used. The list of parameters as well as their types are the same for both the component and the corresponding property. Component is assigned to a node via a property.
Logic#
The component logic is implemented using a set of methods that are called by the corresponding World Logic functions:
- init() — all necessary resources are created and initialized.
-
updateAsyncThread() — used for specifying all logic functions you want to be called every frame independently of the rendering thread.
NoticeThis function does not have protection locks, so it is not recommended to modify other components inside this function, unless you are absolutely sure, that these components won't be modified or removed elsewhere. -
updateSyncThread() — used for specifying any parallel logic functions to be executed before the update(). This method is used to perform resource-consuming calculations such as pathfinding, procedural texture generation, etc.
NoticeThis method should be used to call only those API methods that apply to the current node: the node itself, its materials and properties. - update() — used for specifying all logic-related functions you want to be called every frame.
- postUpdate() — used to adjust the behavior according to the updated states of the nodes in the same frame.
- updatePhysics() — physics simulation is performed: continuous operations (moving the car forward depending on the engine speed, simulating constant wind, performing immediate reactions to a collision, etc.).
-
swap()— operating with the results of the updateAsyncThread() method — all other methods (threads) have already been performed and are idle. After this function, only two actions occur:
- All objects that are queued for deletion are deleted.
- Profiler is updated.
- shutdown() — cleanup is performed when the component is shutdown.
The most frequently used functions are init() and update().
The logic of a certain component is applied only when the property and the corresponding node are enabled. Thus, you can enable/disable the logic of each specific component at runtime, if necessary.
You can assign as many components to a node as you need. The sequence in which their logic is executed is determined by the order value specified for the corresponding methods. In the example below, the Component1::init() method will be executed first, followed by the Component2::init() method:
// Component1
COMPONENT_INIT(init, 2);

// ...

// Component2
COMPONENT_INIT(init, 3);

// ...
If the order values are the same or not specified, the execution sequence of methods with the same name will be determined by the order of the properties in the Properties window.
Components can interact with other components and nodes.
As an example, you can use components to implement the logic of chasing the player by enemies in your game: regardless of their size, shape, or speed, they will all check the player's position and try to find the path to get to him the as soon as possible. The code will be mostly the same, only the parameters (speed, meshes and probably sounds) may differ, so you can add all these parameters to the component (to easily change them at any time) and write code in the methods of the corresponding class (e.g. add enemies to the world in the init() method, and implement chasing the player in the update() method).
Then you just need to assign a component to all enemy objects and customize the parameters (define meshes, sounds, etc.). The component system will do the rest: execute your code at the corresponding stages of the Engine's main loop for all enemy objects, using their specific parameters. If you later want to change the code (such as to improve the chase algorithm), you'll need to do that in one place only — the component class.
So, let's sum up – using components provides more flexibility in logic implementation, allowing you to:
- Define which parts of code (implemented in component methods) should be executed and which should not.
- Control the execution order of these code parts.
- Reuse parts of code as many times as you need for any number of objects without any changes. If you need to change your code, you'll have to modify only one source (similar to working with NodeReference, if we are talking about content).
- Combine specific pieces of code that will be executed for specific objects. You can build a very complex system out of many small and simple blocks (similar to using NodeReference to create a large and complex structure out of many simple elements).
Installing the Required Software#
To work with C++ components we recommend using MS Visual Studio environment, you can download it from the official site (https://visualstudio.microsoft.com/) and install.
Now, once everything is installed, you can create a project and start writing code!
The information on this page is valid for UNIGINE 2.20 SDK.