Plugins for 3ds Max
Manual Installation
If Unigine plugins were not installed automatically, do the following:
- Go to the Unigine SDK folder, plugins/Max/ directory and choose the plugin depending on the installed version of 3ds Max.
- Copy the UnigineMesh.dle and UniginePath.dle files into the 3ds Max plugins folder: for example, 3ds Max 2013/plugins.
- Restart 3ds Max to get plugins ready to work.
How to Use the Plugin
You should enable the Unigine mesh exporter on the Utilities panel:
- Go to Utilities panel (click the
 tab on the right-hand column) and click More....
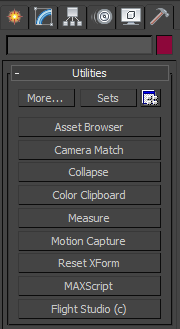
- Choose UnigineMesh Utility in the list that appears and click OK.

The UnigineMesh panel appears in the right-hand column:
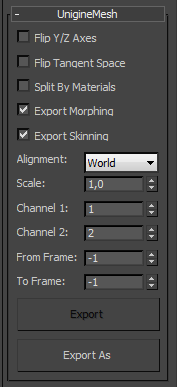
To export 3ds Max models, use the following options:
- Export As... enables to choose the file to which the model should be exported.
- Export saves the model into the same file (as previously specified in the Export As... option).
For other export options, see below.
Export Static Geometry or Animated Object into Mesh
To export static geometry or an animated object into the *.mesh file:
- Select models to be exported.
- Do one of the following:
- On the UnigineMesh panel:
- Set up the export options.
- Click the Export as.. or Export (to export the whole scene).
- On the window that opens, choose the *.mesh format, specify a name and click the Save.
- In the File menu option:
- Choose the Export -> Export selected or Export (to export the whole scene).
- On the window that opens, choose the *.mesh format, specify a name and click the Save.
- Set up the export options and click OK.
- On the UnigineMesh panel:
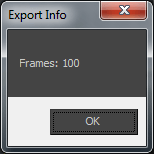
The window with export information opens if the export is done successfully:
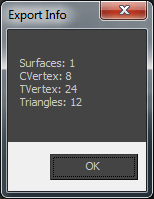
By using the way described above, you can export animated (skinned) object baked together with its animation in one file (*.mesh).
It is also possible to export only the bind pose of the model (and after that, use it in the engine with separately exported animations, see details below). To export only the bind pose, specify the 0 for the From Frame and To Frame options when setting up the export options:

- The maximum number of bones per surface is equal to 128. If the number exceeds this limit, small child bones will be simply ignored by export.
- Each vertex can have up to 4 bones assigned to it.
Mesh Export Options
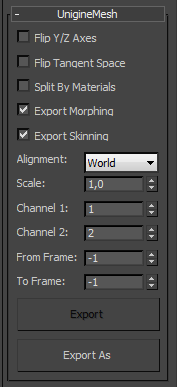
| Flip Y/Z Axes | This option flips the Y and Z axes and inverts the Y axis. You can export a mesh with a proper orientation even if World Up Vector is set to the Y axis. |
|---|---|
| Flip Tangent Space | Flips the sign of the binormal component of the tangent space. |
| Split By Materials | If Multi-materials are used, polygons with the same sub-material assigned are exported as a separate surface.
|
| Export Morphing | Exports the morph controller. |
| Export Skinning | Exports the skin controller. |
| Alignment | Sets a point that will be used as the origin of coordinates:
|
| Scale | A scaling ratio. This value scales the size of a mesh (static or skinned). |
| Channel 1 | UVW channel that should be copied into the 1st UV channel of the exported file. Enter 0 to fill the channel with zeros. |
| Channel 2 | UVW channel that should be copied into the 2nd UV channel of the exported file. Enter 0 to fill the channel with zeros. |
| From Frame | Start animation time. You can specify the -1 to use the start time of the current viewport configuration. |
| To Frame | End animation time. You can specify the -1 to use the end time of the current viewport configuration. |
Export Only Animation of Skinned Mesh
You can export only animation (bones transformations) of a skinned mesh to a separate file. This way, you can have only one mesh and choose what animations to set for it.
To export only animation into *.anim file:
- Select a skinned mesh which animation is going to be exported.
- On the UnigineMesh panel set up the export options.
- Click the Export as.. or Export (to export the whole scene).
- On the window that opens, choose the *.anim format, specify a name and click the Save.
The window with export information opens if the export is done successfully:

Export Path Transformation
You can export a spline (a line or other shape) along which object movement is constrained (via Animation -> Constraints -> Path Constraint in 3ds Max) to a *.path file (a native Unigine path).
To export a spline to the *.path file:
- Select an object which movement is restricted along a spline.
-
On the main menu, select
 -> Export -> Export Selected.
注意You can export only one path at a time.
 - On the window that opens, choose the *.PATH format, specify a name and click Save.
- Set up the export options and click OK.
The window with export information opens if the export is done successfully:
You can create, for example, a frame-based succession of transformations from the exported path (an instance of the WorldTransformPath class).
Path Export Options
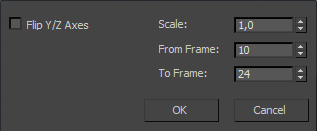
| Flip Y/Z Axes | Flips the Y and Z axes and inverts the Y axis. You can export a path with a proper orientation even if World Up Vector is set to the Y axis. |
|---|---|
| Scale | A scaling ratio. This value scales the size of a path. |
| From Frame | Start animation time. You can specify the -1 to use the start time of the current viewport configuration. |
| To Frame | End animation time. You can specify the -1 to use the end time of the current viewport configuration. |
Import of Unigine Mesh or Skinned Mesh
To import the native Unigine mesh of skinned mesh (*.mesh file) into 3ds Max:
- On the main menu, select File -> Import.
- Choose a *.mesh file and click the Open.
- Specify the import options and click OK.
Mesh Import Options
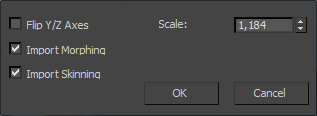
| Flip Y/Z Axes | Flips the Y and Z axes and inverts the Y axis. You can export a mesh with a proper orientation even if World Up Vector is set to the Y axis. |
|---|---|
| Import Morphing | Imports the morph controller. |
| Import Skinning | Imports the skin controller. |
| Scale | A scaling ratio. This value scales the size of a mesh (static or skinned). |
Import of Unigine Skinned Mesh Animation
To import the animation of Unigine skinned mesh (*.anim file ) into 3ds Max:
- On the main menu, select File -> Import.
- Choose an *.anim file and click the Open.
- Specify the import options and click OK.