Shooting Implementation
Now that our character is ready, let's implement shooting, add shooting controls, and use raycasting (intersections) to check if the bullet hits the target.
Shooting Controls#
Let's implement a new component for checking if the fire button is pressed. This is the preferred way as we are going to use this logic in the other components:
- In the HandAnimationController component to start the shooting animation.
- In the WeaponController component to start the shooting logic.
In this component, you can also define a button that acts as a fire button.
To handle user input, use one of the Input class functions to check if the given button is pressed.
-
Create the ShootInput.cs component and copy the following code to it.
ShootInput.cs
Source code (C#)using System; using System.Collections; using System.Collections.Generic; using Unigine; [Component(PropertyGuid = "AUTOGENERATED_GUID")] // <-- this line is generated automatically for a new component public class ShootInput : Component { public bool IsShooting() { // return the current state of the left mouse button and check the mouse capture in the window return Input.IsMouseButtonDown(Input.MOUSE_BUTTON.LEFT); } } Add the ShootInput.cs component to the player Dummy Node.

-
Modify the HandAnimationController.cs component in order to use logic of the ShootInput.cs. Replace your current code with the following one:
HandAnimationController.cs
Source code (C#)using System; using System.Collections; using System.Collections.Generic; using Unigine; [Component(PropertyGuid = "AUTOGENERATED_GUID")] // <-- this line is generated automatically for a new component public class HandAnimationController : Component { // first person controller public FirstPersonController fpsController = null; ${#HL}$ public ShootInput shootInput = null; ${HL#}$ public float moveAnimationSpeed = 30.0f; public float shootAnimationSpeed = 30.0f; public float idleWalkMixDamping = 5.0f; public float walkDamping = 5.0f; public float shootDamping = 1.0f; // animation parameters [ParameterFile(Filter = ".anim")] public string idleAnimation = null; [ParameterFile(Filter = ".anim")] public string moveForwardAnimation = null; [ParameterFile(Filter = ".anim")] public string moveBackwardAnimation = null; [ParameterFile(Filter = ".anim")] public string moveRightAnimation = null; [ParameterFile(Filter = ".anim")] public string moveLeftAnimation = null; [ParameterFile(Filter = ".anim")] public string shootAnimation = null; public vec2 LocalMovementVector { get { return new vec2( MathLib.Dot(fpsController.SlopeAxisY, fpsController.HorizontalVelocity), MathLib.Dot(fpsController.SlopeAxisX, fpsController.HorizontalVelocity) ); } set {} } private ObjectMeshSkinned meshSkinned = null; private float currentIdleWalkMix = 0.0f; // 0 means idle animation, 1 means walk animation private float currentShootMix = 0.0f; // 0 means idle/walk mix, 1 means shoot animation private float currentWalkForward = 0.0f; private float currentWalkBackward = 0.0f; private float currentWalkRight = 0.0f; private float currentWalkLeft = 0.0f; private float currentWalkIdleMixFrame = 0.0f; private float currentShootFrame = 0.0f; private int numShootAnimationFrames = 0; // animation layers number private const int numLayers = 6; private void Init() { // grab the node with the current component assigned // and cast it to the ObjectMeshSkinned type meshSkinned = node as ObjectMeshSkinned; // set the number of animation layers for the node meshSkinned.NumLayers = numLayers; // set animation for each animation layer meshSkinned.SetAnimation(0, idleAnimation); meshSkinned.SetAnimation(1, moveForwardAnimation); meshSkinned.SetAnimation(2, moveBackwardAnimation); meshSkinned.SetAnimation(3, moveRightAnimation); meshSkinned.SetAnimation(4, moveLeftAnimation); meshSkinned.SetAnimation(5, shootAnimation); int animation = meshSkinned.GetAnimation(5); numShootAnimationFrames = meshSkinned.GetNumAnimationFrames(animation); // enable all animation layers for (int i = 0; i < numLayers; ++i) meshSkinned.SetLayerEnabled(i, true); } ${#HL}$ public void Shoot() { // enable the shooting animation currentShootMix = 1.0f; // set the animation layer frame to 0 currentShootFrame = 0.0f; } ${HL#}$ private void Update() { vec2 movementVector = LocalMovementVector; // check if the character is moving bool isMoving = movementVector.Length2 > MathLib.EPSILON; ${#HL}$ // handle input: check if the fire button is pressed if (shootInput.IsShooting()) Shoot(); ${HL#}$ // calculate the target values for the layer weights float targetIdleWalkMix = (isMoving) ? 1.0f : 0.0f; float targetWalkForward = (float) MathLib.Max(0.0f, movementVector.x); float targetWalkBackward = (float) MathLib.Max(0.0f, -movementVector.x); float targetWalkRight = (float) MathLib.Max(0.0f, movementVector.y); float targetWalkLeft = (float) MathLib.Max(0.0f, -movementVector.y); // apply the current layer weights float idleWeight = 1.0f - currentIdleWalkMix; float walkMixWeight = currentIdleWalkMix; float shootWalkIdleMix = 1.0f - currentShootMix; meshSkinned.SetLayerWeight(0, shootWalkIdleMix * idleWeight); meshSkinned.SetLayerWeight(1, shootWalkIdleMix * walkMixWeight * currentWalkForward); meshSkinned.SetLayerWeight(2, shootWalkIdleMix * walkMixWeight * currentWalkBackward); meshSkinned.SetLayerWeight(3, shootWalkIdleMix * walkMixWeight * currentWalkRight); meshSkinned.SetLayerWeight(4, shootWalkIdleMix * walkMixWeight * currentWalkLeft); meshSkinned.SetLayerWeight(5, currentShootMix); // update the animation frames: set the same frame for the animation layers to keep them in sync meshSkinned.SetFrame(0, currentWalkIdleMixFrame); meshSkinned.SetFrame(1, currentWalkIdleMixFrame); meshSkinned.SetFrame(2, currentWalkIdleMixFrame); meshSkinned.SetFrame(3, currentWalkIdleMixFrame); meshSkinned.SetFrame(4, currentWalkIdleMixFrame); // set the shooting animation layer frame to 0 to start animation from the beginning meshSkinned.SetFrame(5, currentShootFrame); currentWalkIdleMixFrame += moveAnimationSpeed * Game.IFps; currentShootFrame = MathLib.Min(currentShootFrame + shootAnimationSpeed * Game.IFps, numShootAnimationFrames); // smoothly update the current weight values currentIdleWalkMix = MathLib.Lerp(currentIdleWalkMix, targetIdleWalkMix, idleWalkMixDamping * Game.IFps); currentWalkForward = MathLib.Lerp(currentWalkForward, targetWalkForward, walkDamping * Game.IFps); currentWalkBackward = MathLib.Lerp(currentWalkBackward, targetWalkBackward, walkDamping * Game.IFps); currentWalkRight = MathLib.Lerp(currentWalkRight, targetWalkRight, walkDamping * Game.IFps); currentWalkLeft = MathLib.Lerp(currentWalkLeft, targetWalkLeft, walkDamping * Game.IFps); currentShootMix = MathLib.Lerp(currentShootMix, 0.0f, shootDamping * Game.IFps); } } -
Select the hands node, drag and drop the player Dummy Node to the Shoot Input field in the HandAnimationController section, and select the ShootInput component.

Using Raycasting#
To implement shooting, you can use the properties of the PlayerDummy camera. This camera has its -Z axis pointing at the center of the screen. So, you can cast a ray from the camera to the center of the screen, get the intersection, and check if you hit anything.
In the component code below, we will store two points (p0, p1): the camera point and the point of the mouse pointer. GetIntersection() method will cast a ray from p0 to p1 and check if the ray intersects with any object's surface (that has the matching Intersection mask to restrict the check results). If the intersection with such surface is detected, the method returns the hitObject and hitInfo values (the intersection point and normal).
-
Create a WeaponController.cs component and copy the following code:
WeaponController.cs
Source code (C#)using System; using System.Collections; using System.Collections.Generic; using Unigine; #region Math Variables #if UNIGINE_DOUBLE using Vec3 = Unigine.dvec3; #else using Vec3 = Unigine.vec3; #endif #endregion [Component(PropertyGuid = "AUTOGENERATED_GUID")] // <-- this line is generated automatically for a new component public class WeaponController : Component { public PlayerDummy shootingCamera = null; public ShootInput shootInput = null; public NodeDummy weaponMuzzle = null; public int damage = 1; // intersection mask [ParameterMask(MaskType = ParameterMaskAttribute.TYPE.INTERSECTION)] public int mask = ~0; public void Shoot() { // initialize the camera point (p0) and the point of the mouse pointer (p1) Vec3 p0, p1; shootingCamera.GetDirectionFromMainWindow(out p0, out p1, Input.MousePosition.x, Input.MousePosition.y); // create an intersection normal WorldIntersectionNormal hitInfo = new WorldIntersectionNormal(); // get the first object intersected by the (p0,p1) line Unigine.Object hitObject = World.GetIntersection(p0, p1, mask, hitInfo); // if the intersection is found if (hitObject) { // render the intersection normal Visualizer.RenderVector(hitInfo.Point, hitInfo.Point + hitInfo.Normal, vec4.RED, 0.25f, false, 2.0f); } } private void Update() { // handle input: check if the fire button is pressed if (shootInput.IsShooting()) Shoot(); } } - Add the component to the player Dummy Node.
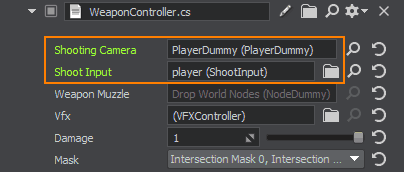
- Assign PlayerDummy to the Shooting Camera field so that the component could get information from the camera.
-
Assign the player Dummy Node to the Shoot Input field.

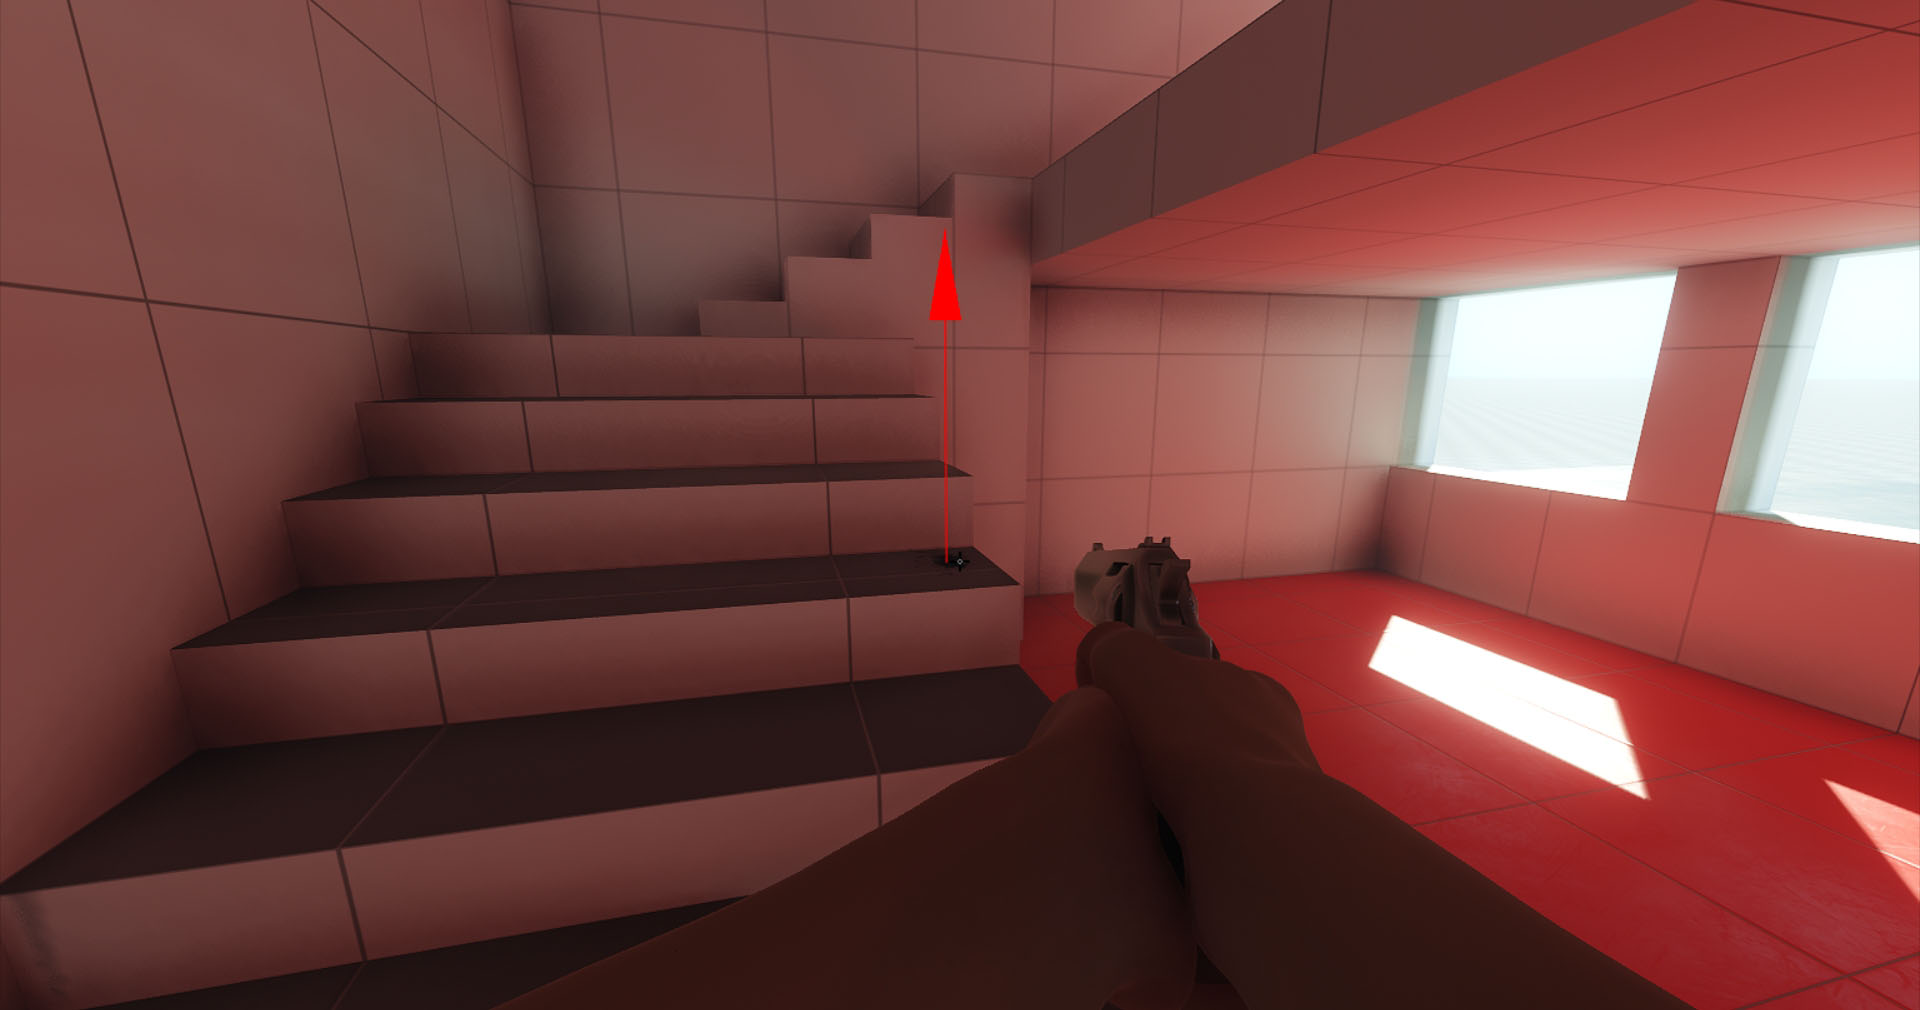
To view the bullet-surface intersection points and surface normals in these points, you can enable Visualizer when the application is running:
- Open the console by pressing ~
- Type show_visualizer 1
