Creating a Car with Wheel Joints

This example shows how to:
- Create a simple car with a frame and wheels attached to it using wheel joints.
- Enable car movement using joint motors.
- Use a keyboard to control car movement.
The basic workflow of creating a simple car with keyboard control is as follows:
- Create the car visual geometry: frame and wheels.
- Set up a third-person camera that follows the car and orbits around it.
- Assign rigid bodies and collision shapes to the wheels and the frame. Set the appropriate masses for them.
-
Set up masses for the wheels and the frame.
NoticeDo not use real masses (e.g. 2000 kg for the frame and 10 kg for the wheels), as joints may become unstable! It might be better to use 64 kg for the body and 25 kg for each wheel to provide realistic behavior. - Connect the wheels to the frame using wheel joints. Set up joint parameters.
- Enable the car movement using joint motors by setting up movement controls with corresponding keyboard keys.
Step 1. Importing Vehicle Geometry#
The first thing we are going to address in this tutorial is the geometry of our car. It is possible to use any other custom made model for the vehicle appearance. Every wheel and the frame will be individual independent nodes in the world, so make sure that your vehicle model includes separate meshes for the wheels and the frame.
Right now we are going to take the vehicle model from the content addon included in the SDK and then add some physical parameters to the geometry to achieve a viable driving simulation.
- Let's create an empty C# project.
-
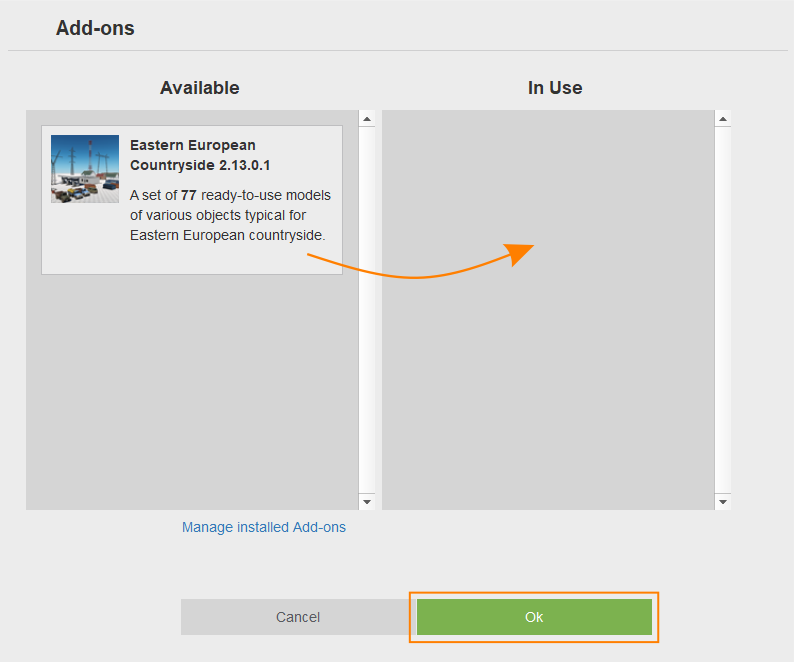
Install the Eastern European Countryside add-on (available via UNIGINE SDK Browser in the Add-Ons section) and add it to your project by clicking Other Actions -> Configure Project -> Add-ons in the My Projects section of UNIGINE SDK Browser. Drag it into the In Use field and click OK.
-
Launch the Editor via the Open Editor button. For your vehicle you can choose any of the minibus nodes located in data/countryside/minibus or import your own model in any supported file format.
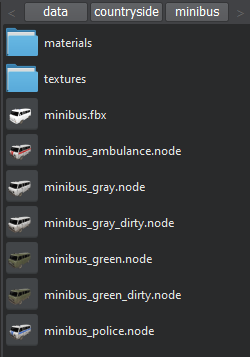
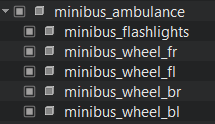
A minibus vehicle model has the body frame as the parent node and its wheels as child nodes.
-
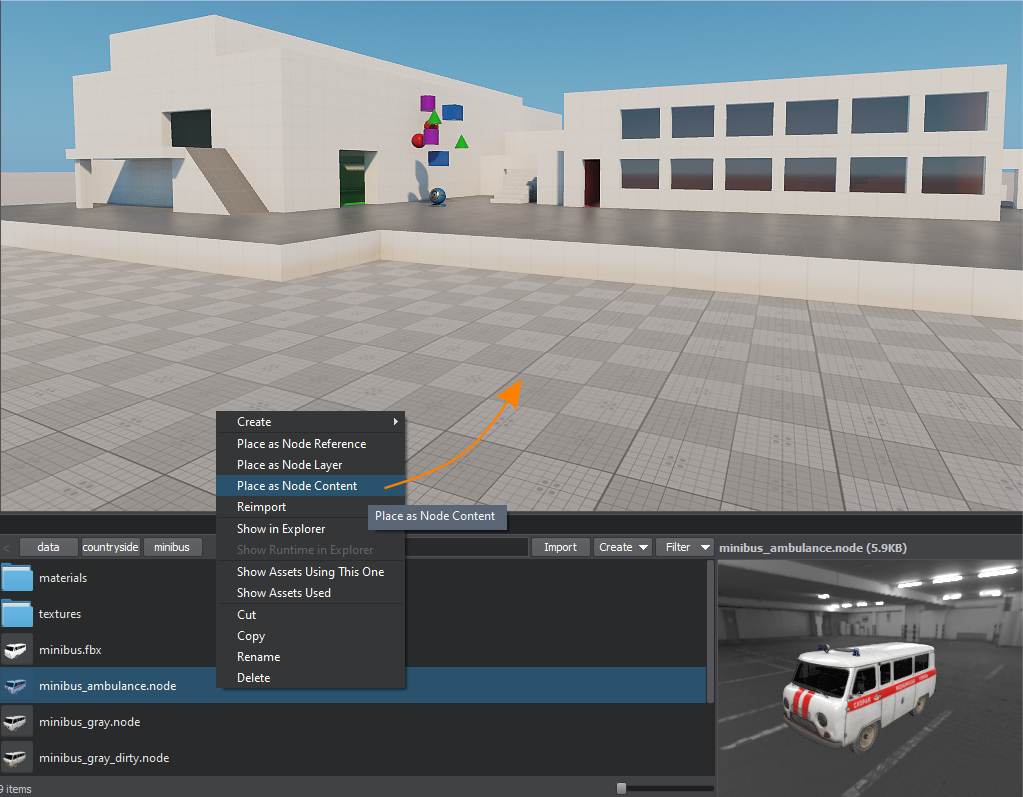
In the Asset Browser, right-click on a minibus node you like the most and choose Place as Node Content. Place the vehicle on the ground in the world. As we don't plan to use multiple instances of the car, we simply put all its parts directly to the scene, without the NodeReference container.
Step 2. Setting Up Camera#
Let’s create a camera for a third-person view. While the camera follows the car, the player can control the viewing direction (rotate the camera) with the mouse. To achieve this, perform the following:
- In the World Nodes window delete the first_person_controller containing the default camera.
- Create a custom Persecutor Camera to follow the car. Go to Create -> Camera -> Persecutor and then place it near the vehicle.
- Check the Main Player option in the Parameters tab of the PlayerPersecutor to make it the default camera in the world.
-
Delete the default Persecutor_Target node from the World Nodes window hierarchy and set our minibus as the target node for the PlayerPersecutor camera instead.

- To put the camera closer to the vehicle, set the Max Distance parameter for the PlayerPersecutor to 8.
-
You can press the F5 or Run button in the Editor to test out the resulting camera behavior.

Step 3. Adding Some Physics#
In order to give our car some physical properties, we must assign physical bodies and approximating volumetric shapes to its frame and wheels. To achieve this, do the following:
-
Go to the Parameters tab of the minibus frame (parent node) and in the Physics tab assign a physical rigid body by selecting Body -> Rigid. Also, add a box shape to the body (Shape -> Box).
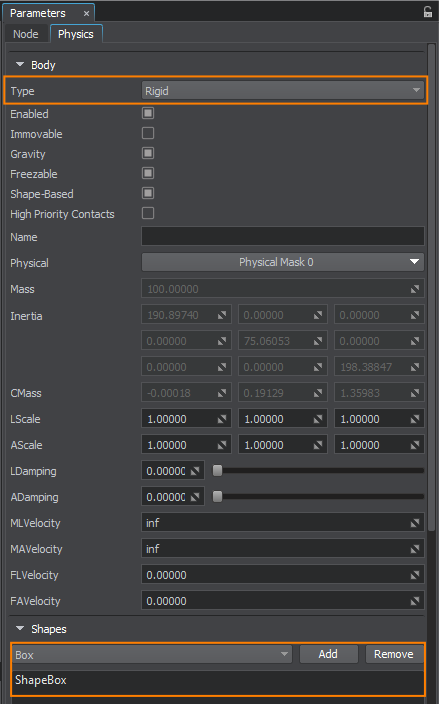
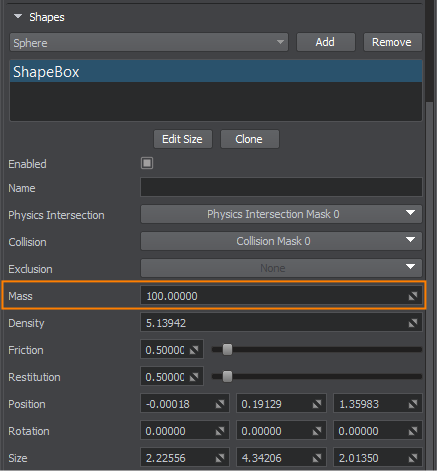
Set the mass of ShapeBox to 100.
-
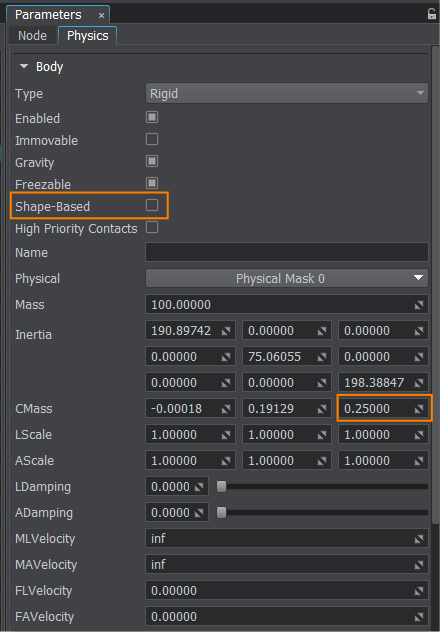
Disable the Shape-Based option for the frame’s rigid body to turn off automatic calculation and customize mass distribution of the vehicle. Set the third component of the CMass parameter to 0.25 effectively lowering the center of mass.
-
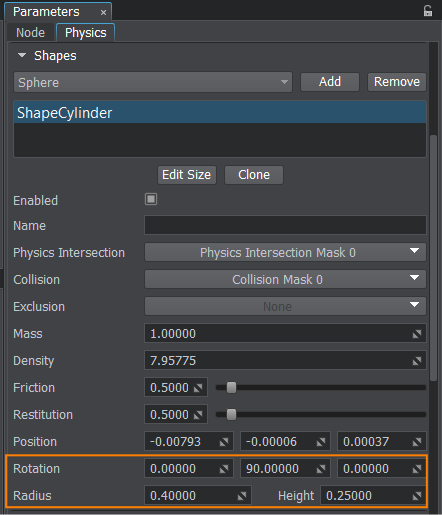
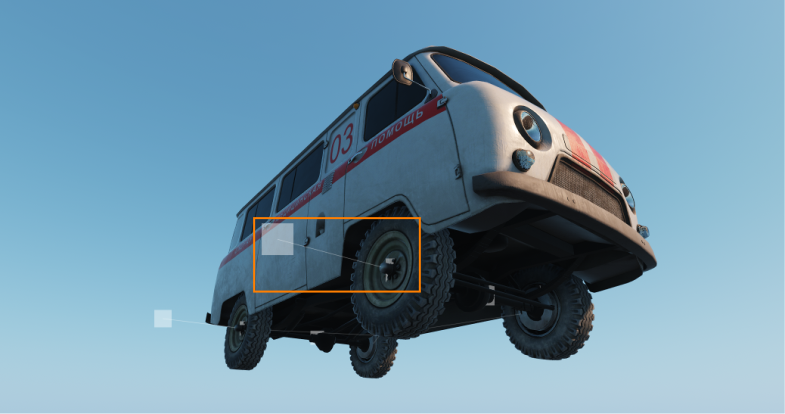
For each of the wheels (child nodes), go to the Parameters tab and in the Physics section assign a rigid body with a cylinder shape that roughly approximates the shape of the wheel mesh. You may need to rotate ShapeCylinder and adjust its radius and height to position it properly (see the image below).
 NoticeIn the World Nodes window, you can select multiple wheel nodes at the same time by holding Shift key and selecting the first and the last one. This way you will be able to add bodies and shapes to all wheels simultaneously.
Step 4. Setting Up Joints#
For the wheels to be connected to the frame and behave realistically, we must connect them using wheel joints. These joints not only remove degrees of freedom providing motion constraints, but also simulate vehicle suspension and motor torque for wheels.
We need to connect the body of every wheel to the frame’s body using wheel joints.
-
To do so select the frame of the minibus (parent node) in the World Nodes hierarchy window and go to the Joints section of the Physics tab. There you must specify the Wheel type for the joint and click the Add button.

-
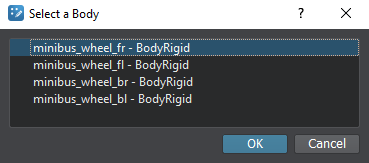
You shall see the following dialog window. Connect the frame body to every wheel’s body by selecting every wheel one by one. The specified rigid body will be connected to the rigid body of the car using a wheel joint.
You will end up with four wheel joints connecting corresponding wheels’ bodies to the frame’s body (you may name them accordingly).
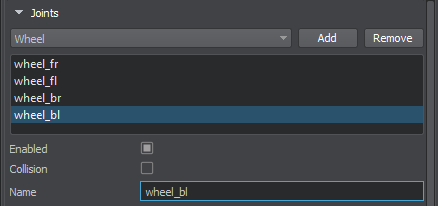
To configure the setup, do the following for every wheel joint (select them one by one and tweak settings below):
-
Press Fix 0 button to fix Anchor 0 point to the wheel position. This will place the joint in the correct position for this wheel.

-
Set the number of joint solving Iterations to 16 making the physical simulation more stable.
NoticeYou can select multiple joints at the same time by holding Shift key and selecting the first and the last one. This way you will be able to set the same settings to all joints simultaneously. -
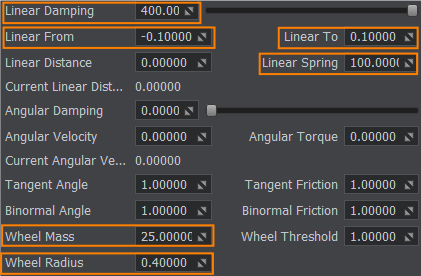
Next, set the following values to the joint’s parameters to achieve a plausible simulation behavior.
-
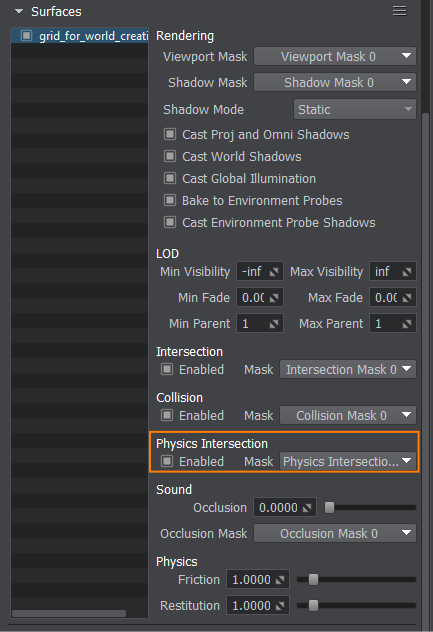
Wheel joints are based on physics raycasting. To make them interact with the ground properly, enable Physics Intersection for the surface of the ground node in the Parameters tab.
Step 5. Applying Velocity to Wheels#
Now let’s create a C# component to implement driving and steering functionality for the car. To achieve this, do the following:
-
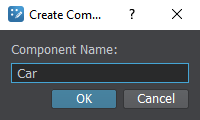
Go to Asset Browser and click Create -> Create C# Component. Name it Car, assign it to the minibus node and then double-click on the newly created component to open it in an IDE.
-
Get references to joints from the wheel nodes and define variables for the velocity, acceleration and torque values.
Source code (C#)public class Car : Component { // driving parameters public float acceleration = 50.0f; public float max_velocity = 90.0f; public float default_torque = 5.0f; // nodes with the joints public Node wheel_bl = null; public Node wheel_br = null; public Node wheel_fl = null; public Node wheel_fr = null; // camera class public Player player = null; // wheel joints private JointWheel joint_wheel_bl = null; private JointWheel joint_wheel_br = null; private JointWheel joint_wheel_fl = null; private JointWheel joint_wheel_fr = null; // settings of input controls private Controls controls = null; // current driving parameters private float current_velocity = 0.0f; private float current_torque = 0.0f; private void Init() { // get the wheel joints from the nodes if (wheel_bl) joint_wheel_bl = wheel_bl.ObjectBody.GetJoint(0) as JointWheel; if (wheel_br) joint_wheel_br = wheel_br.ObjectBody.GetJoint(0) as JointWheel; if (wheel_fl) joint_wheel_fl = wheel_fl.ObjectBody.GetJoint(0) as JointWheel; if (wheel_fr) joint_wheel_fr = wheel_fr.ObjectBody.GetJoint(0) as JointWheel; // get the settings of input controls relevant to the player (camera) if (player) controls = player.Controls; } /* ... */ //more code here } -
Then add control inputs processing to determine the current torque and velocity to be applied to wheel joints.
Source code (C#)public class Car : Component { /* ... */ private void Update() { // get the time it took to render the previous frame float deltaTime = Game.IFps; // process control inputs if (controls) { // set the torque and increase the current velocity if (controls.GetState(Controls.STATE_FORWARD) != 0) { current_torque = default_torque; current_velocity = MathLib.Max(current_velocity, 0.0f); current_velocity += deltaTime * acceleration; } // set the torque and decrease the current velocity else if (controls.GetState(Controls.STATE_BACKWARD) != 0) { current_torque = default_torque; current_velocity = MathLib.Min(current_velocity, 0.0f); current_velocity -= deltaTime * acceleration; } // exponentially decrease the current velocity when the gas or brakes are not engaged else { current_velocity *= MathLib.Exp(-deltaTime); } } } /* ... */ } -
To move the car forward or backward, we are going to use joint motors of the front wheels:
- Setting a positive velocity value will move our car forward.
- Setting a negative velocity value will move our car backward.
Each physics frame, we apply current angular velocity and torque to the wheel joints based on the user input.
Source code (C#)public class Car : Component { /* ... */ // actually apply the torque and velocity to the front wheel joints private void UpdatePhysics() { joint_wheel_fl.AngularVelocity = current_velocity; joint_wheel_fr.AngularVelocity = current_velocity; joint_wheel_fl.AngularTorque = current_torque; joint_wheel_fr.AngularTorque = current_torque; } /* ... */ }
Step 6. Implementing Steering and Handbrake#
To provide the ability to turn left or right as well as the ability to slow down with a handbrake, we shall implement some additional logic that turns the front wheels and stops the rear ones. To achieve this, do the following:
-
Add the following code to the Car component to add the front wheels turning and handbrake support.
Source code (C#)public float turn_speed = 50.0f; public float max_turn_angle = 30.0f; public float car_base = 3.0f; public float car_width = 2.0f; private float current_turn_angle = 0.0f; private void Update() { /* ... */ current_torque = 0.0f; // process control inputs if (controls) { /* ... */ // turn the front wheels based on the direction input if (controls.GetState(Controls.STATE_MOVE_LEFT) != 0) current_turn_angle += deltaTime * turn_speed; else if (controls.GetState(Controls.STATE_MOVE_RIGHT) != 0) current_turn_angle -= deltaTime * turn_speed; else { // get rid of the front wheel wiggle if (MathLib.Abs(current_turn_angle) < 0.25f) current_turn_angle = 0.0f; // align the front wheels if there is no more direction input current_turn_angle -= MathLib.Sign(current_turn_angle) * turn_speed * deltaTime; } // engage handbrake by maxing out the angular damping if the handbrake button is pressed if (controls.GetState(Controls.STATE_USE) != 0) { joint_wheel_bl.AngularDamping = 10000.0f; joint_wheel_br.AngularDamping = 10000.0f; } else { joint_wheel_bl.AngularDamping = 0.0f; joint_wheel_br.AngularDamping = 0.0f; } } // clamp the velocity and the front wheels turn angle current_velocity = MathLib.Clamp(current_velocity, -max_velocity, max_velocity); current_turn_angle = MathLib.Clamp(current_turn_angle, -max_turn_angle, max_turn_angle); // figure out the correct turn angle for the front wheels float angle_0 = current_turn_angle; float angle_1 = current_turn_angle; if (MathLib.Abs(current_turn_angle) > MathLib.EPSILON) { float radius = car_base / MathLib.Tan(current_turn_angle * MathLib.DEG2RAD); float radius_0 = radius - car_width * 0.5f; float radius_1 = radius + car_width * 0.5f; angle_0 = MathLib.Atan(car_base / radius_0) * MathLib.RAD2DEG; angle_1 = MathLib.Atan(car_base / radius_1) * MathLib.RAD2DEG; } joint_wheel_fr.Axis10 = MathLib.RotateZ(angle_1).GetColumn3(0); joint_wheel_fl.Axis10 = MathLib.RotateZ(angle_0).GetColumn3(0); } /* ... */ -
In the Editor, assign wheels (ObjectMeshStatic nodes) and the camera (PlayerPersecutor node) to the corresponding fields of the Car component as specified below.

Congratulations! Now you can finally drive the car around the world. If the current physics of the car is not suitable for your needs, you can always fine tune the parameters of the wheel joints and achieve the results you need. Also, see the Basic Programming How-To Livestream for the hands-on vehicle implementation and discussions. The full source code of the Car component is given below.
public class Car : Component
{
	// driving parameters
	public float acceleration = 50.0f;
	public float max_velocity = 90.0f;
	private float max_turn_angle = 30.0f;
	public float turn_speed = 50.0f;
	public float default_torque = 5.0f;
	public float car_base = 3.0f;
	public float car_width = 2.0f;

	// nodes with the joints
	public Node wheel_bl = null;
	public Node wheel_br = null;
	public Node wheel_fl = null;
	public Node wheel_fr = null;

	// camera class
	public Player player = null;

	// wheel joints
	private JointWheel joint_wheel_bl = null;
	private JointWheel joint_wheel_br = null;
	private JointWheel joint_wheel_fl = null;
	private JointWheel joint_wheel_fr = null;

	// settings of input controls
	private Controls controls = null;

	// current driving parameters
	private float current_velocity = 0.0f;
	private float current_torque = 0.0f;
	private float current_turn_angle = 0.0f;

	private void Init()
	{
		// get the wheel joints from the nodes
		if (wheel_bl)
			joint_wheel_bl = wheel_bl.ObjectBody.GetJoint(0) as JointWheel;

		if (wheel_br)
			joint_wheel_br = wheel_br.ObjectBody.GetJoint(0) as JointWheel;

		if (wheel_fl)
			joint_wheel_fl = wheel_fl.ObjectBody.GetJoint(0) as JointWheel;

		if (wheel_fr)
			joint_wheel_fr = wheel_fr.ObjectBody.GetJoint(0) as JointWheel;

		// get the settings of input controls relevant to the player (camera)
		if (player)
			controls = player.Controls;
	}

	private void Update()
	{
		// get the time it took to render the previous frame
		float deltaTime = Game.IFps;

		current_torque = 0.0f;

		// process control inputs
		if (controls)
		{
			// set the torque and increase the current velocity if the forward button is pressed
			if (controls.GetState(Controls.STATE_FORWARD) != 0)
			{
				current_torque = default_torque;
				current_velocity = MathLib.Max(current_velocity, 0.0f);
				current_velocity += deltaTime * acceleration;
			}
			// set the torque and decrease the current velocity if the backward button is pressed
			else if (controls.GetState(Controls.STATE_BACKWARD) != 0)
			{
				current_torque = default_torque;
				current_velocity = MathLib.Min(current_velocity, 0.0f);
				current_velocity -= deltaTime * acceleration;
			}
			// exponentially decrease the current velocity when the gas or brakes are not engaged
			else
			{
				current_velocity *= MathLib.Exp(-deltaTime);
			}

			// turn the front wheels based on the direction input
			if (controls.GetState(Controls.STATE_MOVE_LEFT) != 0)
				current_turn_angle += deltaTime * turn_speed;
			else if (controls.GetState(Controls.STATE_MOVE_RIGHT) != 0)
				current_turn_angle -= deltaTime * turn_speed;
			else
			{
				// get rid of the front wheel wiggle
				if (MathLib.Abs(current_turn_angle) < 0.25f)
					current_turn_angle = 0.0f;

				// align the front wheels if there are no more direction input
				current_turn_angle -= MathLib.Sign(current_turn_angle) * turn_speed * deltaTime;
			}

			// engage handbrake by maxing out the angular damping if the handbrake button is pressed
			if (controls.GetState(Controls.STATE_USE) != 0)
			{
				joint_wheel_bl.AngularDamping = 10000.0f;
				joint_wheel_br.AngularDamping = 10000.0f;
			}
			else
			{
				joint_wheel_bl.AngularDamping = 0.0f;
				joint_wheel_br.AngularDamping = 0.0f;
			}
		}

		// clamp the velocity and the front wheels turn angle
		current_velocity = MathLib.Clamp(current_velocity, -max_velocity, max_velocity);
		current_turn_angle = MathLib.Clamp(current_turn_angle, -max_turn_angle, max_turn_angle);

		// figure out the correct turn angle for the front wheels
		float angle_0 = current_turn_angle;
		float angle_1 = current_turn_angle;
		if (MathLib.Abs(current_turn_angle) > MathLib.EPSILON)
		{
			float radius = car_base / MathLib.Tan(current_turn_angle * MathLib.DEG2RAD);
			float radius_0 = radius - car_width * 0.5f;
			float radius_1 = radius + car_width * 0.5f;

			angle_0 = MathLib.Atan(car_base / radius_0) * MathLib.RAD2DEG;
			angle_1 = MathLib.Atan(car_base / radius_1) * MathLib.RAD2DEG;
		}

		joint_wheel_fr.Axis10 = MathLib.RotateZ(angle_1).GetColumn3(0);
		joint_wheel_fl.Axis10 = MathLib.RotateZ(angle_0).GetColumn3(0);
	}

	// actually apply the torque and velocity to the front wheel joints
	private void UpdatePhysics()
	{
		joint_wheel_fl.AngularVelocity = current_velocity;
		joint_wheel_fr.AngularVelocity = current_velocity;

		joint_wheel_fl.AngularTorque = current_torque;
		joint_wheel_fr.AngularTorque = current_torque;
	}
}