Создание и удаление объектов из кода
That's great when everything is available in the scene from the outset, but more often than not some objects should be created and deleted at runtime.Хорошо, когда в сцене изначально уже все есть, но чаще бывает так, что какие-то объекты должны создаваться и удаляться во время выполнения приложения, или как говорят, в “рантайме”.
Creating and deleting nodes at runtime as almost as easy as in the Editor. The basic set of actions is as follows:Ноды можно создавать и удалять во время выполнения почти так же просто, как в редакторе. Основной набор действий заключается в следующем:
- Creation. To create a node we should call a constructor of the corresponding class by using the new keyword and providing construction parameters, if necessary.Создание. Чтобы создать ноду, мы должны вызвать конструктор соответствующего класса, используя ключевое слово new и при необходимости указав параметры построения.
- Deletion. To delete a node we simply call the DeleteLater() method for the node we are going to remove.Удаление. Чтобы удалить ноду, мы просто вызываем метод DeleteLater() для ноды, которую мы собираемся удалить.
In general, the code will look as follows:В общем случае это выглядит так:
// создаем ноду типа NodeType с именем nodename
<NodeType> nodename = new <NodeType>(<constructor_params>);

// удаление ноды
nodename.DeleteLater();
Now let us illustrate the process of loading a node from a *.node file from disk using the AssetLinkNode class.Теперь давайте проиллюстрируем процесс загрузки ноды из файла *.node с диска с использованием класса AssetLinkNode.
// ссылка на *.node-ассет на диске
public AssetLinkNode assetNode;
// точка размещения (задает положение, поворот и масштаб)
public Node spawnPoint;

// загружаем ноду из указанного *.node-файла и позиционируем его в соответствии с трансформациями spawnPoint
assetNode.Load(spawnPoint);
You can also create new nodes of various built-in classes using AssetLink, for example create Static Mesh. Just provide the asset file path to a class constructor.Вы также можете создавать новые ноды различных базовых типов, например, создать Static Mesh используя параметр AssetLink, просто указав конструктору класса путь к файлу ассета.
// ссылка на файл ассета на диске
public AssetLink meshAsset;
// точка размещения (задает положение, поворот и масштаб)
public Node spawnPoint;

// проверяем, существует ли указанный ассет-файл на диске
if (meshAsset.IsFileExist)
{
	// создаем новый объект типа Static Mesh из указанного mesh-ассета
	ObjectMeshStatic mesh = new ObjectMeshStatic(meshAsset.Path);
	// копируем трансформацию spawnPoint
	mesh.WorldTransform = spawnPoint.WorldTransform;
}PracticeПрактика#
For our project, let's create the ObjectPlacer component that will place the specified objects in the scene at the specified points (NodeDummy) and the Removable component that will allow us to remove objects by right-clicking. Destroying is always easier that creating, so let's start simple — create the Removable component by inheriting it from Interactable. As a click action, it will simply remove the node to which it is assigned.Для нашего проекта создадим компонент ObjectPlacer, который будет расставлять по сцене указанные предметы в заданных точках (NodeDummy) и компонент Removable, который позволит нам удалять объекты по правому щелчку мыши. Ломать не строить, поэтому давайте начнем с простого – создадим компонент Removable, унаследовав его от Interactable. В качестве действия по щелчку мыши он просто будет удалять ноду, на которую назначен.
using System;
using System.Collections;
using System.Collections.Generic;
using Unigine;

[Component(PropertyGuid = "AUTOGENERATED_GUID")] // <-- идентификатор генерируется автоматически для нового компонента
public class Removable : Interactable
{
	public void Init()
	{
		// задаем текст подсказки, которая будет отображаться при наведении курсора на объект
		tooltip = "Объект можно удалить по правому щелчку мыши.";
	}

	public override void Action(int num=0)
	{
		// удаляем ноду
		node.DeleteLater();
	}
}
Now let's deal with the placer component.А теперь займемся компонентом-расстановщиком.
-
Create a new component, name it ObjectPlacer, and add the following code into it:Создаем новый компонент, называем его ObjectPlacer и пишем в нем следующий код:
ObjectPlacer.csusing System; using System.Collections; using System.Collections.Generic; using Unigine; [Component(PropertyGuid = "AUTOGENERATED_GUID")] // <-- идентификатор генерируется автоматически для нового компонента public class ObjectPlacer : Component { // объединим параметры в группы: для первого и второго объектов [Parameter(Group="First Object Placement")] public AssetLinkNode placeable = null; [Parameter(Group="First Object Placement", Title = "Spawn Points", Tooltip ="Точки для размещения первого объекта.")] public Node spawnPoints1 = null; // верхняя нода иерархии точек размещения [Parameter(Group="Second Object Placement")] public AssetLink meshAsset; [Parameter(Group="Second Object Placement")] public Material meshMat = null; [Parameter(Group="Second Object Placement", Title = "Spawn Points", Tooltip ="Точки для размещения второго объекта.")] public Node spawnPoints2 = null; // верхняя нода иерархии точек размещения private void Init() { // проверяем, существует ли указанный node-файл, содержащий объект(ы) для размещения, и указан ли для него список точек if (placeable.IsFileExist && (spawnPoints1 != null)) { // загружаем содержимое указанного .node-ассета и расставляем по всем точкам, // отмеченным дочерними нодами указанного списка (Spawn-points) for(int i = 0; i < spawnPoints1.NumChildren; i++) placeable.Load(spawnPoints1.GetChild(i).WorldTransform).AddComponent<Removable>(); } // проверяем, существует ли указанный mesh-файл для создания объекта Static Mesh и указан ли для него список точек if (meshAsset.IsFileExist && (spawnPoints2 != null)) { // расставляем по всем точкам, отмеченным дочерними нодами указанного списка (Spawn-points) for(int i = 0; i < spawnPoints2.NumChildren; i++) { // создаем ноду типа Static Mesh с использованием указанного mesh-ассета и назначаем ей указанный материал ObjectMeshStatic mesh = new ObjectMeshStatic(meshAsset.Path); mesh.Name = "generated_mesh_" + i.ToString(); mesh.SetMaterial(meshMat ,"*"); mesh.WorldTransform = spawnPoints2.GetChild(i).WorldTransform; // добавляем ноде компонент Removable, который позволит удалить ее по правому щелчку mesh.AddComponent<Removable>(); } } } } -
Now let's find the interior node (NodeDummy) and assign our ObjectPlacer component to it.Теперь найдем ноду interior (NodeDummy) и назначим на нее компонент ObjectPlacer.
-
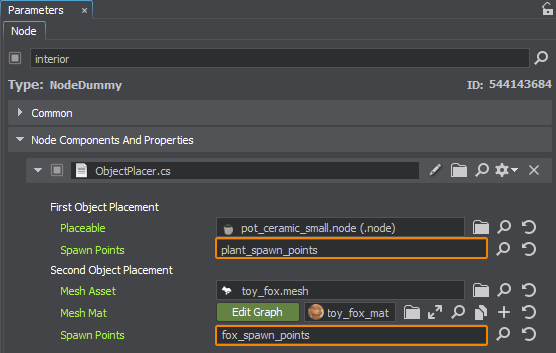
The parameters of the component are divided into two groups: the first one is for placement of the specified *.node asset, and the second one is for generation of Mesh Static objects from the specified *.mesh asset and assignment of the specified material. Next, let's assign a flower (the pot_ceramic_small.node asset) to the Placeable field in the First Object Placement group, toy_fox.mesh and toy_fox_mat material to the Mesh Asset and Mesh Material fields in the Second Object Placement group. Параметры компонента разбиты на две группы: первая для расстановки указанного *.node-ассета, а вторая – для генерации объектов Mesh Static из указанного *.mesh-ассета, с назначением указанного материала. Далее назначим цветок (ассет pot_ceramic_small.node) в поле Placeable в группе First Object Placement, toy_fox.mesh и материал toy_fox_mat в поля Mesh Asset и Mesh Material в группе Second Object Placement.

-
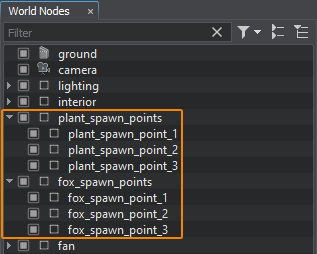
Next, let's define the points to place flowers: create a NodeDummy, name it plant_spawn_points and create several NodeDummy children for it (by clicking on it in the World Hierarchy and choosing Create → Node → Dummy), name them plant_spawn_point_1, plant_spawn_point_2 and plant_spawn_point_3 respectively and place them in the scene in the places where we need flowers. Do the same for the fox figure. We will have the following hierarchy:Затем, определимся с точками для расстановки цветов: создадим ноду NodeDummy, назовем ее plant_spawn_points и создадим несколько дочерних NodeDummy для нее (кликнув по ней в World Hierarchy и выбрав Create → Node → Dummy), назовем их plant_spawn_point_1, plant_spawn_point_2 и plant_spawn_point_3 соответственно и расставим по сцене в тех местах, где нам нужны цветы. То же самое сделаем для фигурки лисы. У нас получится вот такая иерархия:

-
Now drag the plant_spawn_points and fox_spawn_points nodes to the Spawn Point fields in the corresponding groups of the ObjectPlacer component:Теперь перетаскиваем ноды plant_spawn_points и fox_spawn_points в поля Spawn Point в соответствующих группах компонента ObjectPlacer:

Let's run our project by clicking the Play button (or Ctrl + F5) and check the spawned objects.Запустим наш проект, нажав кнопку Play (или Ctrl + F5). И посмотрим на расставленные объекты.

Информация, представленная на данной странице, актуальна для версии UNIGINE 2.20 SDK.
