使用Video Grabber录制视频
Whatever project you are developing, be it a game, an architectural visualization, or an excavator simulator, you may need to record a video (a cutscene for a game or a video presentation of your simulator) and take beautiful high-resolution screenshots. In the previous section we've covered how to animate a scene, make objects move and change their parameters in real time, as well as how to show it from different angles using moving cameras, and adding actions. Now let's figure out how to turn this into a clip or a set of images, which can be shown anywhere, without having an engine or editor at hand.无论你开发的是游戏、建筑可视化项目还是挖掘机模拟器,都可能需要录制视频(游戏过场动画或模拟器的演示视频)以及拍摄高清截图。前文我们已经介绍了如何制作场景动画、实时控制物体移动和参数变化,以及通过移动摄像机展示不同视角并添加动作。现在让我们了解如何将这些内容转换为可在任意设备播放的视频片段或图像序列,而无需依赖引擎或编辑器。
UNIGINE has the Video Grabber tool built into the Editor to create high quality screenshots and capture sequences of frames for video clips.UNIGINE编辑器内置了Video Grabber工具,专门用于生成高质量截图和采集视频帧序列。
Capturing Screenshots截图捕捉#
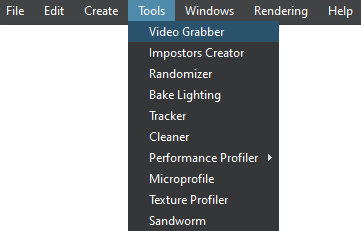
To open Video Grabber, select the appropriate item from the Editor menu:要打开Video Grabber,从编辑器菜单中选择相应选项:

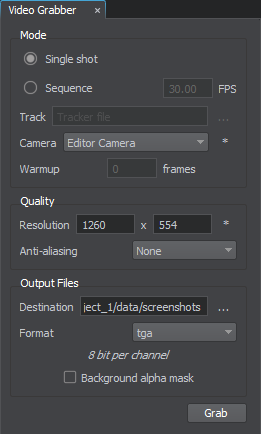
The Video Grabber window will open:Video Grabber窗口将打开:
 |
The settings available in it allow you to select:其中的设置允许你选择:
|
To capture a screenshot, we'll require the Single shot mode. The sequence of actions to create a screenshot is as follows:要捕捉单张截图,我们需要选择单帧模式(Single shot)。创建截图的步骤如下:
- Set the desired camera view.设置所需的摄像机视角。
- Select the required camera from the list: the standard viewport camera (Engine Camera) or any other camera available in the scene (the "*" button will refresh the list).从列表中选择目标摄像机:标准视口摄像机(Engine Camera)或场景中的任意其他摄像机(点击"*"按钮可刷新列表)。
- Specify the required resolution (to use the current viewport size, press the "*" button).指定所需分辨率(如需使用当前视口尺寸,点击"*"按钮)。
- Select antialiasing mode (supersampling multiplier) to improve image quality and remove the jagged effect on diagonal edges.选择抗锯齿模式(超采样倍数),以提升画质并消除斜边锯齿。
- Specify the target folder and select the desired output format (for example, JPG will provide the best compression and EXR supports 16-bpc color depth).指定目标文件夹,并选择输出格式(如JPG可提供最佳压缩,EXR支持16位色深)。
- Now all you need to do to get a screenshot is to click Grab.现在只需点击Grab即可获取截图。
- If you don't want to see any auxiliary visualizations in the final image, disable Visualizer (Helpers → Visualizer Mode → Disabled).若需在最终图像中隐藏所有辅助可视化内容,请禁用Visualizer(操作路径:Helpers → Visualizer Mode → Disabled)。
- If you need a specific screen resolution, regardless of your current monitor resolution, simply enable virtual resolution and specify the required screen size (Settings → Render → Screen → Virtual Resolution).若需指定与当前显示器分辨率无关的特殊屏幕分辨率,只需启用虚拟分辨率并设定所需屏幕尺寸(操作路径:Settings → Render → Screen → Virtual Resolution)。
- If you need a transparent background, enable the Background Alpha Mask option (unavailable for JPG format).若需透明背景,请启用Background Alpha Mask选项(该功能在JPG格式下不可用)。
Capturing Frame Sequences帧序列捕捉#
To capture a sequence of frames, we need a track with an animation that we created in the Tracker tool. Frame sequences are captured in a special mode (not in real time), and this allows you to get a given frame rate on any hardware.要捕捉帧序列,我们需要使用在Tracker工具中创建的动画轨道。帧序列通过特殊模式(非实时)捕捉,这使你能在任何硬件上获得指定的帧率。

Switch Grabber to the Sequence mode and do the following:将Grabber切换至Sequence模式并按以下步骤操作:
- Set the desired frame rate.设定目标帧率。
- Specify the animation track that we prepared for our project in Tracker (tracks/camera_animation.track).指定在Tracker中为项目准备的动画轨道(tracks/camera_animation.track)。
- Set the desired screen resolution, antialiasing mode, target folder, output format, and other settings (just like we did for screenshots).设置目标屏幕分辨率、抗锯齿模式、输出文件夹、文件格式等参数(与截图设置方式相同)
- Now you can start capturing frames by clicking the Grab button. If you want the editor to continue capturing even when out of focus, enable the Keep Running In Background option (Settings → Editor).点击Grab按钮开始捕捉帧序列。如需编辑器在后台持续捕捉,请启用Keep Running In Background 选项(路径:Settings → Editor)。
- When the capture process is complete, you will find the sequence of frames as a set of images in the specified target folder.捕捉完成后,你将在指定文件夹中获得按序列编号的图像集
The first few frames may contain screen-space effect artifacts and incorrect exposure. To correct them, use the Warmup option: specify the number of frames to be skipped before starting capture.前几帧可能包含屏幕空间特效伪影或曝光异常,使用Warmup功能可跳过指定数量的起始帧。
If adaptive exposure is not required, switch to static mode (Settings → Camera Effects → Exposure Mode).如需关闭动态曝光,切换至静态模式(路径:Settings → Camera Effects → Exposure Mode)。
Note that all repetitive captures stored in the same folder will share a common frame count, so to avoid mixing sequences, either clear the target folder before capturing, or use separate folders for different sequences.请注意,所有存储在同一文件夹中的重复捕捉将共享相同的帧计数编号。为避免序列混淆,请在开始捕捉前清空目标文件夹,或为不同序列使用独立文件夹。
Converting a Frame Sequence to Video将帧序列转换为视频#
You can convert the captured frame sequence into a video using a third-party video editor (such as Adobe Premiere). You can also assemble video from images using the ffmpeg library. For example, if you have captured a sequence of frames in TGA format, then to compile them into a video with a frequency of 30 frames per second (the same as you specified when capturing). To do that, enter the following in the command line:你可以使用第三方视频编辑软件(如Adobe Premiere)将捕获的帧序列转换为视频。也可以使用ffmpeg库从图像合成视频。例如,如果你以TGA格式捕获了帧序列,要将它们编译为30帧/秒的视频(与你捕获时指定的帧率相同),请在命令行输入以下内容:
ffmpeg -framerate 30 -i frame_%d.tga -vcodec libx264 -pix_fmt yuv420p output.mp4ffmpeg -framerate 30 -i frame_%d.tga -vcodec libx264 -pix_fmt yuv420p output.mp4
Once the conversion is complete, your finished video output.mp4 will appear in the same folder.转换完成后,生成的output.mp4视频文件将出现在同一文件夹中。
本页面上的信息适用于 UNIGINE 2.20 SDK.
