Creating and Removing Nodes Via Code
That's great when everything is available in the scene from the outset, but more often than not some objects should be created and deleted at runtime.
Creating and deleting nodes at runtime as almost as easy as in the Editor. The basic set of actions is as follows:
- Creation. To create a node we should declare a smart pointer for the type of the node we are going to create and call a constructor of the corresponding class providing construction parameters if necessary.
- Deletion. To delete a node we simply call the deleteLater() method for the node we are going to remove.
In general, the code will look as follows:
// creating a node of the NodeType named nodename
<NodeType>Ptr nodename = <NodeType>::create(<construction_parameters>);

// removing the node
nodename.deleteLater();
Now let us illustrate the process of loading a node from a *.node file from disk using a NodeReference class.
// path to a *.node asset file on disk
String placeablePath = "mynodefile.node"

// specify the spawn transform (position, rotation and scale)
NodePtr spawnPoint;

// load the node from the specified *.node file
NodeReferencePtr placeable = NodeReference::create(FileSystem::guidToPath(FileSystem::getGUID(placeablePath.get())));

// place the new node using the transformations of spawnPoint
placeable->setWorldTransform(spawnPoint->getWorldTransform());
You can also create new nodes of various built-in classes, for example create Static Mesh. Just provide the asset file path to a class constructor.
// path to an asset file on disk
String meshAssetPath = "mynodefile.node"

// specify the spawn transform (position, rotation and scale)
public Node spawnPoint;

// check if the file exists on disk
if (FileSystem::isFileExist(FileSystem::guidToPath(FileSystem::getGUID(meshAssetPath.get())))
{
	// create a new Static Mesh from the specified mesh asset path
	ObjectMeshStaticPtr mesh = ObjectMeshStatic::create(FileSystem::guidToPath(FileSystem::getGUID(meshAssetPath.get())));
	// place the new node using the transformations of spawnPoint
	placeable->setWorldTransform(spawnPoint->getWorldTransform());
}Practice#
For our project, let's create the ObjectPlacer component that will place the specified objects in the scene at the specified points (NodeDummy) and the Removable component that will allow us to remove objects by right-clicking. Destroying is always easier that creating, so let's start simple — create the Removable component by inheriting it from Interactable. As a click action, it will simply remove the node to which it is assigned.
#pragma once
#include <UnigineComponentSystem.h>
#include "Interactable.h"
class Removable :
    public Interactable
{
public:
	// declare constructor and destructor for our class and define the name of the property to be associated with the component.
	// The Removable.prop file containing all parameters listed below will be generated in your project's data folder after running the app for the first time
	COMPONENT_DEFINE(Removable, Interactable);

	// registering methods to be called at the corresponding stages of the world logic (methods are declared in the protected-section below)
	COMPONENT_INIT(init);
	// override of the Action method that deletes the control node
	void action(int num = 0);
protected:
	// declaration of methods to be called at the corresponding stages of the world logic
	void init();
};#include "Removable.h"
// registering the Removable component
REGISTER_COMPONENT(Removable);
using namespace Unigine;
using namespace Math;
void Removable::init()
{
// set the tooltip text that will be displayed when the cursor hovers over the object
tooltip = Unigine::String::format("The object can be removed by right-clicking the mouse.");
}
// override of the Action method that deletes the control node
void Removable::action(int num)
{
// non-zero action indices are invalid for this component, so we ignore them
if (num != 0)
return;
// remove the node to which the component is assigned
node.deleteLater();
}Now let's deal with the placer component.
-
Create a new component, name it ObjectPlacer, and add the following code into it:
ObjectPlacer.h#pragma once #include <UnigineComponentSystem.h> class ObjectPlacer : public Unigine::ComponentBase { public: // declare constructor and destructor for our class and define the name of the property to be associated with the component. // The ObjectPlacer.prop file containing all parameters listed below will be generated in your project's data folder after running the app for the first time COMPONENT_DEFINE(ObjectPlacer, ComponentBase); // registering methods to be called at the corresponding stages of the world logic (methods are declared in the protected-section below) COMPONENT_INIT(init); // combine parameters into groups: for the first and second objects PROP_GROUP("First_Object_Placement") PROP_PARAM(File, placeable, NULL); PROP_PARAM(Node, spawnPoints1, nullptr); // root node of the hierarchy of spawn-points PROP_GROUP("Second_Object_Placement") PROP_PARAM(File, meshAsset, NULL); PROP_PARAM(Material, meshMat, nullptr); PROP_PARAM(Node, spawnPoints2, nullptr); // root node of the hierarchy of spawn-points protected: // declaration of methods to be called at the corresponding stages of the world logic void init(); };ObjectPlacer.cpp#include "ObjectPlacer.h" #include "Removable.h" // registering the Removable component REGISTER_COMPONENT(ObjectPlacer); using namespace Unigine; using namespace Math; void ObjectPlacer::init() { // check if there is a specified node-file contains the hosting object(s) and if it has a list of points if (FileSystem::isFileExist(FileSystem::guidToPath(FileSystem::getGUID(placeable.getRaw()))) && (spawnPoints1 != NULL)) { // load the specified .node-asset's content and place it in every point, // marked with child nodes of the specified list (Spawn-points) for (int i = 0; i < spawnPoints1->getNumChildren(); i++) { NodeReferencePtr node_ref = NodeReference::create(FileSystem::guidToPath(FileSystem::getGUID(placeable.getRaw()))); node_ref->setWorldTransform(spawnPoints1->getChild(i)->getWorldTransform()); ComponentSystem::get()->addComponent<Removable>(node_ref); } } // check if the specified *.mesh file used to create the Static Mesh object exists and a list of points is specified for it if (FileSystem::isFileExist(FileSystem::guidToPath(FileSystem::getGUID(meshAsset.getRaw()))) && (spawnPoints2 != NULL)) { // place in every point marked by child nodes of the specified list (Spawn-points) for (int i = 0; i < spawnPoints2->getNumChildren(); i++) { // create the Static Mesh node using the specified *.mesh asset and set the specified material for it ObjectMeshStaticPtr mesh = ObjectMeshStatic::create(FileSystem::guidToPath(FileSystem::getGUID(meshAsset.getRaw()))); mesh->setName(String::format("generated_mesh_%d", i)); mesh->setMaterial(meshMat, "*"); mesh->setWorldTransform(spawnPoints2->getChild(i)->getWorldTransform()); mesh->setIntersection(true, 0); // add the Removable component to the node, that allows us to delete a node by right-clicking ComponentSystem::get()->addComponent<Removable>(mesh); } } } -
Let's save our files and then build and run our application by hitting Ctrl + F5 to make the Component System generate a property to be used to assign our component to nodes. Close the application after running it and switch to UnigineEditor.
Now let's find the interior node (NodeDummy) and assign our ObjectPlacer property to it.
-
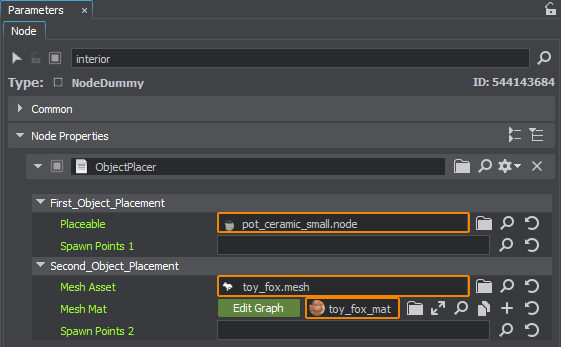
The parameters of the component are divided into two groups: the first one is for placement of the specified *.node asset, and the second one is for generation of Mesh Static objects from the specified *.mesh asset and assignment of the specified material. Next, let's assign a flower (the pot_ceramic_small.node asset) to the Placeable field in the First Object Placement group, toy_fox.mesh and toy_fox_mat material to the Mesh Asset and Mesh Material fields in the Second Object Placement group.

-
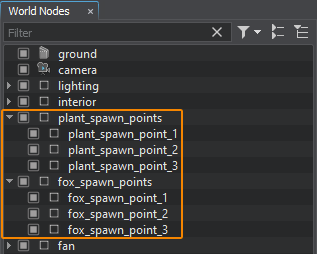
Next, let's define the points to place flowers: create a NodeDummy, name it plant_spawn_points and create several NodeDummy children for it (by clicking on it in the World Hierarchy and choosing Create → Node → Dummy), name them plant_spawn_point_1, plant_spawn_point_2 and plant_spawn_point_3 respectively and place them in the scene in the places where we need flowers. Do the same for the fox figure. We will have the following hierarchy:

-
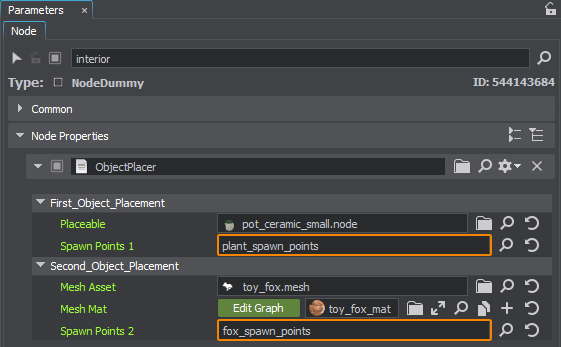
Now drag the plant_spawn_points and fox_spawn_points nodes to the Spawn Point fields in the corresponding groups of the ObjectPlacer component:

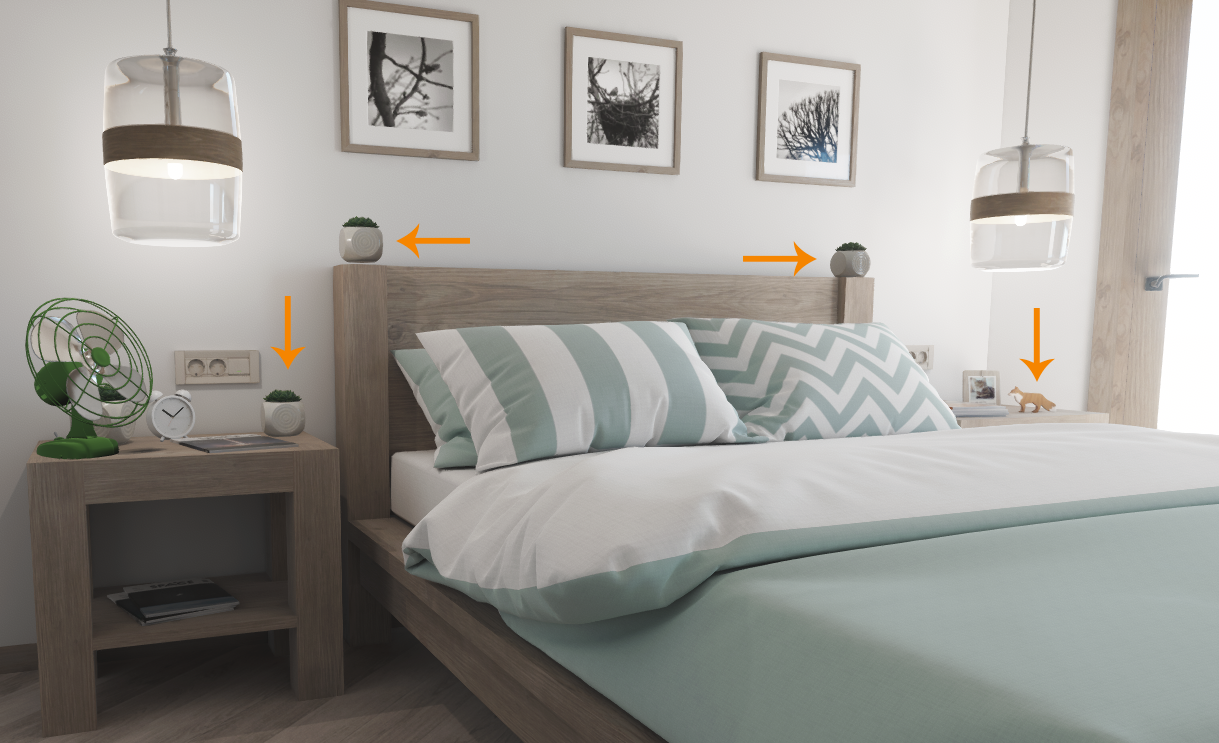
Save the world by hitting Ctrl + S. Switch to SDK Browser and launch our application by clicking the Run button on our project's card and check the spawned objects.

The information on this page is valid for UNIGINE 2.19.1 SDK.