Работа с компонентами в Редакторе
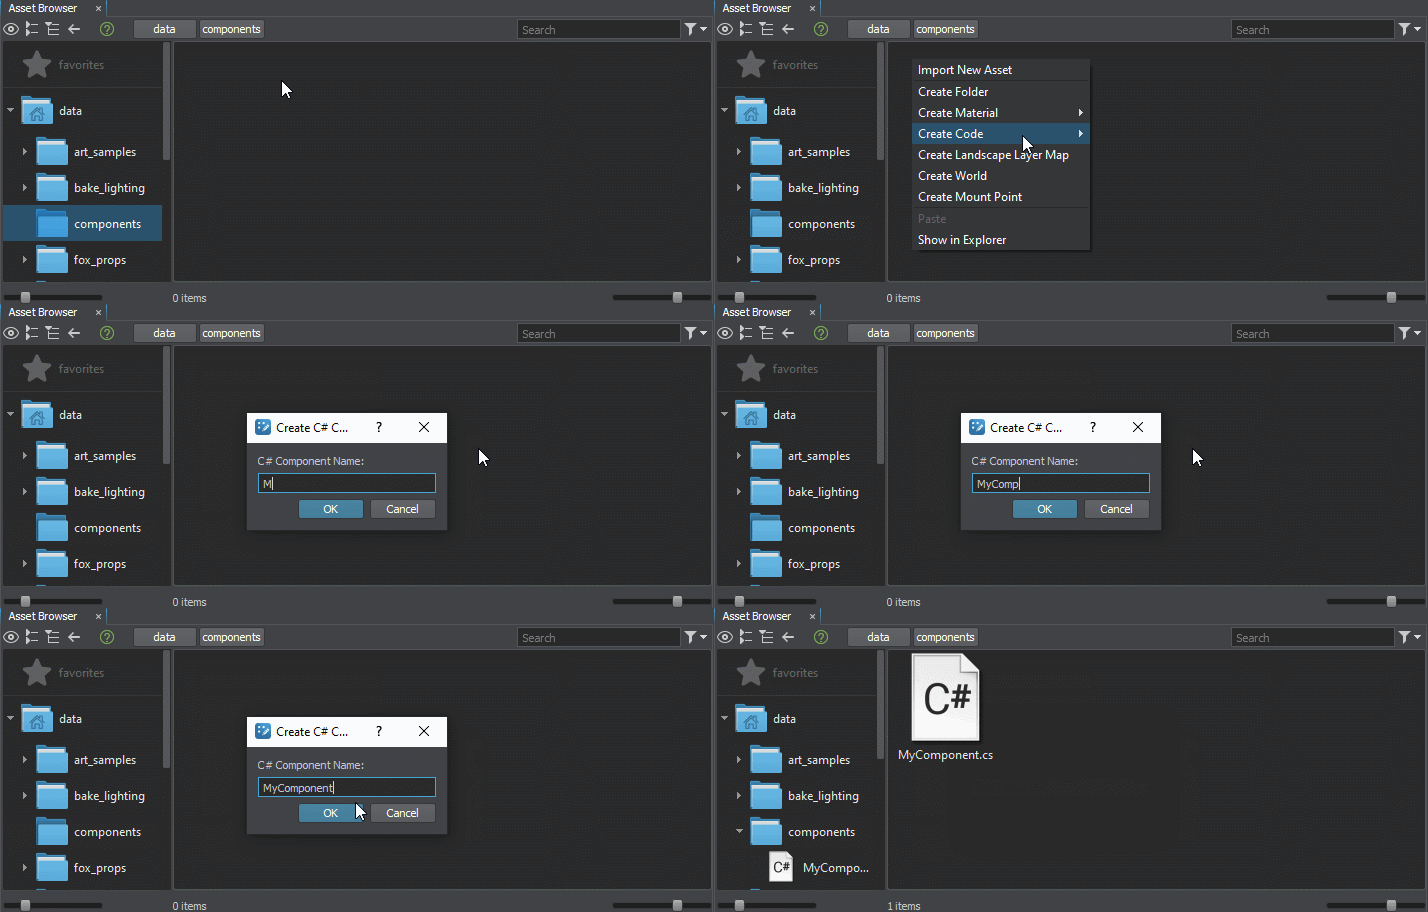
C# Component System is highly integrated with the Editor for ease of use. New components can be created directly in the Editor: right-click in Asset Browser and select Create Code → C# Component.C# Компонентная система имеет высокую степень интеграции с Редактором, что обеспечивает простоту и удобство использования. Новые компоненты можно создавать прямо в Редакторе, щелкните правой кнопкой в Asset Browser и выберите Create Code → C# Component.
Specify the component name in the dialog box and a C# component file with this name will be created in the current Asset Browser directory.Укажите имя компонента в диалоговом окне, после чего в текущем каталоге Asset Browser будет создан файл C# компонента с соответствующим именем.
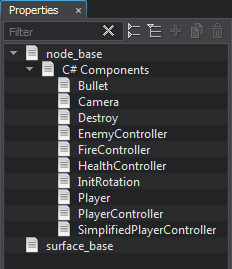
All used C# components are displayed in the Properties window as children of the basic C# Components property.Все используемые C# компоненты отображаются в окне Properties, как наследники базового свойства C# Components.
Double-click on a component in this hierarchy or in Asset Browser to open it for editing in the default IDE (in our case it is Visual Studio Code). Now we can start writing code.Дважды щелкните по компоненту в этой иерархии или в Asset Browser, чтобы открыть его для редактирования в IDE по умолчанию (у нас это будет Visual Studio Code). Теперь можно писать код.
The first thing we see in the code is the MyComponent class inherited from the Component class — this is the base class for all components in your project. You can build a whole hierarchy using your own components, by inheriting some components from others in accordance with the OOP principles (we'll review this in detail later).Первое, что мы видим в коде – это класс MyComponent унаследованный от класса Component – это базовый класс для всех компонентов в вашем проекте, из своих компонентов вы можете построить целую иерархию, наследуя одни компоненты от других – все в соответствии с принципами ООП (про это чуть позже).
Inside the MyComponent class there are already templates for the Init() and Update() methods, let's start writing code there. Inside the Update() method, let's add the following line:Внутри класса MyComponent уже есть заготовки методов Init() и Update(), сюда и напишем свой первый код. Внутри метода Update() давайте добавим следующую строку:
node.Rotate(0.0f, 0.0f, 10.0f);This line rotates the node to which the component is issigned by 10 degrees around the Z axis (we access the node via node).Эта строчка поворачивает ноду, к которой добавлена компонента, на 10 градусов вокруг оси Z (к ноде мы обращаемся через node).
Let's save the changes and switch to the Editor. After saving the changes made to the code, the editor will automatically recompile the C# components, and if we haven't made any mistakes, we will see a green notification that the compilation is successful.Сохраним изменения и переключимся в Редактор. После сохранения изменений внесенных в код редактор автоматически перекомпилирует компоненты C#, и если мы нигде не ошиблись, то увидим зеленое уведомление об успешной компиляции.

A red message signals that an error has been detected, and if you click on it, the console will display detailed information.Появление красного сообщения сигнализирует об обнаружении ошибок, при нажатии на него в консоли отображаются подробные сведения.

The component is ready, but now it must be assigned to some node, otherwise its code won't be executed. Decide which object you want to rotate, drag the component from Asset Browser and drop onto this object (you can drop it on the object directly in the viewport or on the node in the World Nodes window).Компонента готова, но теперь ее надо назначить какой-нибудь ноде, иначе ее код выполняться не будет. Выберите объект, который хотите повращать и перетащите на него компоненту прямо из Asset Browser (можно перетаскивать прямо во вьюпорт или на ноду в окне World Nodes).
The component may be assigned to a node via code as well:Также компоненту к ноде можно добавить из кода:
// like this:
NewComponent component = AddComponent(node);
// or like this:
NewComponent component = node.AddComponent();
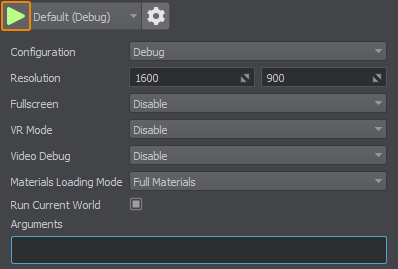
Now let's press the Play button to see the result (by the way, if you click on the gear button, you can change the application launch parameters).Теперь нажмем на кнопку Play чтобы посмотреть, что получилось (кстати, если нажать на “шестеренку”, то можно изменить параметры запуска приложения).
The object rotates as intended!Объект вращается как задумано!
ParametersПараметры#
As we have already mentioned, to implement logic and control processes in components, you may need additional parameters that can be displayed in the editor so that the user can change them.Как мы уже говорили, для реализации логики и управления процессами в компонентах могут понадобиться дополнительные параметры, которые можно отображать в редакторе, чтобы пользователь мог их изменять.
In our simple example, let's add a field (parameter) to the component to specify the rotation angle that will define how fast the object rotates. To do this, replace the constant value with the angle parameter in the line where rotation is set:Для нашего простого примера добавим в компоненту поле (параметр) для задания угла поворота, чтобы определить насколько быстро будет вращаться объект. Для этого в строчке с вращением заменим константу на параметр angle:
node.Rotate(0.0f, 0.0f, angle);And add the following line before the Init() method to define the parameter:А перед методом Init() добавим строчку с определением параметра:
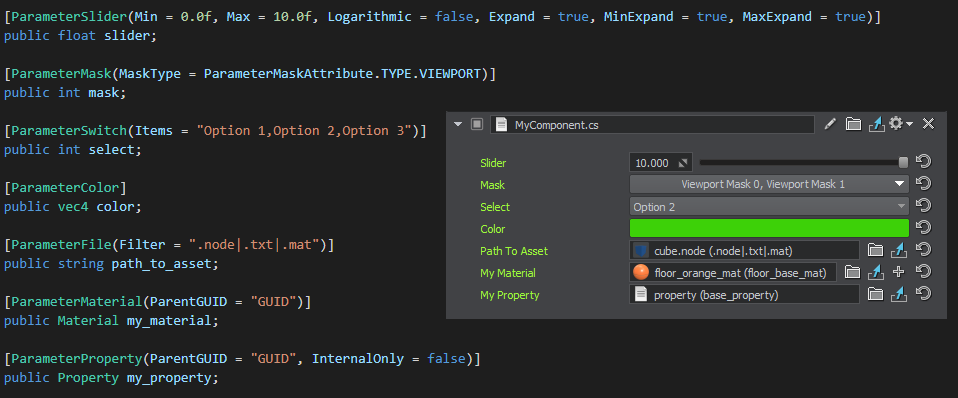
public float angle = 0.1f;For all public fields of the component class the user interface is automatically generated in the Editor based on the data type and attribute set, if it is necessary to display private and protected fields, it is enough to add the [ShowInEditor] option.Для всех полей public класса компоненты в Редакторе автоматически генерируется пользовательский интерфейс на основе типа данных и набора атрибутов, если нужно отобразить private и protected поля, то достаточно добавить опцию [ShowInEditor].
Let's save the changes again and switch to the Editor. Now the Parameters window for our component shows the Angle parameter, with a default value of 0.1, which can be changed.Снова сохраним изменения, переключимся в Редактор. Теперь в окне Parameters для нашей компоненты отображается параметр Angle, со значением по умолчанию 0.1, которое можно поменять.

You can use multiple attributes of various types when defining parameters. See the documentation for the detailed information about supported parameter types and attributes described in the Component class.При определении параметров можно использовать множество атрибутов, подробную информацию о поддерживаемых типах параметров и атрибутах можно посмотреть в документации в описании класса Component.
Hierarchy and Inheritance, Overriding Parameters and Overloading MethodsИерархия и наследование, переопределение параметров и перегрузка методов#
Suppose you have a component that implements a certain functionality, and you need a certain number of subcomponents that have exactly the same functionality but different parameter values. This is a common situation when implementing quality presets or control configurations. Simply inherit a property from the base component in the Editor for each preset and configure the required parameter values. You can then assign these inherited properties to nodes, thus attaching the logic of the base component with parameter values taken from the inherited properties. No unnecessary copying, no redundant code.Предположим, у вас есть компонента, реализующая определенную функциональность, и вам нужно определенное количество подкомпонент, имеющих точно такие же функциональные возможности, но разные значения параметров. Это обычная ситуация при реализации пресетов качества или конфигураций элементов управления. Просто унаследуйте свойство от базовой компоненты в Редакторе для каждого пресета и настройте необходимые значения параметров. После этого можно назначать эти унаследованные свойства нодам, таким образом присоединяя к ним логику базового компонента со значениями параметров, взятыми из унаследованных свойств. Без излишнего копирования, без избыточного кода.
In addition to overriding parameter values, you can also extend the functionality of base components in child components. This is done in accordance with the OOP concept by inheriting the child component class from the base component class, for example:Помимо переопределения значений параметров, можно расширять и функционал базовых компонент в дочерних. Делается это в соответствии с концепцией ООП путем наследования класса дочерней компоненты от класса базовой, например:
// The Interactable class is a child of the base Component class
public class Interactable : Component
{
	public int MyIntParam;
	private void Update()
	{
	// ...
	}
	public virtual void Action()
	{
		Log.Message("Action is performed by the {0} node.\n ", node.Name);
		// ...
	}
}

// ------------------------------------------------------------------
// Класс Toggle наследник класса Interactable
public class Toggle : Interactable
{
	// дополнительный параметр
	public Node controlNode=null;

	// перегрузка родительского метода Action
	public override void Action()
	{
		Log.Message("Toggle action for: {0} \n ", node.Name);
		// ...
	}

	// расширение родительского функционала новым методом
	public void SomeNewMethod()
	{
		//...
	}
}
We'll review more examples a bit later.Подробнее разберем на конкретных примерах чуть позднее.
Debugging C# ComponentsОтладка C# компонент#
The Visual Studio Code environment is known for its excellent debugging tools. You can test the source code of C# components while your application is running, whether the application is launched using the Play button directly in UnigineEditor (Attach) or created and running from the IDE (Launch).Среда Visual Studio Code известна своими отличными инструментами отладки. Можно проверить исходный код компонентов C# во время работы вашего приложения, независимо от того, запущено ли приложение с помощью кнопки Play прямо в UnigineEditor (Attach) или создано и запущено из IDE (Launch).
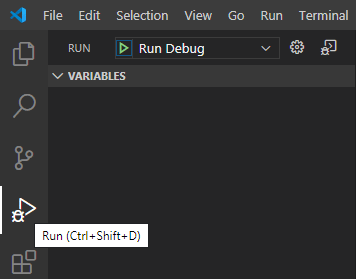
To start debugging, first switch to the Run view. To do this, select the Run icon in the Activity Bar on the left or use the keyboard shortcut Ctrl+Shift+D.Чтобы начать отладку, вы должны сначала переключиться на вид Run. Для этого выберите значок Run в панели Activity Bar слева или используйте сочетание клавиш Ctrl+Shift+D.
Debugging in IDEОтладка в IDE#
To compile all your components, build the application, and debug it by running it directly from the IDE (without switching to UnigineEditor and pressing Play), select Run → Run Debug:Чтобы скомпилировать все ваши компоненты, собрать приложение и отладить его, запустив его прямо из IDE (без переключения на UnigineEditor и нажатия кнопки Play), вы должны выбрать Run → Run Debug:

Now you can add the necessary breakpoints and just press F5 to start the debugging process.Теперь вы можете добавить необходимые точки останова и просто нажать F5, чтобы запустить процесс отладки.
At startup, the application will run with the world set for your project in SDK Browser at creation. If the default world is not set, you will see a black screen after launching the app. In this case, you can open the console (press "~" on the keyboard) and load the desired world using the world_load <world_name> console command.При запуске приложение будет работать с миром, установленным для вашего проекта Браузером SDK при создании. Если мир по умолчанию не установлен, после запуска приложения вы увидите черный экран. В этом случае вы можете открыть консоль (нажмите "~" на клавиатуре) и загрузить желаемый мир с помощью консольной команды: world_load <имя_мира>.
Debugging via Attaching to Running ApplicationОтладка путем подключения к запущенному приложению#
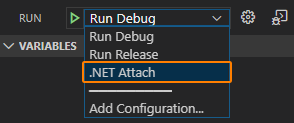
You can also connect VS Code debugger to an instance of your application that is already running. The most common case is launching it via the Play button in UnigineEditor. In this case select Run → .NET Attach.Вы также можете подключить отладчик VS Code к экземпляру вашего приложения, которое уже запущено. Наиболее распространенный случай – запуск его с помощью кнопки Play в Редакторе. В этом случае выберите Run → .NET Attach.
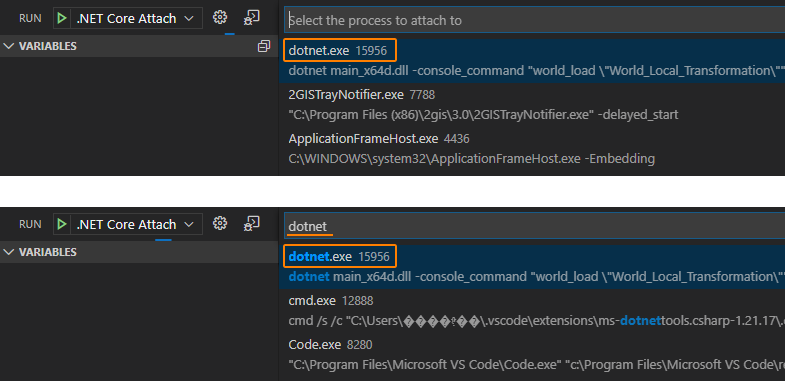
Now you can add necessary breakpoints and simply press F5 to launch the debugging process. The only difference here is that you should select the application to attach to. You should select the first process in the list named dotnet.exe (type 'dotnet' in the search field to find it quickly).Теперь вы можете добавить необходимые точки останова и просто нажать F5, чтобы запустить процесс отладки. Единственное отличие здесь в том, что вы должны выбрать приложение, к которому нужно подключиться. Вы должны выбрать первый процесс в списке с именем dotnet.exe (введите 'dotnet' в поле поиска, чтобы быстро его найти).
Setting BreakpointsУстановка точек останова#
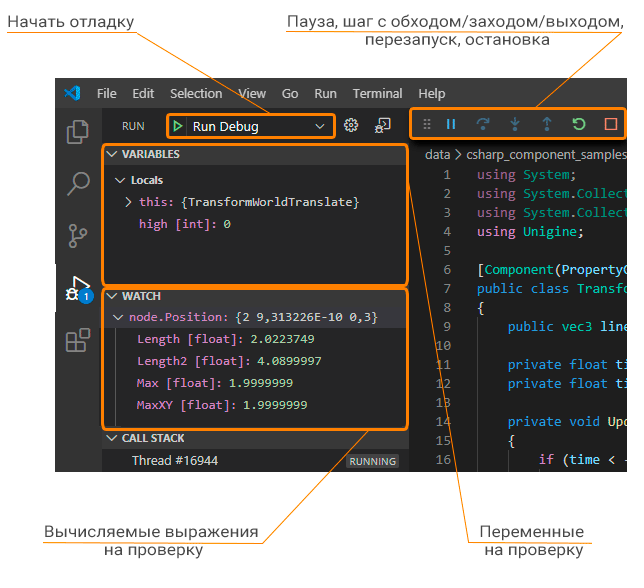
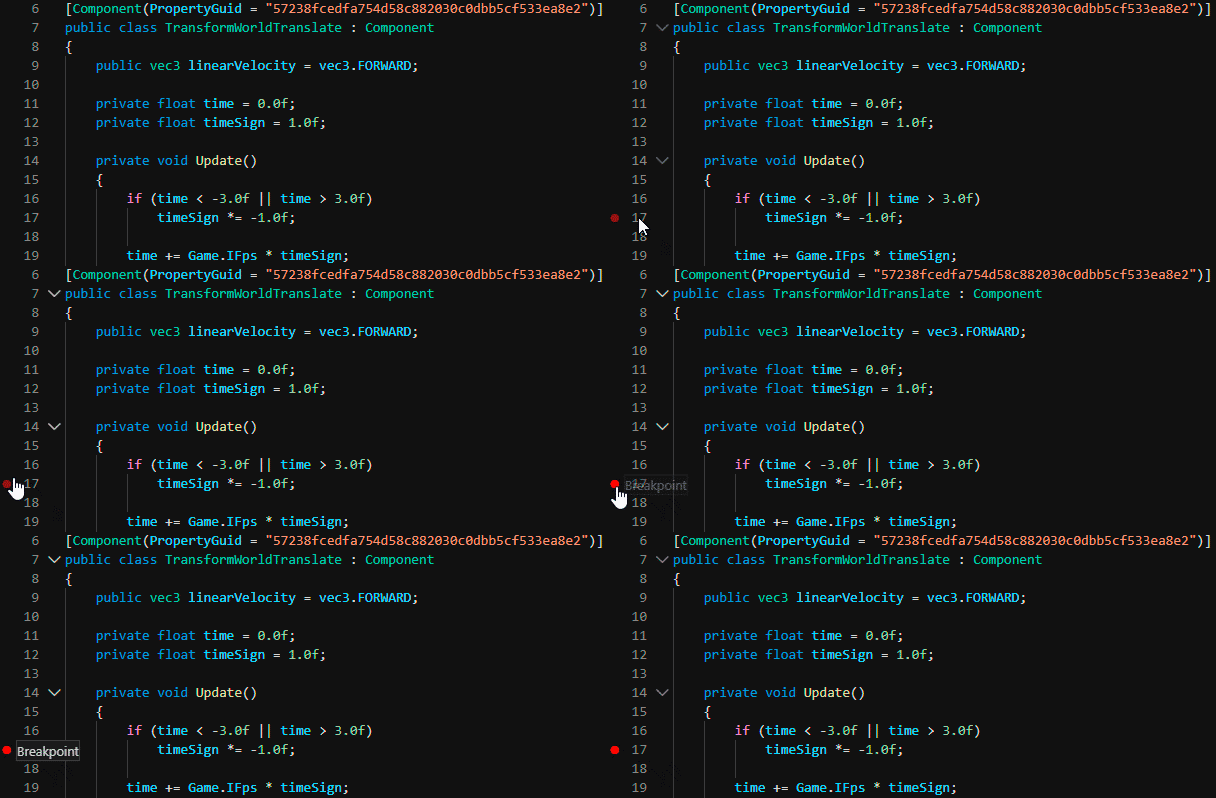
Breakpoints are used to pause your application by stopping execution of your code and giving you a chance to inspect and analyze your program's operation. You can check values of variables, and move step-by-step through your code.Точки останова используются для приостановки вашего приложения, выполнение вашего кода прерывается и вы получаете возможность проверить и проанализировать работу своей программы. Вы можете проверять значения переменных и двигаться по коду по шагам.
To set up a breakpoint put the cursor to the desired line of your code and press F9 or use the menu.Чтобы установить точку останова, поместите курсор на нужную строку вашего кода и нажмите F9 или используйте меню.
Информация, представленная на данной странице, актуальна для версии UNIGINE 2.18.1 SDK.
