Making Videos With Video Grabber
Whatever project you are developing, be it a game, an architectural visualization, or an excavator simulator, you may need to record a video (a cutscene for a game or a video presentation of your simulator) and take beautiful high-resolution screenshots. In the previous section we've covered how to animate a scene, make objects move and change their parameters in real time, as well as how to show it from different angles using moving cameras, and adding actions. Now let's figure out how to turn this into a clip or a set of images, which can be shown anywhere, without having an engine or editor at hand.
UNIGINE has the Video Grabber tool built into the Editor to create high quality screenshots and capture sequences of frames for video clips.
Capturing Screenshots#
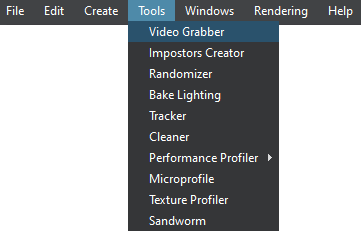
To open Video Grabber, select the appropriate item from the Editor menu:

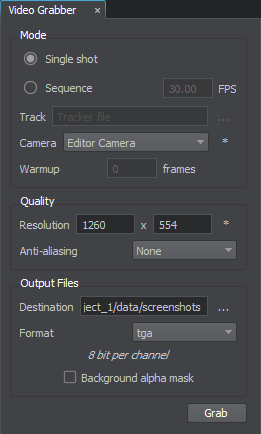
The Video Grabber window will open:
 |
The settings available in it allow you to select:
|
To capture a screenshot, we'll require the Single shot mode. The sequence of actions to create a screenshot is as follows:
- Set the desired camera view.
- Select the required camera from the list: the standard viewport camera (Engine Camera) or any other camera available in the scene (the "*" button will refresh the list).
- Specify the required resolution (to use the current viewport size, press the "*" button).
- Select antialiasing mode (supersampling multiplier) to improve image quality and remove the jagged effect on diagonal edges.
- Specify the target folder and select the desired output format (for example, JPG will provide the best compression and EXR supports 16-bpc color depth).
- Now all you need to do to get a screenshot is to click Grab.
- If you don't want to see any auxiliary visualizations in the final image, disable Visualizer (Helpers → Visualizer Mode → Disabled).
- If you need a specific screen resolution, regardless of your current monitor resolution, simply enable virtual resolution and specify the required screen size (Settings → Render → Screen → Virtual Resolution).
- If you need a transparent background, enable the Background Alpha Mask option (unavailable for JPG format).
Capturing Frame Sequences#
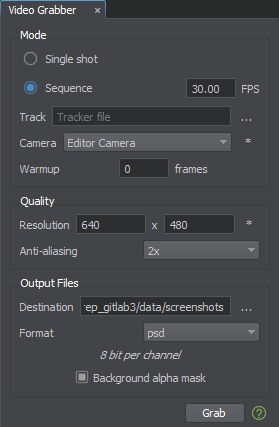
To capture a sequence of frames, we need a track with an animation that we created in the Tracker tool. Frame sequences are captured in a special mode (not in real time), and this allows you to get a given frame rate on any hardware.

Switch Grabber to the Sequence mode and do the following:
- Set the desired frame rate.
- Specify the animation track that we prepared for our project in Tracker (tracks/camera_animation.track).
- Set the desired screen resolution, antialiasing mode, target folder, output format, and other settings (just like we did for screenshots).
- Now you can start capturing frames by clicking the Grab button. If you want the editor to continue capturing even when out of focus, enable the Keep Running In Background option (Settings → Editor).
- When the capture process is complete, you will find the sequence of frames as a set of images in the specified target folder.
The first few frames may contain screen-space effect artifacts and incorrect exposure. To correct them, use the Warmup option: specify the number of frames to be skipped before starting capture.
If adaptive exposure is not required, switch to static mode (Settings → Camera Effects → Exposure Mode).
Note that all repetitive captures stored in the same folder will share a common frame count, so to avoid mixing sequences, either clear the target folder before capturing, or use separate folders for different sequences.
Converting a Frame Sequence to Video#
You can convert the captured frame sequence into a video using a third-party video editor (such as Adobe Premiere). You can also assemble video from images using the ffmpeg library. For example, if you have captured a sequence of frames in TGA format, then to compile them into a video with a frequency of 30 frames per second (the same as you specified when capturing). To do that, enter the following in the command line:
ffmpeg -framerate 30 -i frame_%d.tga -vcodec libx264 -pix_fmt yuv420p output.mp4
Once the conversion is complete, your finished video output.mp4 will appear in the same folder.
The information on this page is valid for UNIGINE 2.19 SDK.