VR入门
 The article reviews the creation of C++ VR projects only. You can switch to the C# version in the upper right corner of the page.本文仅回顾了C++VR项目的创建。 您可以在页面右上角切换到C#版本。
This article is for anyone who wants to start developing Virtual Reality projects in UNIGINE and is highly recommended for all new users. We're going to look into the VR Sample demo to see what's inside and learn how to use it to create our own project for VR. We're also going to consider some simple examples of making modifications and extending the basic functionality of this sample.本文适用于任何想要开始在UNIGINE中开发虚拟现实项目的人,强烈建议所有新用户阅读本文。 我们将研究 VR Sample 演示,看看里面有什么,并学习如何使用它来创建我们自己的VR项目。 我们还将考虑一些简单的示例,用于修改和扩展此示例的基本功能。
So, let's get started!那么,我们开始吧!
VR SampleVR Sample#
Thinking about VR developers, we created the VR Sample demo, enabling you to jump straight in and start creating projects of your own. We recommend using this demo as a basis for your VR project.考虑到VR开发人员,我们创建了 VR Sample 演示,使您能够直接进入并开始创建自己的项目。 我们建议使用此演示作为您的VR项目的基础.
The demo is based on the VR Template that supports all SteamVR-compatible devices out-of-the-box. It provides automatic loading of controller models in run-time. Additionally, the template includes the implementation of basic mechanics such as grabbing and throwing objects, pressing buttons, opening/closing drawers, and a lot more.该演示基于支持所有开箱即用的 SteamVR 兼容设备的 VR Template。 它在运行时提供控制器模型的自动加载。 此外,该模板还包括基本机制的实现,如抓取和投掷物体,按下按钮,打开/关上桌子抽屉等等。
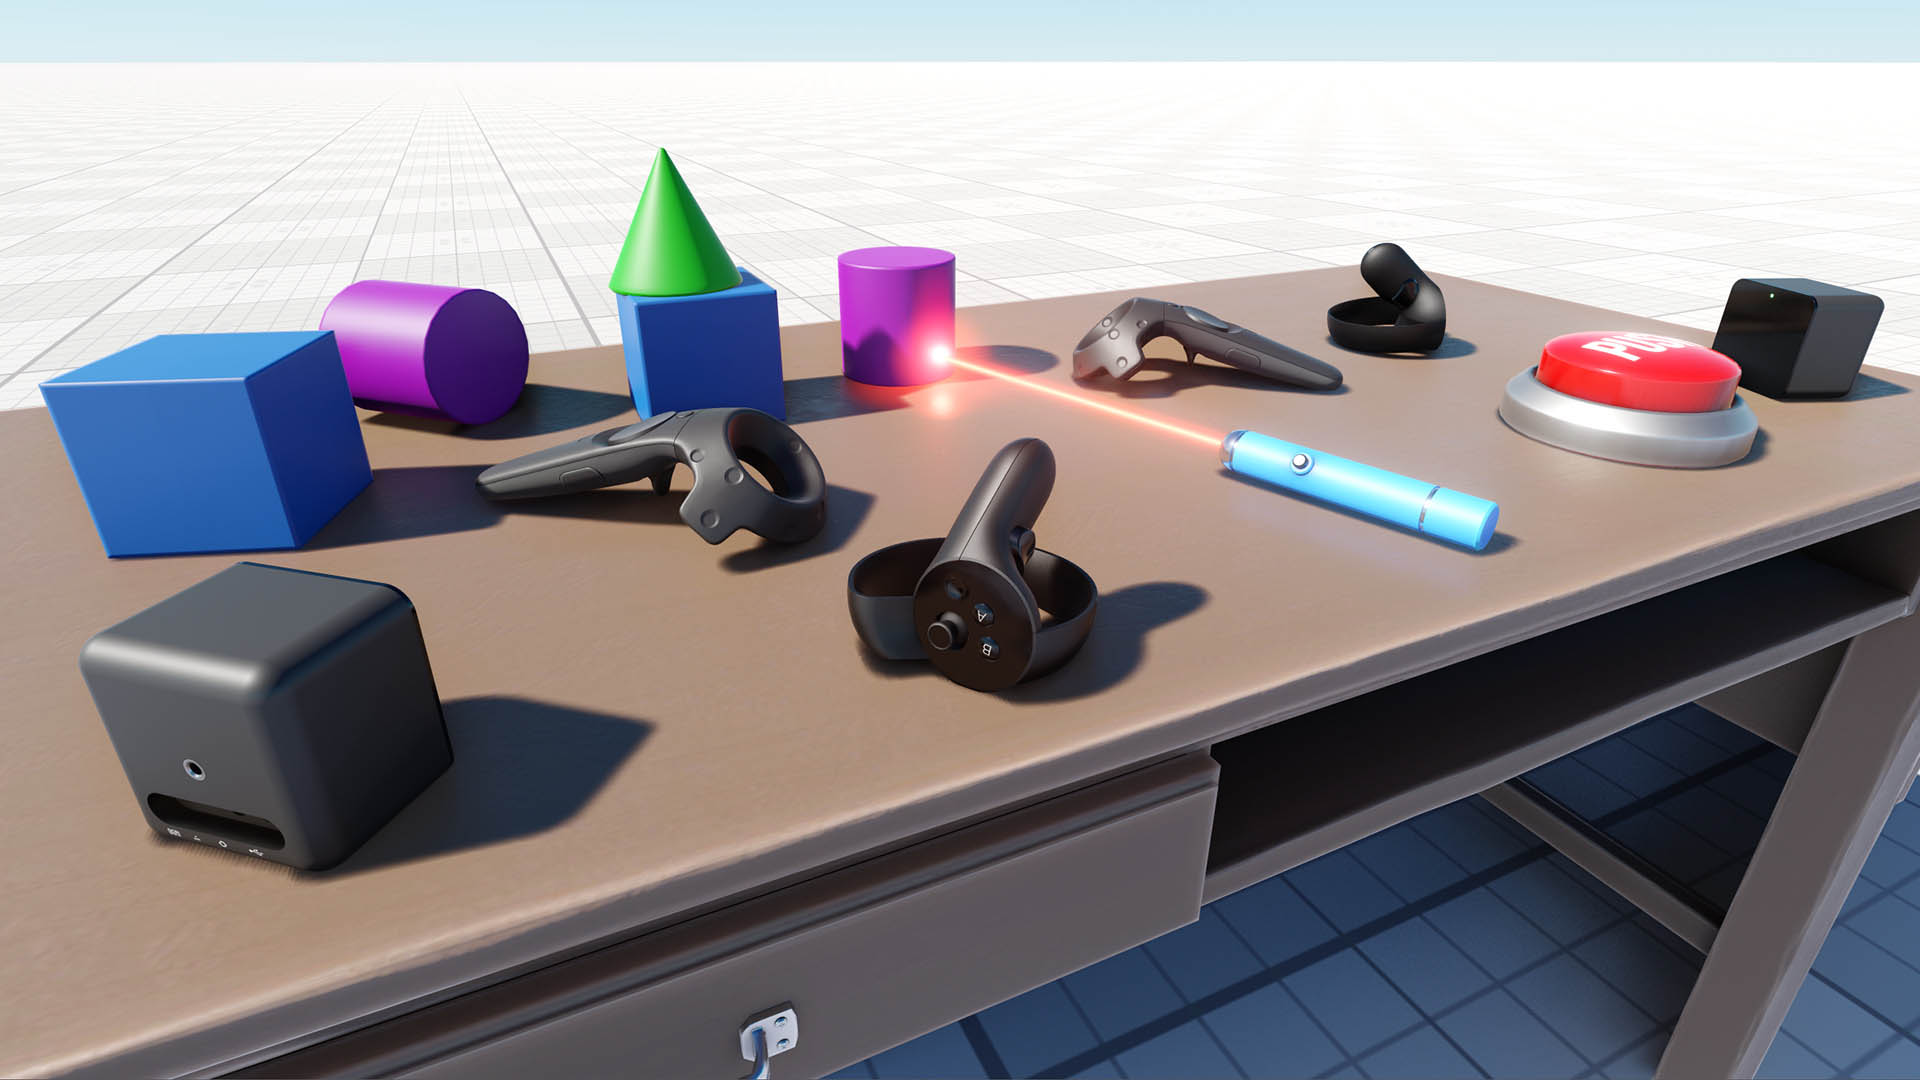
The world in this sample project has its settings optimized for the best performance in VR and includes the *.render asset that can be loaded at any time by simply double-clicking on it in the Asset Browser to reset any changes you made to default optimized values.此示例项目中的世界已针对VR中的最佳性能进行了优化,其中包括一个*.render资源,只需在资源浏览器中双击它即可随时加载该资源,以重置对默认优化值所做的任何更改。The sample project is created using the Component System, so the functionality of each object is determined by the components attached.示例项目是使用组件系统创建的,因此每个对象的功能由附加的组件决定。
You can extend an object's functionality simply by adding more components. For example, the laser pointer object has the following components attached:您可以通过添加更多组件来扩展对象的功能。 例如,激光指示器对象具有附加的以下组件:
- ObjMovable - enables grabbing and throwing an objectObjMovable 允许抓取和抛出一个对象
- ObjLaserPointer - enables casting a ray of light by the objectObjLaserPointer 启用投射光线的对象

1. Making a Template Project1、制作模板项目#
So, well, we have a cool demo with some stuff inside, but how do we use it as a template? It's simple – just open your SDK Browser, go to the Samples tab, and select Demos.那么,我们有一个很酷的演示,里面有一些东西,但是我们如何使用它作为模板? 这很简单,只需打开SDK浏览器,转到Samples选项卡,然后选择Demos。
Find the VR Sample in the Available section and click Install. After installation, the demo will appear in the Installed section, and you can click Copy as Project to create a project based on this sample.在Available部分找到VR Sample,然后单击Install。 安装后,演示将出现在Installed部分,您可以单击 Copy as Project 基于此示例创建项目。

In the Create New Project window that opens, enter the name for your new VR project in the corresponding field and click Create New Project.在打开的Create New Project窗口中,在相应字段中输入新VR项目的名称,然后单击Create New Project。

2. Setting Up a Device and Configuring Project2、设置设备和配置项目#
Suppose you have successfully installed your Head-Mounted Display (HMD) of choice.假设您已成功安装所选的头戴式显示器(HMD)。
Learn more on setting up devices for diffent VR platforms. If you have any difficulties, please visit the Steam Support. In case of Vive devices, this Troubleshooting guide might be helpful.了解有关为不同 VR 平台设置设备的详细信息。 如果您遇到任何困难,请访问 Steam 支持。 对于 Vive 设备,此故障排除指南可能会有所帮助。
For Mixed Reality application development, you will need to download and install Varjo Base in addition to SteamVR.对于Mixed Reality应用程序开发,除了SteamVR之外,您还需要下载并安装Varjo Base。All SteamVR-compatible devices are supported out-of-the-box.所有SteamVR兼容的设备都支持开箱即用。
By default, VR is not initialized. So, you need to perform one of the following:默认情况下,VR未初始化。 因此,您需要执行以下操作之一:
-
If you run the application via UNIGINE SDK Browser, set the Stereo 3D option to the value that corresponds to the installed HMD (OpenVR or Varjo) in the Global Options tab and click Apply.如果通过UNIGINE SDK浏览器运行应用程序,请在Global Options选项卡中将Stereo 3D选项设置为与已安装HMD(OpenVR或Varjo)相对应的值,然后单击Apply。

-
If you run the application from the command line, specify the -vr_app command line option on the application start-up. For OpenVR and Oculus it should be as follows:如果从命令行运行应用程序,请在应用程序启动时指定-vr_app命令行选项。 对于OpenVR和Oculus,它应该如下所示:命令行
your_app_name -vr_app openvrFor Varjo:对于Varjo:命令行your_app_name -vr_app varjoAlternatively, you can specify this command-line option in the Customize Run Options window when running the application via the SDK Browser:或者,您可以在通过SDK浏览器运行应用程序时在Customize Run Options窗口中指定此命令行选项:
The integration of OpenVR functionality in the UNIGINE VR system enables the implementation of applications for Oculus HMDs. That's why the OpenVR should be specified in case of utilizing Oculus devices.在UNIGINE VR系统中集成OpenVR功能,可以实现 Oculus HMD 的应用程序。 这就是为什么在使用Oculus设备时应该指定OpenVR的原因。3. Open Project's Source3、开放项目的源代码#
To open your VR project in an IDE, select it on the Projects tab of the UNIGINE SDK Browser and click Open Code IDE.要在IDE中打开VR项目,请在UNIGINE SDK浏览器的Projects选项卡上选择它,然后单击Open Code IDE。

As the IDE opens, you can see, that the project contains a lot of different classes. This brief overview will give you a hint on what are they all about.当IDE打开时,您可以看到该项目包含许多不同的类。 这个简短的概述将给您一个关于它们是什么的提示。
Don't forget to set the appropriate platform and configuration settings for your project before compiling your code in Visual Studio.在Visual Studio中编译代码之前,不要忘记为项目设置适当的平台和配置设置。

Now, we can try and build our application for the first time.现在,我们可以第一次尝试构建我们的应用程序。
Build your application in Visual Studio (Build -> Build Solution) or otherwise, and launch it by selecting the project on the Projects tab of the UNIGINE SDK Browser and clicking Run.以Visual Studio(Build -> Build Solution)或其他方式构建应用程序,并通过在UNIGINE SDK浏览器的Projects选项卡上选择项目并单击Run来启动它。
Before running your application via the UNIGINE SDK Browser make sure, that appropriate Customize Run Options (Debug version in our case) are selected, by clicking an ellipsis under the Run button.在通过UNIGINE SDK浏览器运行应用程序之前,请确保通过单击Run按钮下的省略号来选择适当的Customize Run Options(在我们的例子中为Debug版本)。

4. Attaching Objects to HMD4、将对象附加到HMD#
Sometimes it might be necessary to attach some object to the HMD to follow it (e.g. a hat). All movable objects (having the movable.prop property assigned and the Dynamic flag enabled) have a switch enabling this option.有时可能需要将一些对象附加到HMD以跟随它(例如帽子)。 所有可移动对象(已分配movable.prop属性并启用Dynamic标志)都有一个启用此选项的切换。
For example, if you want to make a cylinder on the table attachable to the HMD, just select the corresponding node named "cylinder" in the World Hierarchy click Edit in the Reference section and enable the Can Attach to Head option.例如,如果要使桌子上的圆柱体可附加到HMD,只需在 Reference 部分的 World Hierarchy单击Edit中选择名为 "cylinder" 的相应节点,然后启用 Can Attach to Head 选项。

Then select the parent node reference, and click Apply.然后选择父 Node Reference,并单击Apply。
The same thing can be done via code at run time:同样的事情可以通过代码在运行时完成:
#include "Framework/Components/Objects/ObjMovable.h"
#include <UnigineWorld.h>

using namespace Unigine;

...

// retrieving a NodeReference named "cylinder" and getting its reference node
NodePtr node = checked_ptr_cast<NodeReference>(World::getNodeByName("cylinder"))->getReference();

// checking if this node is a movable object by trying to get its ObjMovable component
ObjMovable *obj = ComponentSystem::get()->getComponent<ObjMovable>(node);
if (obj != nullptr)
{
	// making the object attachable to the HMD
	obj->can_attach_to_head = 1;
}
5. Accessing Mixed Reality Features (Optional)5、访问混合现实功能(可选)#
The Mixed Reality features are available out-of-the-box for applications running with Varjo headsets - Varjo XR-3 and Varjo XR-4. The Varjo Mixed Reality features supported by the UNIGINE VR system are listed here.Mixed Reality功能可用于使用Varjo耳机,Varjo XR-3和Varjo XR-4,运行的应用程序。 UNIGINE VR系统支持的Varjo混合现实功能在这里列出。To start developing a mixed reality application in UNIGINE, you should set up the environment as described above. Do not forget to install Varjo Base and ensure that VR is initialized successfully.要开始在UNIGINE中开发混合现实应用程序,您应该按照上面的所述设置环境。 不要忘记安装Varjo Base并确保VR成功初始化。
The VR Template provides the MixedRealityMenuGui property assigned to the head_menu GUI node. It demonstrates the operation of the available Mixed Reality settings: you can tweak them to see how they affect the rendered image.VR Template提供分配给head_menu GUI节点的MixedRealityMenuGui属性。 它演示了可用的混合现实设置的操作:您可以调整它们以查看它们如何影响渲染的图像。

Via this menu, you can toggle the video signal from the real-world view, adjust different settings for the camera, such as white balance correction, ISO, and others. The widgets for the menu are initialized in run-time, but the node is created via UnigineEditor.通过此菜单,您可以从真实世界视图切换视频信号,调整相机的不同设置,如白平衡校正,ISO等。 菜单的小部件在运行时初始化,但节点是通过UnigineEditor创建的。

To manage mixed reality, use methods of the VRMixedReality and VRMarkerObject classes of UNIGINE API.要管理混合现实,请使用UNIGINE API的VRMixedReality和VRMarkerObject类的方法。
6. Accessing Eye-Tracking Feature (Optional)6、访问眼动追踪功能(可选)#
Eye-tracking is also available out-of-the-box for applications running with Varjo headsets.对于使用Varjo耳机运行的应用程序,Eye-tracking也是开箱即用的。In the VR Sample, there is the eyetracking_pointer property assigned to the node of the same name. It shows the name of the node towards which the gaze is directed. The implementation of the property is available in the vr_sample/Demo/Global folder. You can extend or change the functionality by modifying the EyetrackingPointer component.在VR Sample中,有分配给同名节点的eyetracking_pointer属性。 它显示凝视指向的节点的名称。 该属性的实现在vr_sample/Demo/Global文件夹中可用。 您可以通过修改EyetrackingPointer组件来扩展或更改功能。
![]()
7. Attaching Objects to Controllers7、将对象附加到控制器#
If you need to attach some object loaded in run-time to a controller (e.g., a menu), you can assign the AttachToHand property to this object.如果您需要将一些在运行时加载的对象附加到控制器(例如菜单),则可以将AttachToHand属性分配给此对象。
For example, if you have a GUI object and want to attach it to the controller, select this object in the World Hierarchy, click Add New Property in the Parameters window, and specify the AttachToHand property.例如,如果您有一个GUI对象并希望将其附加到控制器,请在World Hierarchy中选择此对象,在Parameters窗口中单击添加新属性,并指定AttachToHand属性。

The property settings allow specifying the controller to which the object should be attached (either left or right), as well as the object's transformation.属性设置允许指定对象应附加到的控制器(左或右),以及对象的转换。
In the VR Sample, this component is attached to the hand_menu node and initializes widgets in run-time.在VR Sample中,该组件附加到hand_menu节点,并在运行时初始化小部件。
8. Switching Nodes by Gesture (Optional)8、通过手势切换节点(可选)#
When the application is launched with the Ultraleap integration plugin, you can control the objects with your hands.当使用Ultraleap集成插件启动应用程序时,您可以用手控制对象。
Hand-tracking in VR available for Varjo VR and XR headsets.VR中的手跟踪可用于Varjo VR和XR耳机。The VR Template provides the NodeSwitchEnableByGesture property assigned to the vr_layer -> VR -> Ultraleap dummy node and is available when using a VR device with hand-tracking support. The property settings allow specifying the number of nodes you can switch between, the nodes to switch, and the gesture type for switching.VR Template提供了分配给vr_layer -> VR -> Ultraleap虚拟节点的NodeSwitchEnableByGesture属性,并且在使用支持手跟踪的VR设备时可用。 属性设置允许指定可以在其中切换的节点数量、要切换的节点以及切换的手势类型。

When you hold your left wrist with your right hand, the menu appears:当您用右手握住左手腕时,菜单就会出现:

9. Adding a New Interaction9、添加新交互#
Suppose we want to extend the functionality of the laser pointer in our project, that we can grab, throw, and use (turn on) for now, by adding an alternative use action (change material of the object being pointed at, when certain button is pressed).假设我们想在我们的项目中扩展激光指示器的功能,我们可以通过添加一个替代的使用动作(当按下某个按钮时,改变被指向的对象的材质)来扩展激光指示器的功能。

So, we're going to add a new altUseIt() method to the VRInteractable class for this new action and map it to the state of a certain controller button.因此,我们将为这个新动作在VRInteractable类中添加一个新的altUseIt()方法,并将其映射到某个控制器按钮的状态。
VRInteractable.h
#pragma once
#include <UnigineNode.h>
#include <UniginePhysics.h>
#include "../Framework/ComponentSystem.h"
#include "Players/VRPlayer.h"

using namespace Unigine;
using namespace Math;

class VRPlayer;

class VRInteractable : public ComponentBase
{
public:
	// ...

	// interact methods
	virtual void grabIt(VRPlayer* player, int hand_num) {}
	virtual void holdIt(VRPlayer* player, int hand_num) {}
	virtual void useIt(VRPlayer* player, int hand_num) {}
	virtual void altuseIt(VRPlayer* player, int hand_num) {} //<-- method for new alternative use action
	virtual void throwIt(VRPlayer* player, int hand_num) {}
};
Declare and implement an override of the altUseIt() method for our laser pointer in the ObjLaserPointer.h and ObjLaserPointer.cpp files respectively:分别在ObjLaserPointer.h和ObjLaserPointer.cpp文件中声明并实现对激光笔的altUseIt()方法的重写:
ObjLaserPointer.h
#pragma once
#include <UnigineWorld.h>
#include "../VRInteractable.h"

class ObjLaserPointer : public VRInteractable
{
public:
	// ...

	// interact methods
	// ...
	// alternative use method override
	void altuseIt(VRPlayer* player, int hand_num) override;

	// ...

private:
	// ...
	int change_material;	//<-- "change material" state

	// ...
};
ObjLaserPointer.cpp
// ...

void ObjLaserPointer::init()
{
  	// setting the "change material" state to 0
	change_material = 0;

    // ...
}

void ObjLaserPointer::update()
{
	if (laser->isEnabled())
	{
      	// ...
      		// show text

		if (hit_obj && hit_obj->getProperty() && grabbed)
		{
			//---------CODE TO BE ADDED TO PERFORM MATERIAL SWITCHING--------------------
			if (change_material)// if "alternative use" button was pressed
			{
				// change object's material to mesh_base
				hit_obj->setMaterialPath("Unigine::mesh_base", "*");
			}
			//---------------------------------------------------------------------------
			// ...
		}
		else
			obj_text->setEnabled(0);
	}
	// unsetting the "change material" state
	change_material = 0;
}

// ...

// alternative use method override
void ObjLaserPointer::altuseIt(VRPlayer* player, int hand_num)
{
	// setting the "change material" state
	change_material = 1;
}

// ...
Now, we're going to map this action to the state of the YB controller button. For this purpose we should modify the VRPlayer class (which is the base class for all VR players) by adding the following code to its postUpdate() method:现在,我们将此操作映射到YB控制器按钮的状态。 为此,我们应该修改VRPlayer类(这是所有VR播放器的基类),在其postUpdate()方法中添加以下代码:
VRPlayer.cpp
// ...

void VRPlayer::postUpdate()
{
	for (int i = 0; i < getNumHands(); i++)
	{
		int hand_state = getHandState(i);
		if (hand_state != HAND_FREE)
		{
			auto &components = getGrabComponents(i);

            // ...
            //-------------CODE TO BE ADDED--------------------------
			// alternative use of the grabbed object
			if (getControllerButtonDown(i, BUTTON::YB))
			{
				for (int j = 0; j < components.size(); j++)
					components[j]->altuseIt(this, i);
				// add callback processing if necessary
			}
            //--------------------------------------------------------
		}
	}
	update_button_states();
}

// ...
10. Adding a New Interactable Object10、添加新的可交互对象#
The next step in extending the functionality of our VR Sample is adding a new interactable object.扩展VR Sample功能的下一步是添加一个新的可交互对象。
Let's add a new type of interactable object, that we can grab, hold and throw with an additional feature: object will change its form (to a certain preset) when we grab it, and restore it back, when we release it. It will also display certain text in the console, if the corresponding option is enabled.让我们添加一个新类型的可交互对象,我们可以抓取,握在手里,和扔出一个额外的功能:当我们抓住它时,对象会改变它的形式(到某个预设),并在我们释放它时恢复它的初始状态。 如果启用了相应的选项,它还将在控制台中显示某些文本。
![]()
So, we're going to use the following components:因此,我们将使用以下组件:
- ObjMovable - to enable basic grabbing and throwing functionalityObjMovable 启用基本的抓取和投掷功能
- new ObjTransformer component to enable form changing and log message printing functionality新的ObjTransformer组件,以启用形状更改和日志消息打印功能
The following steps are to be performed:要执行以下步骤:
-
Add a new ObjTransformer class inherited from the VRInteractable. In Visual Studio we can do it by choosing Project -> Add Class from the main menu, clicking Add, specifying class name and base class in the window that opens, and clicking Finish:添加从VRInteractable继承的新ObjTransformer类。 在Visual Studio中,我们可以通过从主菜单中选择Project -> Add Class,单击Add,在打开的窗口中指定类名和基类,然后单击Finish:

-
Implement functionality of transformation to the specified node on grabbing, and restoring previous form on releasing a node.实现抓取时对指定节点的转换功能,释放节点时恢复原来的形状功能。Below you'll find header and implementation files for our new ObjTransformer class:下面您将找到我们新的ObjTransformer类的头文件和实现文件:
ObjTransformer.h
源代码 (C++)#pragma once #include <UnigineNode.h> #include "Components/VRInteractable.h" #include "Framework/Utils.h" class ObjTransformer : public VRInteractable { public: ObjTransformer(const NodePtr &node, int num) : VRInteractable(node, num) {} virtual ~ObjTransformer() {} // property name UNIGINE_INLINE static const char* getPropertyName() { return "transformer"; } // parameters PROPERTY_PARAMETER(Toggle, show_text, 1); // Flag indicating if messages are to be printed to the console PROPERTY_PARAMETER(String, text, "TRANSFORMATION"); // Text to be printed to the console when grabbing or releasing the node PROPERTY_PARAMETER(Node, target_object); // Node to be displayed instead of the transformer-node, when it is grabbed // interact methods void grabIt(VRPlayer* player, int hand_num) override; // override grab action handler void throwIt(VRPlayer* player, int hand_num) override; // override trow action handler void holdIt(VRPlayer* player, int hand_num) override; // override hold action handler protected: void init() override; };ObjTransformer.cpp
源代码 (C++)#include "ObjTransformer.h" REGISTER_COMPONENT( ObjTransformer ); // macro for component registration by the Component System // initialization void ObjTransformer::init(){ // hiding the target object (if any) if (target_object){ target_object->setEnabled(0); } } // grab action handler void ObjTransformer::grabIt(VRPlayer* player, int hand_num) { // if a target object is assigned, showing it, hiding the original object and displaying a message in the log if (target_object){ target_object->setEnabled(1); // hide original object's surfaces without disabling components ObjectPtr obj = checked_ptr_cast<Object>(node); for (int i = 0; i < obj->getNumSurfaces(); i++) obj->setEnabled(0, i); if (show_text) Log::message("\n Transformer's message: %s", text.get()); } } // throw action handler void ObjTransformer::throwIt(VRPlayer* player, int hand_num) { // if a target object is assigned, hiding it, and showing back the original object if (target_object){ target_object->setEnabled(0); // show original object's surfaces back ObjectPtr obj = checked_ptr_cast<Object>(node); for (int i = 0; i < obj->getNumSurfaces(); i++) obj->setEnabled(1, i); } } // hold action handler void ObjTransformer::holdIt(VRPlayer* player, int hand_num) { // changing the position of the target object target_object->setWorldPosition(player->getHandNode(hand_num)->getWorldPosition()); } - Build your application and launch it as we did earlier, a new property file (transformer.prop) will be generated for our new component.构建您的应用程序并启动它,就像我们之前的一样,将为我们的新组件生成一个新的属性文件(transformer.prop)。
- Open the world in the UnigineEditor, create a new box primitive (Create -> Primitive -> Box), and place it somewhere near the table, create a sphere primitive (Create -> Primitive -> Sphere) to be used for transformation.在UnigineEditor中打开世界,创建一个新的box图元(Create -> Primitive -> Box),并将其放置在桌子附近的某个地方,创建一个球体图元(Create -> Primitive -> Sphere)用于转换。
-
To add components to the box object select it and click Add New Property in the Node Properties section, then drag the movable.prop property to the new empty field that appears. Repeat the same for the transformer.prop property, and drag the sphere from the World Hierarchy window to the Target Object field.要将组件添加到box对象,请选择它并在Node Properties部分中单击Add New Property,然后将movable.prop属性拖到出现的新空字段中。 对transformer.prop属性重复相同的操作,并将球体从World Hierarchy窗口拖到Target Object字段。

- Save your world and close the UnigineEditor.保存您的世界并关闭UnigineEditor。
- Launch your application.启动应用程序。
11. Restricting Teleportations11、限制传送#
By default, it is possible to teleport to any point on the scene. To avoid user interaction errors in VR (e.g., teleporting into walls or ceilings), you can restrict teleportation to certain areas. To do so, perform the following:默认情况下,可以瞬移到现场的任何点。 为了避免VR中的用户交互错误(例如,传送到墙壁或天花板),您可以将传送限制在某些区域。 为此,请执行以下操作:
- Create a mesh defining the area you want to restrict user teleportation to.创建一个网格,定义要限制用户传送到的区域。
-
Set an intersection mask to the desired surface(s) of this mesh either in the UnigineEditor or using the setIntersectionMask() method:在UnigineEditor中或使用setIntersectionMask()方法为该网格的所需表面设置一个intersection mask:源代码 (C++)
// defining the teleportation mask as a hexadecimal value (e.g. with only the last bit enabled) int teleport_mask = 0x80000000; // setting the teleportation mask to the MyAreaMesh object's surface with the num index MyAreaMesh->setIntersectionMask(num, teleport_mask); - Set the same intersection mask for the teleport ray using the following method: VRPlayerVR::setTeleportationMask(teleport_mask).
使用以下方法为传送射线设置相同的相交掩码:VRPlayerVR::setTeleportationMask(teleport_mask)。
Multiple meshes can be used to define teleportation area.多个网格可用于定义传送区域。Where to Go From Here下一步可以做什么#
Congratulations! Now, you know how to create your own VR project on the basis of the VR Sample demo, and extend its functionality. So, you can continue developing it on your own. There are some recommendations for you, that might be useful:祝贺您! 现在,您知道如何在VR Sample演示的基础上创建自己的VR项目,并扩展其功能。 所以,您可以继续自己开发它。 有一些建议给您,可能是有用的:
- Try to analyse the source code of the sample further and figure out how it works, use it to write your own.尝试进一步分析示例的源代码并弄清楚它是如何工作的,用它来编写自己的代码。
- Read the Virtual Reality Best Practices article for more information and useful tips on preparing content for VR and making user experience better.阅读VR最佳实践文章,了解有关为VR准备内容并改善用户体验的更多信息和有用提示。
- Read the Component System article for more information on working with the Component System.阅读组件系统文章,了解有关使用组件系统的更多信息。
- Check out the Component System Usage Example for more details on implementing logic using the Component System.查看组件系统使用示例了解有关使用组件系统实现逻辑的更多详细信息。
You can select the VR project template when creating a new application via the SDK Browser to create an empty VR application from scratch (having demo content and code stripped off).您可以在通过SDK浏览器创建新应用程序时选择VR项目模板,从头开始创建一个空的VR应用程序(与演示内容和代码从它删除)。