IG Aviation Add-on
Чтобы использовать этот функционал вам необходимо получить лицензию на
 The IG Aviation add-on contains a set of ready-to-use aircraft components creating such effects as engine and landing gear fire, smoke, contrail, landing gears, helicopter rotor blade settings with the blurring effect and rotor wash effect. The add-on also shows implementation of the wheel trace and meteo radar.Дополнение IG Aviation содержит набор готовых к использованию компонентов самолета, создающих такие эффекты, как возгорание двигателя и шасси, дым, инверсионный след, шасси, настройки лопастей несущего винта вертолета с эффектом размытия и эффектом промывки несущего винта. Дополнение также показывает реализацию трассировки колес и метеорадара.
ComponentsКомпоненты#
Aircraft EffectsАвиационные эффекты#
To set up various aircraft effects (engine or landing gear fire, smoke, contrail, etc.):Для настройки различных эффектов самолета (возгорание двигателя или шасси, дым, инверсионный след и т.д.):
- Assign the EffectAircraftController property to the parent node (aircraft) and leave all parameters unchanged.Назначьте свойство EffectAircraftController родительскому узлу (воздушному судну) и оставьте все параметры без изменений.
-
Assign the EffectAircraft property to each node representing visual effects of various types.Присвойте свойство EffectAircraft каждому узлу, представляющему визуальные эффекты различных типов.
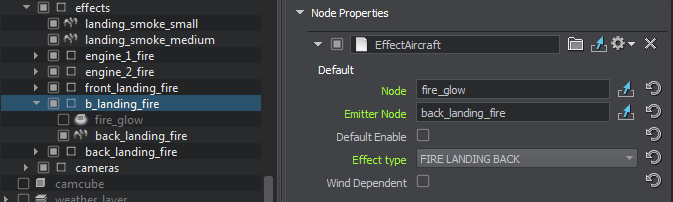 The following property parameters are available:Доступны следующие параметры свойства:
- Node — a node to be enabled/disabledNode — узел, который должен быть включен/отключен
- Emitter Node — a node emitting particles for the effectEmitter Node — узел, испускающий частицы для эффекта
- Default Enable — indicates whether the effect should be enabled by defaultDefault Enable — указывает, должен ли эффект быть включен по умолчанию
- Effect Type — aircraft effect type selection (engine or landing gear fire, smoke, contrail, etc.)Effect Type — выбор типа эффекта самолета (возгорание двигателя или шасси, дым, инверсионный след и т.д.)
- Wind Dependent — indicates whether the effect is affected by wind or notWind Dependent — указывает, влияет ли на эффект ветер или нет
Landing GearsШасси#
This component allows controlling the landing gears. It contains several properties that shall be assigned as follows:Этот компонент позволяет управлять шасси. Он содержит несколько свойств, которые должны быть присвоены следующим образом:
-
Assign the LandingGears property to the parent node (aircraft).Назначьте свойство LandingGears родительскому узлу (воздушному судну).
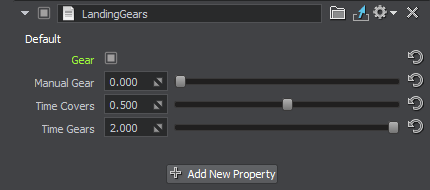 The following property parameters are available:Доступны следующие параметры свойства:
- Gear — indicates that gears are extendedGear — указывает, что шестерни выдвинуты
- Time Covers — cover opening time, in secondsTime Covers — время открытия крышки, в секундах
- Time Gears — gear extension time, in secondsTime Gears — время включения передачи, в секундах
-
Define which nodes represent parts of landing gears and assign the LandingGearPart property to them.Определите, какие узлы представляют части шасси, и присвойте им свойство LandingGearPart.
 The following property parameters are available:Доступны следующие параметры свойства:
- Node — the node to be moved (usually the node to which this property is assigned)Node — узел, подлежащий перемещению (обычно это узел, которому присвоено это свойство)
- Is Cover — indicates whether the part is a cover or not (a cover is opened prior to gear extension)Is Cover — указывает, является ли деталь крышкой или нет (крышка открывается перед выдвижением зубчатого колеса)
-
Use Dummy Cover — indicates whether the wheel well is to be covered with a dummy cover after gear retraction. When enabled, an additional When Extended option is displayed. It is used to specify whether the dummy cover shall be visible when the gear is extended.Use Dummy Cover — указывает, следует ли закрывать колесную нишу фиктивной крышкой после втягивания передачи. При включении отображается дополнительная опция When Extended. Он используется для указания того, должна ли быть видна крышка-манекен при выдвинутом шасси.ПримечаниеIf this option is enabled, the Node field should not contain the node to which this property is assigned, as the component will be disabled forever after retraction.Если эта опция включена, поле Node не должно содержать узел, которому присвоено это свойство, так как компонент будет отключен навсегда после удаления.
- Rotate — indicates whether the part should rotateRotate — указывает, должна ли деталь вращаться
- Axis — coordinates of the part's rotation axisAxis — координаты оси вращения детали
- Extension Angle — rotation angle of the part, when the gear is extended, in degreesExtension Angle — угол поворота детали при выдвинутом зубчатом колесе, в градусах
- Retraction Angle — rotation angle of the part, when the gear is retracted, in degreesRetraction Angle — угол поворота детали при убранном зубчатом колесе, в градусах
- Cover Closable — indicates whether the cover should close after gear extension, or to stay openCover Closable — указывает, должна ли крышка закрываться после выдвижения шестерни или оставаться открытой
Rotor BladeЛопасть несущего винта#
The RotorBlade property controls the coning of the helicopter rotor blades and creates blurring to disk due to the blade rotation. To use this property, the rotor blade in your helicopter model should have a separate mesh and material.Свойство RotorBlade управляет конусообразностью лопастей несущего винта вертолета и создает размытие диска из-за вращения лопасти. Чтобы использовать это свойство, лопасть несущего винта в вашей модели вертолета должна иметь отдельную сетку и материал.
Using this property also implies that you have the blade material (mesh_blade.mgraph in the add-on) and the node and material for circle into which the blades blur when rotating fast (check the disk node and mesh_blur_blades.mgraph material of the helicopter_simple Node Reference in the add-on).Использование этого свойства также подразумевает, что у вас есть материал лезвия (mesh_blade.mgraph в дополнении), а также узел и материал для круга, в который лезвия превращаются при быстром вращении (проверьте узел disk и материал mesh_blur_blades.mgraph helicopter_simple Node Reference в дополнении).
Assign the RotorBlade property to the parent node (rotor node).Назначьте свойство RotorBlade родительскому узлу (узлу-ротору).
The following property parameters are available:Доступны следующие параметры свойства:

| Input | |
| Speed | Rotor rotation speed, in RPM. This is the default value that can be changed at runtime.Скорость вращения ротора, в об/мин. Это значение по умолчанию, которое может быть изменено во время выполнения. |
|---|---|
| Beta 0 | Parameter defining the coning angle. This is the default value that can be changed at runtime.Параметр, определяющий угол сужения. Это значение по умолчанию, которое может быть изменено во время выполнения. |
| Beta Cos | Parameter used for the longitudinal flapping. This is the default value that can be changed at runtime.Параметр, используемый для продольного взмахивания крыльями. Это значение по умолчанию, которое может быть изменено во время выполнения. |
| Beta Sin | Parameter used for the lateral flapping. This is the default value that can be changed at runtime.Параметр, используемый для бокового взмаха. Это значение по умолчанию, которое может быть изменено во время выполнения. |
| Rotor | |
| Rotation Direction | Direction of the rotor rotation.Направление вращения ротора. |
| Pivot | Node to be rotated with the given RPM.Узел должен вращаться с заданной частотой вращения. |
| Axis | Rotation axis of the pivot node.Ось вращения поворотного узла. |
| Blade | |
| Sample | Single blade sample. The model should have only one blade, the number of blades is controlled by the Total Count parameter. The blade should have its own mesh and material independent from the helicopter model body. The material should provide for the blade bending visualization.Образец с одним лезвием. Модель должна иметь только одно лезвие, количество лезвий регулируется параметром Total Count. Лопасть должна иметь свою собственную сетку и материал, не зависящий от корпуса модели вертолета. Материал должен обеспечивать визуализацию изгиба лезвия. |
| Length | Blade length, in meters.Длина лезвия, в метрах. |
| Total Count | Total number of rotor blades. The blade sample is cloned the required number of times, equally spaced, and arranged in a circle.Общее количество лопастей несущего винта. Образец лезвия клонируется необходимое количество раз, на равном расстоянии друг от друга и размещается по кругу. |
| Material Beta 0 Parameter |
Name of the blade material parameter used to control the coning angle visualization.Название параметра материала лезвия, используемого для управления визуализацией угла сужения. |
| Material Blade Length Parameter |
Name of the blade material parameter used to set the blade length.Название параметра материала лезвия, используемого для установки длины лезвия. |
| Circle | |
| Node | The blurred circle node that replaces the blades at high RPM values.Узел размытого круга, который заменяет лопасти при высоких значениях оборотов. |
| Material Beta 0 Parameter |
Name of the circle material parameter used to control the coning angle visualization.Название параметра материала окружности, используемого для управления визуализацией угла сужения. |
| Material Beta Cos Parameter |
Name of the circle material parameter used to control the longitudinal flapping visualization.Название параметра материала окружности, используемого для управления визуализацией продольных взмахов. |
| Material Beta Sin Parameter |
Name of the circle material parameter used to control the lateral flapping visualization.Название параметра материала окружности, используемого для управления визуализацией боковых взмахов. |
| Material Blade Length Parameter |
Name of the circle material parameter used to set the blade length.Название параметра материала круга, используемого для задания длины лезвия. |
| Material Blade Count Parameter |
Name of the circle material parameter used to set the blade count.Название параметра материала круга, используемого для установки количества лезвий. |
| Material UV Animation Parameter |
Name of the circle material parameter used to control the circle UV animation depending on the rotor RPM value.Название параметра материала круга, используемого для управления УФ-анимацией круга в зависимости от значения частоты вращения ротора. |
| RPM To Time Coefficient |
Multiplier to translate the RPM value to the UV animation parameter value.Множитель для преобразования значения RPM в значение параметра UV-анимации. |
| Blurring | |
| Threshold Blade Speed | Rotation speed before which only blades are visible, and starting from which the blades begin to blur. The bottom value of the rotation speed interval at which both the blades and the blurred circle are visible.Скорость вращения, до которой видны только лопасти и начиная с которой лопасти начинают размываться. Нижнее значение интервала скоростей вращения, при котором видны как лопасти, так и размытый круг. |
| Threshold Circle Speed | Rotation speed starting from which only the blurred circle is rendered, the blades are no longer visible. The top value of the rotation speed interval at which both the blades and the blurred circle are visible.Скорость вращения, начиная с которой отображается только размытый круг, лопасти больше не видны. Верхнее значение интервала скоростей вращения, при котором видны как лопасти, так и размытый круг. |
| Blade Alpha | Curve controlling the blade transparency during the interval at which both the blades and the blurred circle are visible.Кривая, управляющая прозрачностью лезвия в течение интервала, в течение которого видны как лезвия, так и размытый круг. |
| Circle Alpha | Curve controlling the circle transparency during the interval at which both the blades and the blurred circle are visible.Кривая, управляющая прозрачностью круга в течение интервала, в течение которого видны как лезвия, так и размытый круг. |
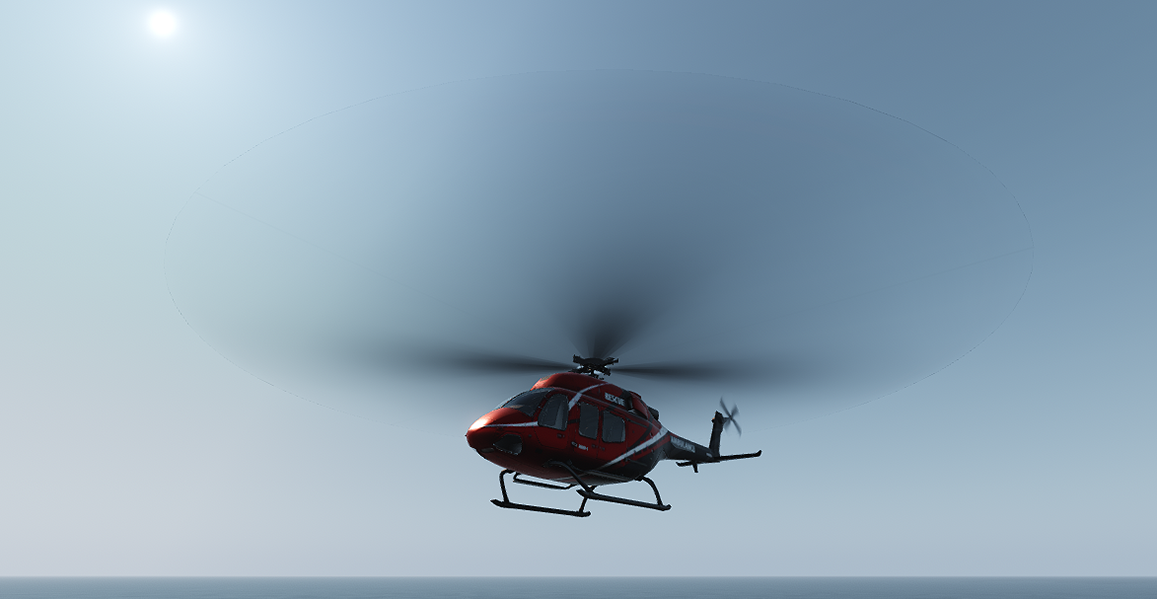
Rotor Wash EffectЭффект вихрей#
This component allows creating the effect of dust clouds raised up by the rotor wash when the helicopter is standing on the ground, taking off or landing, or flies close to the surface.Этот компонент позволяет создавать эффект пылевых облаков, поднимаемых потоком воздуха от несущего винта, когда вертолет стоит на земле, взлетает или приземляется, или летит близко к поверхности.
-
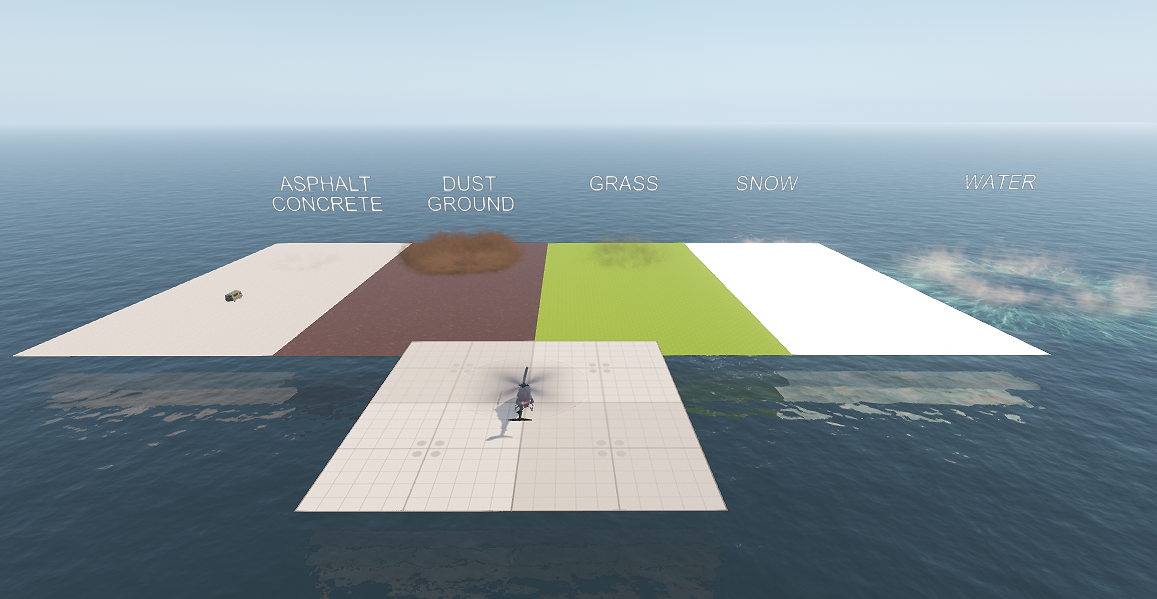
Create the effects for each type of surface in UNIGINE Editor and assign the RotorWashEffect property to each of them. The following parameters are available:Создайте эффекты для каждого типа поверхности в редакторе UNIGINE и назначьте свойство RotorWashEffect каждому из них. Доступны следующие параметры:
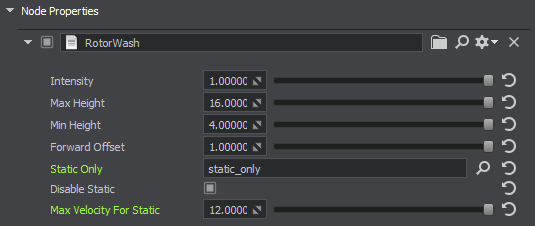
Intensity Rotor wash visibility intensity value. With the minimum value of 0 the effect is completely invisible. With the maximum value of 1 — completely visible. This is the default value that can be changed at runtime.Значение интенсивности видимости промывки ротора. При минимальном значении 0 эффект полностью невидим. С максимальным значением 1 — полностью виден. Это значение по умолчанию, которое может быть изменено во время выполнения.Max Height Height of the node from the ground, at which the effect disappears.Высота узла от земли, при которой эффект исчезает.Min Height Height of the node from the ground, at which the effect has the maximum intensity.Высота узла от земли, при которой эффект имеет максимальную интенсивность.Forward Offset Multiplier to move the effect forward relative to the helicopter. The offset distance depends on the movement speed. This setting is intended to make the effect visible for the cockpit view.Множитель для перемещения эффекта вперед относительно вертолета. Расстояние смещения зависит от скорости перемещения. Эта настройка предназначена для того, чтобы эффект был виден из кабины пилота.Static Only Root node for effects that are only displayed when the helicopter is not moving.Корневой узел для эффектов, которые отображаются только тогда, когда вертолет не движется.Disable Static Disable the static effect node when the helicopter is moving. If the option is disabled (i.e. the static effect is enabled), the static effect is displayed throughout the whole life time of its particle systems. In most cases disabling this option (i.e. enabling the static effect visibility throughout the particles life time) is unnecessary, because the effect won’t be seen from the cockpit.Отключите узел статического эффекта, когда вертолет движется. Если опция отключена (т.е. включен статический эффект), статический эффект отображается в течение всего срока службы систем частиц. В большинстве случаев отключать эту опцию (т.е. включать видимость статического эффекта на протяжении всего срока службы частиц) нет необходимости, поскольку эффект не будет виден из кабины пилота.Max Static Velocity Upper speed limit at which the helicopter is considered static (m/s).Верхний предел скорости, при котором вертолет считается неподвижным (м/с). -
Assign the modifier depending on the effect node type: ParticlesParameterModifier / DecalParameterModifier / FieldHeightParameterModifier. The modifiers are required for the alignment of the corresponding node (Particles/Decal/FieldHeight) with the effect.Назначьте модификатор в зависимости от типа узла эффекта: ParticlesParameterModifier / DecalParameterModifier / FieldHeightParameterModifier. Модификаторы необходимы для выравнивания соответствующего узла (Particles/Decal/FieldHeight) с эффектом.ParticlesParameterModifier has the following parameters:ParticlesParameterModifier имеет следующие параметры:
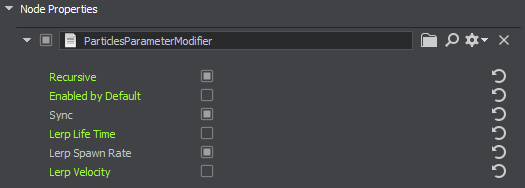
Recursive Toggles synchronization of child particle systems.Переключает синхронизацию дочерних систем частиц.Enabled by Default Toggles the node default state. If the node is disabled by default, you need to enable it via code after adding to the scene.Переключает состояние узла по умолчанию. Если узел отключен по умолчанию, вам нужно включить его с помощью кода после добавления в сцену.Sync Synchronization of particles via Syncker. Recommended to enable only if synchronization via network is critical, because it may affect performance.Синхронизация частиц с помощью Syncker. Рекомендуется включать только в том случае, если синхронизация по сети имеет решающее значение, поскольку это может повлиять на производительность.Lerp Life Time Lerp the particles life time value with the effect intensity. If the effect intensity is equal to 0, the life time value also equals to 0.Сопоставьте значение времени жизни частиц с интенсивностью эффекта. Если интенсивность эффекта равна 0, то значение времени жизни также равно 0.Lerp Spawn Rate Lerp the particles spawn rate value with the effect intensity. If the effect intensity is equal to 0, the spawn rate value also equals to 0.Сопоставьте значение скорости появления частиц с интенсивностью эффекта. Если интенсивность эффекта равна 0, то значение скорости появления также равно 0.Lerp Velocity Lerp the particles velocity value with the effect intensity. If the effect intensity is equal to 0, the velocity value also equals to 0.Сопоставьте значение скорости частиц с интенсивностью эффекта. Если интенсивность эффекта равна 0, то значение скорости также равно 0. -
Assign the RotorWashController property to the helicopter and select the type of surface corresponding to each effect.Назначьте вертолету свойство RotorWashController и выберите тип поверхности, соответствующий каждому эффекту.
-
Set the surface type via code for each surface.Установите тип поверхности с помощью кода для каждой поверхности.
Weather RadarМетеорадар#
Weather radar (aka WSR) used to monitor weather ahead of the aircraft (clouds and precipitation) is an integral part of a professional flight simulator enabling pilots to train strategic and tactical planning of a safe flight trajectory. It is implemented as a MeteoRadar component and requires adequate skills to use it efficiently — accurately tune this system and interpret the weather radar display correctly. All key parameters of the radar are available for adjustment including display range (to monitor both the short-distance and long-distance weather), gain (for weather severity assessment), as well as tilt angles, FOV, and others. The radar works with 3D volumetric clouds generated by UNIGINE's advanced Clouds System ensuring consistency of radar readouts with the view from the aircraft cabin.Метеорадар (он же WSR), используемый для мониторинга погоды впереди самолета (облаков и осадков), является неотъемлемой частью профессионального летного тренажера, позволяя пилотам тренировать стратегическое и тактическое планирование безопасной траектории полета. Он реализован как компонент MeteoRadar и требует соответствующих навыков для его эффективного использования — точной настройки этой системы и правильной интерпретации показаний метеорадара. Все ключевые параметры радара доступны для настройки, включая дальность отображения (для мониторинга погоды на ближних и дальних расстояниях), усиление (для оценки опасности погодных условий), а также углы наклона, FOV и прочее. Радар работает с волюметрическими облаками, которые сгенерируются системой облаков UNIGINE, что обеспечивает согласованность показаний радара с видом из кабины самолета.
The intensity of clouds displayed on the radar is calculated as the cloud density at each point multiplied by the current humidity.Интенсивность облаков, отображаемых на радаре, рассчитывается как плотность облаков в каждой точке, умноженная на текущую влажность.
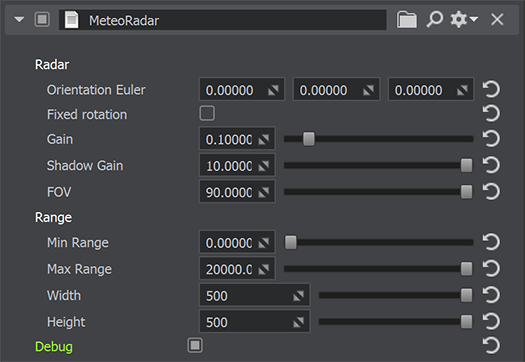
To use the weather radar, create a dummy node and assign the MeteoRadar component to it. The following parameters are available:Для использования метеорадара создайте Node Dummy и назначьте на нее компонент MeteoRadar. Доступны следующие параметры:
| Radar | |
| Orientation Euler | Vector of Euler angles (pitch, roll, yaw).Вектор углов Эйлера (тангаж, крен, рыскание). |
|---|---|
| Fixed Rotation | Toggles the hiroscope for the meteo radar on and off.Включает и выключает гироскоп для метеорадара. |
| Gain | Sensitivity of the meteo radar. The higher the value, the less sensitive the radar (it shows only dangerous regions).Чувствительность метеорадара. Чем выше значение, тем менее чувствителен радар (он показывает только опасные области). |
| Shadow Gain | Power of the meteo radar.Мощность метеорадара. |
| FOV | FOV angle of the meteo radar in degrees.Угол обзора метеорадара в градусах. |
| Range | |
| Min Range | Minimum distance at which the radar displays the weather information (the lower limit of display range).Минимальное расстояние, на котором радар отображает информацию о погоде (нижний предел дальности отображения). |
| Max Range | Maximum distance at which the radar displays the weather information (the upper limit of display range).Максимальное расстояние, на котором радар отображает информацию о погоде (верхний предел дальности отображения). |
| Width | Width of the image on the radar display (number of horizontal lines).Ширина изображения на дисплее радара (количество горизонтальных линий). |
| Height | Height of the image on the radar display (number of vertical lines).Высота изображения на дисплее радара (количество вертикальных линий). |
| Debug | Toggles on and off visualization of the current direction of the radar.Включает и выключает визуализацию текущего направления движения радара. |
The add-on includes an example of the meteo radar UI represented as the MeteoRadarWidget component and available in the Debug mode of the application. The interface example includes a display with a scan effect and a set of parameters that control radar settings and scan range.Дополнение включает в себя пример пользовательского интерфейса метеорадара, представленного в виде компонента MeteoRadarWidget и доступного в Режиме отладки приложения. Пример интерфейса включает в себя дисплей с эффектом сканирования и набор параметров, управляющих настройками радара и дальностью сканирования.
Opening the WorldОткрытие мира#
To open the world containing models:Чтобы открыть мир, содержащий модели:
- Установите дополнение IG Aviation (доступно через браузер UNIGINE SDK в разделе Add-Ons) и добавьте его в свой проект (нажав Other Actions -> Configure Project -> Assets в разделе Projects в разделе UNIGINE SDK Browser).
- Click File -> Open World (Ctrl + O) or open the Asset Browser window, open the /ig_aircraft/sample_content folder, and select the ig_aircraft world. The scene will open.Нажмите File -> Open World (Ctrl + O) или откройте окно Asset Browser, откройте папку \ig_aircraft\sample_content и выберите мир ig_aircraft. Сцена откроется.
Separate nodes are also available as *.node files in corresponding subdirectories of the data/ig_aircraft/ directory.Отдельные узлы также доступны в виде файлов *.node в соответствующих подкаталогах каталога data/ig_aircraft/.The content in the /ig_aircraft/sample_content folder is designed to demonstrate how to use the properties. It may be deleted, if you don't need the demo scene and assets.Содержимое папки \ig_aircraft\sample_content предназначено для демонстрации того, как использовать свойства. Он может быть удален, если вам не нужна демонстрационная сцена и ресурсы.
Configuring Your ProjectНастройка Вашего проекта#
The add-on contains the readme.md file with the configuration steps.Дополнение содержит файл readme.md с шагами настройки.To add the IG Aviation add-on to your C++ project:Чтобы добавить надстройку IG Aviation в ваш проект на C++:
-
Установите дополнение IG Aviation (доступно через UNIGINE SDK Browser в разделе Add-Ons) и добавьте его в свой проект (нажав Other Actions -> Configure Project -> Assets в разделе Projects в UNIGINE SDK Browser).Другой способ добавить дополнение к вашему проекту - скопировать следующие папки из этого дополнения в папку вашего проекта:
- data/ig_aircraft и от data/properties до data
- от source/ig_aircraft_components до source
- Добавьте файлы source/ig_aircraft_components/* в свой проект на C++.
- Создайте свое приложение для регистрации добавленных компонентов в системе компонентов C++.
-
Configure ig_config.xml — add the following into the entity_types block:Configure ig_config.xml — добавьте следующее в блок entity_types:Исходный код (XML)
<entity id="201" name="be-200-mod"> <path>ig_aircraft/sample_content/be_200_mod.node</path> <component id="0" name="light_outer"> <property>LightAircraftController</property> <parameter type="int" name="data1">landing</parameter> <parameter type="int" name="data2">taxi</parameter> <parameter type="int" name="data3">navigation</parameter> <parameter type="int" name="data4">beacon</parameter> <parameter type="int" name="data5">strobe</parameter> <parameter type="int" name="data6">logo</parameter> </component> <component id="1" name="light_inner"> <property>LightAircraftController</property> <parameter type="int" name="data1">windows</parameter> <parameter type="int" name="data2">cockpit</parameter> </component> <component id="2" name="fire_engine"> <property>EffectAircraftController</property> <parameter type="int" name="data1">fire_engine_1</parameter> <parameter type="int" name="data2">fire_engine_2</parameter> <parameter type="int" name="data3">fire_engine_3</parameter> <parameter type="int" name="data4">fire_engine_4</parameter> </component> <component id="3" name="fire_aircraft"> <property>EffectAircraftController</property> <parameter type="int" name="data1">fire_landing_front</parameter> <parameter type="int" name="data2">fire_landing_back</parameter> <parameter type="int" name="data3">fire_tail</parameter> </component> <component id="4" name="landing_gears"> <property>LandingGears</property> <parameter type="int" name="data1">gear</parameter> <parameter type="float" name="data2">manual_gear</parameter> </component> <component id="5" name="effects"> <property>EffectAircraftController</property> <parameter type="int" name="data1">smoke</parameter> <parameter type="int" name="data2">contrail</parameter> </component> <articulated_part id="1" name="aileron"> <node invert_pitch="1">aileron_left</node> <node>aileron_right</node> </articulated_part> <articulated_part id="2" name="rudder"> <node invert_yaw="1">rudder</node> </articulated_part> <articulated_part id="3" name="elevator"> <node invert_pitch="1">flipper_left</node> <node invert_pitch="1">flipper_right</node> </articulated_part> <articulated_part id="4" name="flap"> <node invert_pitch="1">flap_0_left</node> <node invert_pitch="1">flap_0_right</node> <node invert_pitch="1">flap_1_left</node> <node invert_pitch="1">flap_1_right</node> </articulated_part> <articulated_part id="5" name="engine"> <node>engine_left</node> <node>engine_right</node> </articulated_part> <articulated_part id="6" name="wheel"> <node>chassis_element_left/chassis_left/wheels_left</node> <node>chassis_element_right/chassis_right/wheels_right</node> <node>dummy_axis_chassis_front/chassis_front001/wheels_front</node> </articulated_part> <articulated_part id="7" name="slat"> <node>slat_left</node> <node>slat_right</node> </articulated_part> <volume_definition id="0" name="body" shape="0">volumes</volume_definition> <volume_definition id="1" name="wings" shape="1">volumes</volume_definition> </entity> <entity id="180" name="uc-135"> <path>ig_aircraft/sample_content/helicopter/node/helicopter_simple.node</path> <component id="1" name="RotorBlade"> <node>body/rotor_aux</node> <property>RotorBlade</property> <parameter type="float" name="data1">speed</parameter> <parameter type="float" name="data2">beta_0</parameter> <parameter type="float" name="data3">beta_cos</parameter> <parameter type="float" name="data4">beta_sin</parameter> </component> <component id="2" name="RotorWashController"> <property>RotorWashController</property> <parameter type="float" name="data1">intensity</parameter> <parameter type="float" name="data2">rpm_intensity</parameter> </component> </entity> <entity id="218" name="minibus"> <path>ig_aircraft/sample_content/minibus/minibus.node</path> <component id="0" name="wheel_trace"> <property>WheelTraceController</property> <parameter type="float" name="data1">input_intensity</parameter> </component> </entity> - Configure your host. An example of host configuration may be found in the readme.md file.Настройте свой хост. Пример конфигурации хоста можно найти в файле readme.md.
In the configured project, you'll be able to create the following entity types:В настроенном проекте вы сможете создать следующие типы сущностей:
- 201 — aircraft (fire effects, landing gears)201 — самолет (эффекты пожара, шасси)
- 180 — helicopter (rotor coning, rotor wash)180 — вертолет (конусообразование несущего винта, промывка несущего винта)
- 218 — car (wheel trace decal)218 — автомобиль (наклейка со следом колеса)