Occluder Terrain
The Occluder Terrain provides a cheaper and more efficient way of handling intersections with the terrain, especially when a terrain is large and has a lot of objects placed upon it. Invisible objects that are culled by the occluder are not sent to the GPU, which increases performance.
See also#
- The WorldOccluderTerrain class to manage occluder terrain nodes via API
Occluder Terrain Usage#
To increase performance, the occluder terrain should be used in the following cases:
- An occluder terrain can be a great benefit in case of mountains or complex urban environments.
- An occluder terrain is highly effective if there are many objects that are costly to render (they have a lot of polygons and/or heavy shaders). However, these objects should not be too large, since if any part of the surface is seen, the object cannot be culled.
NoticeIf a terrain is flat, the occluder can reduce FPS, because there are no surfaces that can be culled.
However, there are cases when the occluder terrain should not be used:
- When the camera is high above the ground (for example, for flight simulators), an occluder should be disabled. At the same time, when it is near or on the ground (during a takeoff or landing), occluders can be enabled to provide the performance gain.
- If the terrain relief is changed in the runtime, it is not recommended to use the occluder. As a possible variant in this case, you can black out the areas where changes will take place, in the height map.
Creating Occluder Terrain#
To create the Occluder Terrain object, perform the following steps:
- On the Menu bar, click Create -> Optimization -> Occluder Terrain.
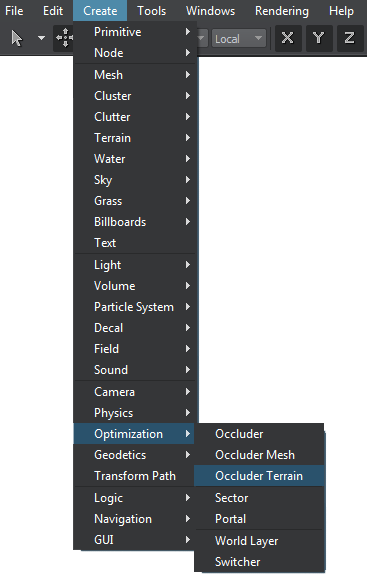
- Place the Occluder Terrain object somewhere in the world.
- Specify the Occluder Terrain parameters.
Occluder Terrain Texture#
Occluder Terrain is a RGB8 texture automatically generated from the downsized height map. It contains:
- Red channel — a height map
- Green and Blue channels — a cone map (radius and height of cones).
To create the occluder texture, the engine is fed with a height map, the same as for the occluded terrain, but downsized. The smaller the imported height map is, the better. If a visible relief is falsely culled by the occluder, use a height map of a bigger size. For example, the 8193x8193 terrain can be occluded with the use of 256x256 or 512x512 height map.
On the base of a downsized height map, the cone map is automatically calculated, and the height map is replaced with the occluder texture.
Cone-Step Mapping#
A simple approach to calculate intersection with the occluder terrain is to trace a ray from the camera and use a fixed step to advance it, until it intersects with the height map. This approach has the disadvantages of slow speed, a lot of texture fetches, and low accuracy.
Instead, the cone-step mapping provides a more effective solution that uses a precomputed cone map to substantially accelerate calculations. A cone map places an inverted cone with a vertex on each of the height map texels. The radius of the cone is expanded until it hits any of surrounding heights with its side.
- This maximum width angle is stored in the green channel of the occluder texture — the cone map.
- The height of the cone is stored in the blue channel.
When the ray is traced along the viewing direction, it intersects with a cone and instead of continuing to sample within it, it leaps straight to its outside. Searching inside the cone can be safely omitted since no intersections with the height field are guaranteed within it. The next tracing point to leap to along the ray is the outside of the next cone, thus skipping large areas of texture space. This approach is cheap, fast, and accurate.
Parameters#
In the Node tab of the Parameters window, you can adjust the following parameters of the occluder terrain:
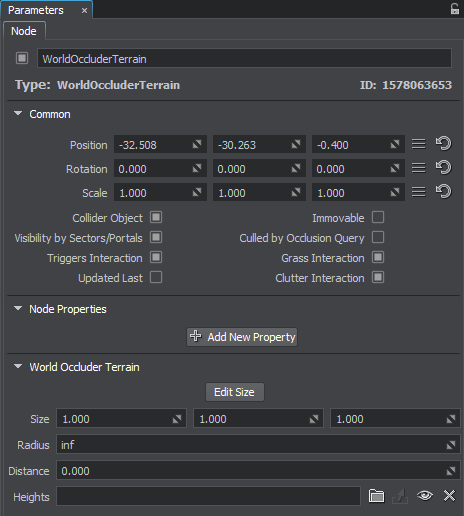
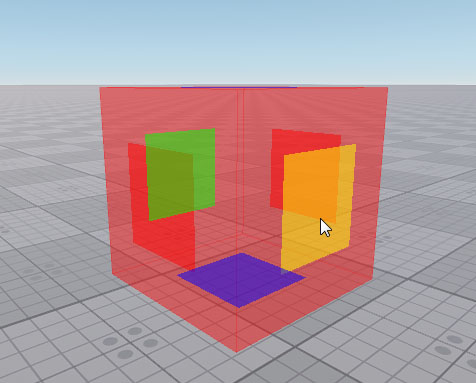
| Edit Size | Toggles the editing mode for the world occluder terrain node on and off. When enabled, the occluder terrain box sides that can be resized are highlighted with the colored rectangles. To change the size of a side, drag the corresponding rectangle.
|
|---|---|
| Size | Size of the occluder terrain box along X, Y, and Z axis.
Notice
To avoid the visual artifacts, it is strongly recommended to place the occluder terrain node slightly lower than the occluded terrain. |
| Radius | The distance from the camera to perform the occlusion. Up to this distance the ray is traced. Most of the geometry is culled by the foreground objects, so the occlusion by the distant objects can be disregarded to save performance. |
| Distance | The occluder terrain is completely disabled when the camera moves away from its box on the specified distance. |
| Heights |
Notice
Cone-step mapping is a time consuming operation. If there are no changes in terrain relief, do not assign heights texture each time on world load. Instead, simply specify the occluder texture directly for faster loading. |