IG Aviation Add-on
您应该升级到
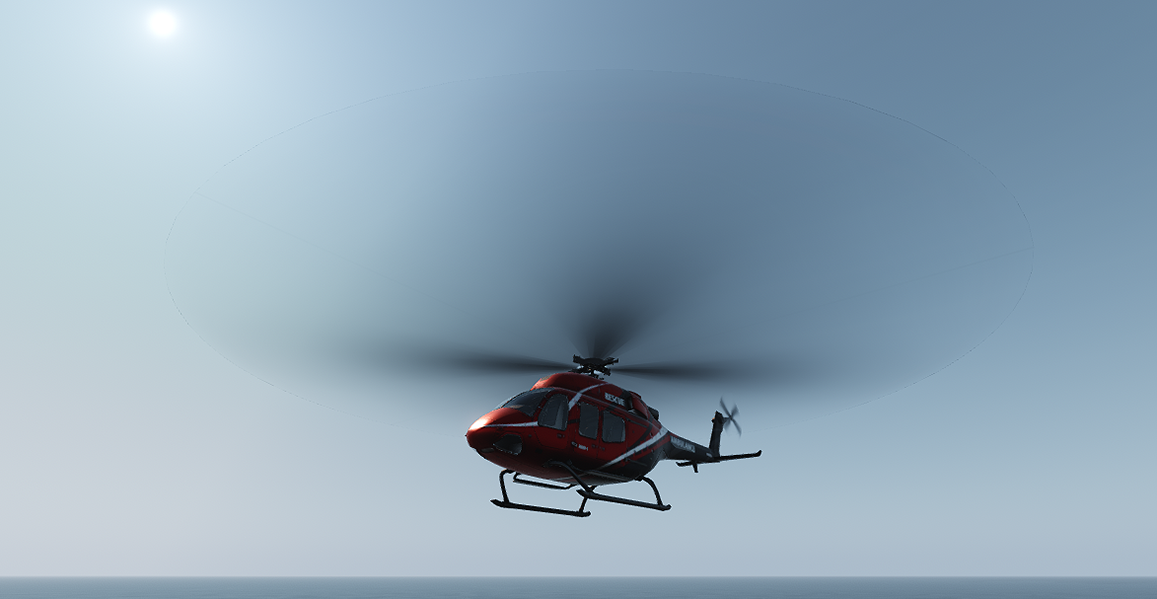
 The IG Aviation add-on contains a set of ready-to-use aircraft components creating such effects as engine and landing gear fire, smoke, contrail, landing gears, helicopter rotor blade settings with the blurring effect and rotor wash effect. The add-on also shows implementation of the wheel trace and meteo radar.IG Aviation附加组件包含一组现成使用的飞机组件,创建诸如发动机和起落架火灾,烟雾,尾迹,起落架,直升机旋翼叶片设置与模糊效果和旋翼洗涤效果。该插件还显示了车轮跟踪和气象雷达的实现。

Components组件#
Aircraft Effects飞机的影响#
To set up various aircraft effects (engine or landing gear fire, smoke, contrail, etc.):设置各种飞机效果(发动机或起落架火灾,烟雾,尾迹等):
- Assign the EffectAircraftController property to the parent node (aircraft) and leave all parameters unchanged.将EffectAircraftController属性分配给父节点(飞机),并保持所有参数不变。
-
Assign the EffectAircraft property to each node representing visual effects of various types.将EffectAircraft属性分配给表示各种类型视觉效果的每个节点。
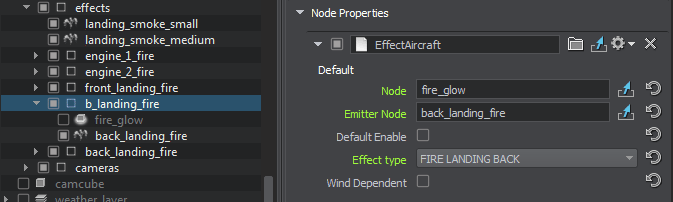 The following property parameters are available:以下属性参数可用:
- Node — a node to be enabled/disabledNode—要启用/禁用的节点
- Emitter Node — a node emitting particles for the effectEmitter Node -一个为效果发射粒子的节点
- Default Enable — indicates whether the effect should be enabled by defaultDefault Enable -默认情况下是否启用该效果
- Effect Type — aircraft effect type selection (engine or landing gear fire, smoke, contrail, etc.)Effect Type -飞机效果类型选择(发动机或起落架火灾,烟雾,尾迹等)
- Wind Dependent — indicates whether the effect is affected by wind or notWind Dependent -表示效果是否受风的影响
Landing Gears起落架#
This component allows controlling the landing gears. It contains several properties that shall be assigned as follows:这个部件允许控制起落架。它包含以下几个属性:
-
Assign the LandingGears property to the parent node (aircraft).将LandingGears属性分配给父节点(飞机)。
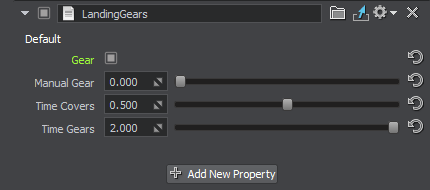 The following property parameters are available:以下属性参数可用:
- Gear — indicates that gears are extendedGear -表示延长齿轮
- Time Covers — cover opening time, in secondsTime Covers -覆盖开放时间,以秒为单位
- Time Gears — gear extension time, in seconds0 -齿轮延伸时间,以秒为单位
-
Define which nodes represent parts of landing gears and assign the LandingGearPart property to them.定义哪些节点表示起落架的部分,并为它们分配LandingGearPart属性。
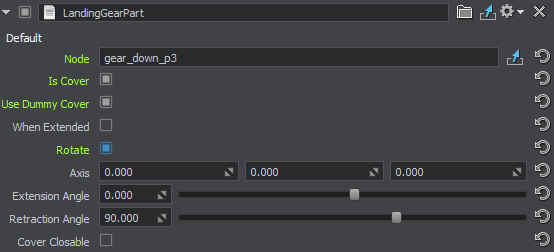 The following property parameters are available:以下属性参数可用:
- Node — the node to be moved (usually the node to which this property is assigned)Node—要移动的节点(通常是分配了此属性的节点)
- Is Cover — indicates whether the part is a cover or not (a cover is opened prior to gear extension)Is Cover -表明是否部分封面(封面前打开齿轮扩展)
-
Use Dummy Cover — indicates whether the wheel well is to be covered with a dummy cover after gear retraction. When enabled, an additional When Extended option is displayed. It is used to specify whether the dummy cover shall be visible when the gear is extended.Use Dummy Cover -表示齿轮收放后是否用假盖盖住轮舱。启用后,将显示一个额外的When Extended选项。它用于规定当齿轮伸出时假盖是否可见。注意If this option is enabled, the Node field should not contain the node to which this property is assigned, as the component will be disabled forever after retraction.如果启用了此选项,则Node字段不应包含分配此属性的节点,因为该组件将在收回后永远禁用。
- Rotate — indicates whether the part should rotateRotate -表明部分是否应该旋转
- Axis — coordinates of the part's rotation axisAxis -部件旋转轴的坐标
- Extension Angle — rotation angle of the part, when the gear is extended, in degreesExtension Angle -旋转角的部分,延长齿轮时,在度
- Retraction Angle — rotation angle of the part, when the gear is retracted, in degrees-齿轮缩回时零件的旋转角度,以度为单位
- Cover Closable — indicates whether the cover should close after gear extension, or to stay openCover Closable -表明封面是否应该关闭设备扩展,或保持开放
Rotor Blade转子叶片#
The RotorBlade property controls the coning of the helicopter rotor blades and creates blurring to disk due to the blade rotation. To use this property, the rotor blade in your helicopter model should have a separate mesh and material.RotorBlade属性控制直升机旋翼叶片的锥形,并由于叶片旋转而产生磁盘模糊。要使用这个属性,旋翼叶片在你的直升机模型应该有一个单独的网格和材质。
Using this property also implies that you have the blade material (mesh_blade.mgraph in the add-on) and the node and material for circle into which the blades blur when rotating fast (check the disk node and mesh_blur_blades.mgraph material of the helicopter_simple Node Reference in the add-on).使用此属性还意味着您拥有叶片材质(附加组件中的mesh_blade.mgraph)以及叶片在快速旋转时模糊的圆的节点和材质(检查附加组件中的helicopter_simple Node Reference的disk节点和mesh_blur_blades.mgraph材质)。
Assign the RotorBlade property to the parent node (rotor node).RotorBlade财产分配给父节点(转子节点)。
The following property parameters are available:以下属性参数可用:

| Input | |
| Speed | Rotor rotation speed, in RPM. This is the default value that can be changed at runtime.转子转速,在RPM。这是默认值,可以在运行时改变。 |
|---|---|
| Beta 0 | Parameter defining the coning angle. This is the default value that can be changed at runtime.定义锥角的参数。这是可以在运行时更改的默认值。 |
| Beta Cos | Parameter used for the longitudinal flapping. This is the default value that can be changed at runtime.参数用于纵向拍打。这是默认值,可以在运行时改变。 |
| Beta Sin | Parameter used for the lateral flapping. This is the default value that can be changed at runtime.用于侧扑动的参数。这是可以在运行时更改的默认值。 |
| Rotor | |
| Rotation Direction | Direction of the rotor rotation.转子的旋转方向。 |
| Pivot | Node to be rotated with the given RPM.以给定RPM旋转的节点。 |
| Axis | Rotation axis of the pivot node.旋转轴的主节点。 |
| Blade | |
| Sample | Single blade sample. The model should have only one blade, the number of blades is controlled by the Total Count parameter. The blade should have its own mesh and material independent from the helicopter model body. The material should provide for the blade bending visualization.单叶片样品。模型应该只有一个叶片,叶片的数量由Total Count参数控制。叶片应该有自己的网格和材质独立于直升机模型体。材质应提供叶片弯曲可视化。 |
| Length | Blade length, in meters.叶片长度,在米。 |
| Total Count | Total number of rotor blades. The blade sample is cloned the required number of times, equally spaced, and arranged in a circle.旋翼叶片总数。叶片样品被克隆所需的次数,等间隔,并安排在一个圆圈。 |
| Material Beta 0 Parameter |
Name of the blade material parameter used to control the coning angle visualization.叶片材质参数的名称用于控制锥进角可视化。 |
| Material Blade Length Parameter |
Name of the blade material parameter used to set the blade length.用于设置叶片长度的叶片材质参数名称。 |
| Circle | |
| Node | The blurred circle node that replaces the blades at high RPM values.模糊圈节点替换叶片在高转速值。 |
| Material Beta 0 Parameter |
Name of the circle material parameter used to control the coning angle visualization.用于控制圆锥角可视化的圆材质参数名称。 |
| Material Beta Cos Parameter |
Name of the circle material parameter used to control the longitudinal flapping visualization.的名字圈材质参数用于控制纵向拍打可视化。 |
| Material Beta Sin Parameter |
Name of the circle material parameter used to control the lateral flapping visualization.用于控制侧扑动可视化的圆材质参数名称。 |
| Material Blade Length Parameter |
Name of the circle material parameter used to set the blade length.用于设置叶片长度的圆形材质参数名称。 |
| Material Blade Count Parameter |
Name of the circle material parameter used to set the blade count.的名字圈材质参数用于设置叶片数。 |
| Material UV Animation Parameter |
Name of the circle material parameter used to control the circle UV animation depending on the rotor RPM value.圆形材质参数的名称,用于根据转子转速值控制圆形UV动画。 |
| RPM To Time Coefficient |
Multiplier to translate the RPM value to the UV animation parameter value.乘数将RPM价值紫外线动画参数值。 |
| Blurring | |
| Threshold Blade Speed | Rotation speed before which only blades are visible, and starting from which the blades begin to blur. The bottom value of the rotation speed interval at which both the blades and the blurred circle are visible.转速在此之前只有叶片可见,从此开始叶片开始模糊。转速区间的最底层值,在该转速区间内叶片和模糊的圆都是可见的。 |
| Threshold Circle Speed | Rotation speed starting from which only the blurred circle is rendered, the blades are no longer visible. The top value of the rotation speed interval at which both the blades and the blurred circle are visible.旋转速度从只呈现模糊圈开始,叶片不再可见。的转速区间的最高价值叶片和模糊圈是可见的。 |
| Blade Alpha | Curve controlling the blade transparency during the interval at which both the blades and the blurred circle are visible.在叶片和模糊的圆都可见的时间间隔内控制叶片透明度的曲线。 |
| Circle Alpha | Curve controlling the circle transparency during the interval at which both the blades and the blurred circle are visible.圆曲线控制透明度的间隔期间叶片和模糊圈是可见的。 |
Rotor Wash Effect转子清洗效果#
This component allows creating the effect of dust clouds raised up by the rotor wash when the helicopter is standing on the ground, taking off or landing, or flies close to the surface.该组件允许创建尘埃云的影响提出了转子洗直升机时站在地上,起飞或降落,苍蝇接近水面。
-
Create the effects for each type of surface in UNIGINE Editor and assign the RotorWashEffect property to each of them. The following parameters are available:在UNIGINE编辑器中为每种类型的表面创建效果,并为每个表面分配RotorWashEffect属性。可用的参数如下:
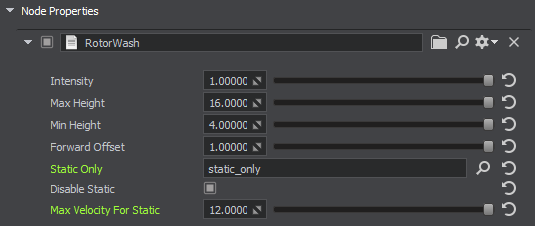
Intensity Rotor wash visibility intensity value. With the minimum value of 0 the effect is completely invisible. With the maximum value of 1 — completely visible. This is the default value that can be changed at runtime.转子洗能见度强度值。的最小值0效果是完全看不见的。的最大价值1 -完全可见。这是默认值,可以在运行时改变。Max Height Height of the node from the ground, at which the effect disappears.节点离地面的高度,在此高度上效果消失。Min Height Height of the node from the ground, at which the effect has the maximum intensity.节点的高度从地面效应的最大强度。Forward Offset Multiplier to move the effect forward relative to the helicopter. The offset distance depends on the movement speed. This setting is intended to make the effect visible for the cockpit view.倍增器移动效果向前相对于直升机。偏移距离取决于移动速度。这个设置的目的是使效果在驾驶舱视图中可见。Static Only Root node for effects that are only displayed when the helicopter is not moving.根节点的影响只显示当直升机不动。Disable Static Disable the static effect node when the helicopter is moving. If the option is disabled (i.e. the static effect is enabled), the static effect is displayed throughout the whole life time of its particle systems. In most cases disabling this option (i.e. enabling the static effect visibility throughout the particles life time) is unnecessary, because the effect won’t be seen from the cockpit.当直升机移动时禁用静态效果节点。如果该选项被禁用(即静态效果被启用),则静态效果将在其粒子系统的整个生命周期中显示。在大多数情况下,禁用此选项(即在粒子生命周期内启用静态效果可见性)是不必要的,因为从驾驶舱看不到效果。Max Static Velocity Upper speed limit at which the helicopter is considered static (m/s).直升机的速度上限被认为是静态(米/秒)。 -
Assign the modifier depending on the effect node type: ParticlesParameterModifier / DecalParameterModifier / FieldHeightParameterModifier. The modifiers are required for the alignment of the corresponding node (Particles/Decal/FieldHeight) with the effect.根据效果节点类型分配修饰符:ParticlesParameterModifier / DecalParameterModifier / FieldHeightParameterModifier。修饰符用于将相应的节点(Particles/Decal/FieldHeight)与效果对齐。ParticlesParameterModifier has the following parameters:ParticlesParameterModifier有以下参数:
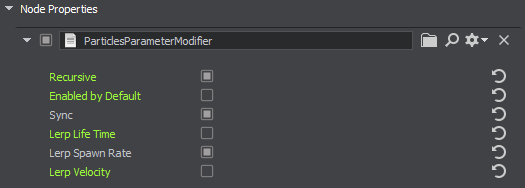
Recursive Toggles synchronization of child particle systems.切换子粒子系统的同步。Enabled by Default Toggles the node default state. If the node is disabled by default, you need to enable it via code after adding to the scene.切换节点默认状态。如果节点在默认情况下是禁用的,你需要通过代码添加到现场之后启用它。Sync Synchronization of particles via Syncker. Recommended to enable only if synchronization via network is critical, because it may affect performance.通过同步器实现粒子同步。建议仅在通过网络进行同步非常重要时启用,因为这可能会影响性能。Lerp Life Time Lerp the particles life time value with the effect intensity. If the effect intensity is equal to 0, the life time value also equals to 0.昆虫蜜粒子生命时间价值与强度的影响。如果影响强度等于0,生命时间价值也等于0。Lerp Spawn Rate Lerp the particles spawn rate value with the effect intensity. If the effect intensity is equal to 0, the spawn rate value also equals to 0.使粒子产卵率值与效果强度相关联。如果效果强度等于0,刷出率值也等于0。Lerp Velocity Lerp the particles velocity value with the effect intensity. If the effect intensity is equal to 0, the velocity value also equals to 0.昆虫蜜粒子速度值和强度的影响。如果影响强度等于0,速度值也等于0。 -
Assign the RotorWashController property to the helicopter and select the type of surface corresponding to each effect.将RotorWashController属性分配给直升机,并选择与每个效果对应的表面类型。
-
Set the surface type via code for each surface.通过代码为每个表面设置表面类型。
Weather Radar流星雷达#
Weather radar (aka WSR) used to monitor weather ahead of the aircraft (clouds and precipitation) is an integral part of a professional flight simulator enabling pilots to train strategic and tactical planning of a safe flight trajectory. It is implemented as a MeteoRadar component and requires adequate skills to use it efficiently — accurately tune this system and interpret the weather radar display correctly. All key parameters of the radar are available for adjustment including display range (to monitor both the short-distance and long-distance weather), gain (for weather severity assessment), as well as tilt angles, FOV, and others. The radar works with 3D volumetric clouds generated by UNIGINE's advanced Clouds System ensuring consistency of radar readouts with the view from the aircraft cabin.气象雷达(又名WSR)用于监测飞机前的天气(云和降水),是专业飞行模拟器的一个组成部分,使飞行员能够训练安全飞行轨迹的战略和战术规划。它是作为 MeteoRadar 组件实现的,需要足够的技能来有效地使用它:准确地调整这个系统并正确地解释天气雷达显示。雷达的所有关键参数都可以调整,包括显示距离(监测短距离和远距离天气),增益(用于天气严重程度评估),以及倾斜角度,FOV等。该雷达与UNIGINE先进的云系统生成的3D体云一起工作,确保雷达读数与飞机机舱视图的一致性。
The intensity of clouds displayed on the radar is calculated as the cloud density at each point multiplied by the current humidity.雷达上显示的云强度是用每个点的云密度乘以当前的湿度计算出来的。
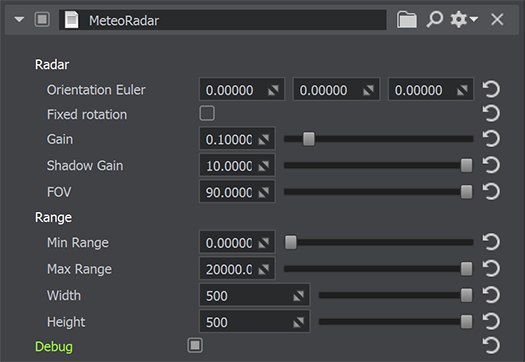
To use the weather radar, create a dummy node and assign the MeteoRadar component to it. The following parameters are available:要使用气象雷达,创建一个 Node Dummy,并将MeteoRadar组件分配给它。可用的参数如下:
| Radar | |
| Orientation Euler | Vector of Euler angles (pitch, roll, yaw).向量的欧拉角(音高、轧辊、偏航)。 |
|---|---|
| Fixed Rotation | Toggles the hiroscope for the meteo radar on and off.打开和关闭气象雷达的瞄准镜。 |
| Gain | Sensitivity of the meteo radar. The higher the value, the less sensitive the radar (it shows only dangerous regions).流星雷达的灵敏度。值越高,越不敏感的雷达(它只显示了危险的地区)。 |
| Shadow Gain | Power of the meteo radar.气象雷达的功率。 |
| FOV | FOV angle of the meteo radar in degrees.视场角流星雷达的度。 |
| Range | |
| Min Range | Minimum distance at which the radar displays the weather information (the lower limit of display range).雷达显示天气信息的最小距离(显示范围的下限)。 |
| Max Range | Maximum distance at which the radar displays the weather information (the upper limit of display range).最大距离的雷达显示天气信息(显示范围的上限)。 |
| Width | Width of the image on the radar display (number of horizontal lines).雷达显示图像的宽度(水平线的数目)。 |
| Height | Height of the image on the radar display (number of vertical lines).雷达显示器上的图像的高度(数量的竖线)。 |
| Debug | Toggles on and off visualization of the current direction of the radar.切换雷达当前方向的可视化开关。 |
The add-on includes an example of the meteo radar UI represented as the MeteoRadarWidget component and available in the Debug mode of the application. The interface example includes a display with a scan effect and a set of parameters that control radar settings and scan range.该插件包含一个气象雷达 UI 示例,表示为 MeteoRadarWidget 组件,可在 调试模式 中使用 应用程序。 界面示例包括具有扫描效果的显示和一组控制雷达设置和扫描范围的参数。
Opening the World打开世界#
To open the world containing models:打开包含模型的世界:
- 安装IG Aviation插件(可以通过UNIGINE SDK浏览器在Add-Ons部分),并将它添加到您的项目(通过点击 Projects部分UNIGINE SDK Browser Other Actions -> Configure Project -> Assets)。
- Click File -> Open World (Ctrl + O) or open the Asset Browser window, open the /ig_aircraft/sample_content folder, and select the ig_aircraft world. The scene will open.单击File -> Open World (Ctrl + O)或打开Asset Browser窗口,打开\ig_aircraft\sample_content文件夹,并选择ig_aircraft世界。场景将会打开。
Separate nodes are also available as *.node files in corresponding subdirectories of the data/ig_aircraft/ directory.单独的节点也可以作为*.node文件data/ig_aircraft/对应的子目录的目录。The content in the /ig_aircraft/sample_content folder is designed to demonstrate how to use the properties. It may be deleted, if you don't need the demo scene and assets.\ig_aircraft\sample_content文件夹中的内容旨在演示如何使用这些属性。如果你不需要演示场景和资源,它可能会被删除。
Configuring Your Project配置您的项目#
The add-on contains the readme.md file with the configuration steps.附加组件包含带有配置步骤的readme.md文件。To add the IG Aviation add-on to your C++ project:在你的c++项目中添加IG Aviation插件:
-
安装附加组件(可以通过UNIGINE SDK Browser IG Aviation Add-Ons部分),并将它添加到您的项目(通过点击 Projects部分UNIGINE SDK Browser Other Actions -> Configure Project -> Assets)。添加附加到您的项目的另一种方法是复制以下文件夹从这个附加到你的项目文件夹:
- data/ig_aircraft和data/properties data
- source/ig_aircraft_components到source
- 添加source/ig_aircraft_components/*文件到你的c++项目。
- 构建应用程序注册添加组件在c++组件系统。
-
Configure ig_config.xml — add the following into the entity_types block:配置ig_config.xml -将以下内容添加到entity_types块中:源代码 (XML)
<entity id="201" name="be-200-mod"> <path>ig_aircraft/sample_content/be_200_mod.node</path> <component id="0" name="light_outer"> <property>LightAircraftController</property> <parameter type="int" name="data1">landing</parameter> <parameter type="int" name="data2">taxi</parameter> <parameter type="int" name="data3">navigation</parameter> <parameter type="int" name="data4">beacon</parameter> <parameter type="int" name="data5">strobe</parameter> <parameter type="int" name="data6">logo</parameter> </component> <component id="1" name="light_inner"> <property>LightAircraftController</property> <parameter type="int" name="data1">windows</parameter> <parameter type="int" name="data2">cockpit</parameter> </component> <component id="2" name="fire_engine"> <property>EffectAircraftController</property> <parameter type="int" name="data1">fire_engine_1</parameter> <parameter type="int" name="data2">fire_engine_2</parameter> <parameter type="int" name="data3">fire_engine_3</parameter> <parameter type="int" name="data4">fire_engine_4</parameter> </component> <component id="3" name="fire_aircraft"> <property>EffectAircraftController</property> <parameter type="int" name="data1">fire_landing_front</parameter> <parameter type="int" name="data2">fire_landing_back</parameter> <parameter type="int" name="data3">fire_tail</parameter> </component> <component id="4" name="landing_gears"> <property>LandingGears</property> <parameter type="int" name="data1">gear</parameter> <parameter type="float" name="data2">manual_gear</parameter> </component> <component id="5" name="effects"> <property>EffectAircraftController</property> <parameter type="int" name="data1">smoke</parameter> <parameter type="int" name="data2">contrail</parameter> </component> <articulated_part id="1" name="aileron"> <node invert_pitch="1">aileron_left</node> <node>aileron_right</node> </articulated_part> <articulated_part id="2" name="rudder"> <node invert_yaw="1">rudder</node> </articulated_part> <articulated_part id="3" name="elevator"> <node invert_pitch="1">flipper_left</node> <node invert_pitch="1">flipper_right</node> </articulated_part> <articulated_part id="4" name="flap"> <node invert_pitch="1">flap_0_left</node> <node invert_pitch="1">flap_0_right</node> <node invert_pitch="1">flap_1_left</node> <node invert_pitch="1">flap_1_right</node> </articulated_part> <articulated_part id="5" name="engine"> <node>engine_left</node> <node>engine_right</node> </articulated_part> <articulated_part id="6" name="wheel"> <node>chassis_element_left/chassis_left/wheels_left</node> <node>chassis_element_right/chassis_right/wheels_right</node> <node>dummy_axis_chassis_front/chassis_front001/wheels_front</node> </articulated_part> <articulated_part id="7" name="slat"> <node>slat_left</node> <node>slat_right</node> </articulated_part> <volume_definition id="0" name="body" shape="0">volumes</volume_definition> <volume_definition id="1" name="wings" shape="1">volumes</volume_definition> </entity> <entity id="180" name="uc-135"> <path>ig_aircraft/sample_content/helicopter/node/helicopter_simple.node</path> <component id="1" name="RotorBlade"> <node>body/rotor_aux</node> <property>RotorBlade</property> <parameter type="float" name="data1">speed</parameter> <parameter type="float" name="data2">beta_0</parameter> <parameter type="float" name="data3">beta_cos</parameter> <parameter type="float" name="data4">beta_sin</parameter> </component> <component id="2" name="RotorWashController"> <property>RotorWashController</property> <parameter type="float" name="data1">intensity</parameter> <parameter type="float" name="data2">rpm_intensity</parameter> </component> </entity> <entity id="218" name="minibus"> <path>ig_aircraft/sample_content/minibus/minibus.node</path> <component id="0" name="wheel_trace"> <property>WheelTraceController</property> <parameter type="float" name="data1">input_intensity</parameter> </component> </entity> - Configure your host. An example of host configuration may be found in the readme.md file.配置主机。主机配置的一个示例可以在readme.md文件中找到。
In the configured project, you'll be able to create the following entity types:在配置的项目中,您将能够创建以下实体类型:
- 201 — aircraft (fire effects, landing gears)201 -飞机(火焰效果,起落架)
- 180 — helicopter (rotor coning, rotor wash)180 -直升机(旋翼锥形,旋翼清洗)
- 218 — car (wheel trace decal)218 -汽车(轮跟踪贴花)