带有Oculus插件的Oculus Rift输出
 The Oculus plugin is used to support the Oculus Rift head-mounted display. For the correct work of the plugin Oculus Rift PC Runtime is required. Note that your customers must have runtime installed as well. The plugin supports all HMD types supported by the latest Oculus Rift PC Runtime (including Oculus Rift CV1 (Consumer Version). Oculus 插件用于支持Oculus Rift头戴式显示器。为了正确运行插件,必须使用 Oculus Rift PC Runtime 。请注意,您的客户还必须安装运行时。该插件支持最新的Oculus Rift PC运行时(包括Oculus Rift CV1(消费版))支持的所有HMD类型。
Since Oculus VR has stopped supporting Linux, the plugin is available only for Windows.由于Oculus VR已停止支持Linux,因此该插件仅适用于Windows。The Oculus plugin provides the VR mode that allows for rendering to both the Oculus Rift head-mounted display and the PC display. When the VR mode is disabled, the image is rendered only to the PC display. The mode can be toggled by using the engine.oculus.setEnabled() function.
Oculus插件提供了 VR模式,该模式允许渲染到Oculus Rift头戴式显示器和PC显示器。禁用VR模式时,图像仅渲染到PC显示器。可以使用 engine.oculus.setEnabled() 函数来切换模式。
Both the windowed and the full screen modes are supported. On the PC display the image is rendered as follows: 窗口模式和全屏模式均受支持。在PC显示屏上,图像呈现如下:
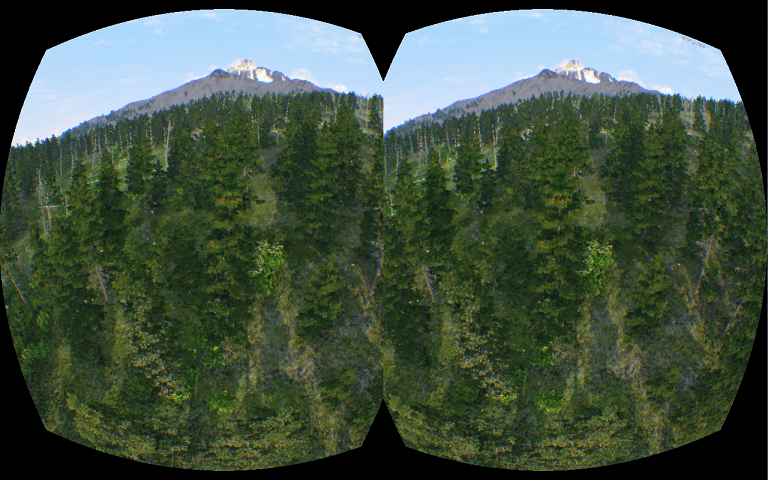
Valley benchmark rendered on PC display with Oculus使用Oculus在PC显示器上呈现的Valley基准See Also也可以看看#
- engine.oculus functions engine.oculus 函数
- <UnigineSDK>/data/samples/plugins/app_oculus_00 sample for additional details<UnigineSDK>/data/samples/plugins/app_oculus_00示例以获取更多详细信息
- OVR_CAPI.h File ReferenceOVR_CAPI.h文件参考
- The Oculus Best Practices document and the Oculus Developer Guide document that can be downloaded from the official web site.可以从官方网站下载Oculus Best Practices文件和Oculus Developer Guide文档。
To run the plugin sample from the UNIGINE SDK Browser, go to the Samples tab, choose UnigineScript -> App and run the app_oculus_00 sample.要从UNIGINE SDK浏览器运行插件示例,请转到Samples选项卡,选择UnigineScript -> App并运行app_oculus_00示例。
Implementing Unigine Application with Oculus Support在Oculus支持下实现Unigine应用程序#
To use the Oculus Rift virtual display with Unigine, perform the following:要将Oculus Rift虚拟显示器与Unigine一起使用,请执行以下操作:
- Get and set up the latest Oculus Rift PC Runtime.获取并设置最新的 Oculus Rift PC运行时。
- Create a new project with Oculus support via UNIGINE SDK Browser: click Video Output Options, check the Oculus support (Oculus plugin) option in the form that opens and click OK.
注意To add Oculus support to an existing project, in UNIGINE SDK Browser, click Other Actions -> Configure Project -> Video Output Options -> Oculus support (Oculus plugin) -> Ok. To add Oculus support to an existing project, in UNIGINE SDK Browser, click Other Actions -> Configure Project -> Video Output Options -> Oculus support (Oculus plugin) -> Ok.
To add Oculus support to an existing project, in UNIGINE SDK Browser, click Other Actions -> Configure Project -> Video Output Options -> Oculus support (Oculus plugin) -> Ok. 通过UNIGINE SDK浏览器创建一个具有Oculus支持的新项目:单击视频输出选项,选中表单中的 Oculus支持(Oculus插件) 选项随即打开,然后点击确定。 注意To add Oculus support to an existing project, in UNIGINE SDK Browser, click Other Actions -> Configure Project -> Video Output Options -> Oculus support (Oculus plugin) -> Ok. 要将Oculus支持添加到现有项目中,请在UNIGINE SDK浏览器中,单击Other Actions -> Configure Project -> Video Output Options -> Oculus support (Oculus plugin) -> Ok.
- Implement the application logic by using functions of the Oculus plugin API.通过使用Oculus插件API的函数来实现应用程序逻辑。
- Plug in the Oculus Rift virtual display.插入Oculus Rift虚拟显示器。
- Launch the Oculus plugin on the application start-up.在应用程序启动时启动 Oculus插件。
Launching Oculus启动Oculus#
To launch the plugin, specify the extern_plugin command line option on the application start-up:要启动插件,请在应用程序启动时指定extern_plugin命令行选项:
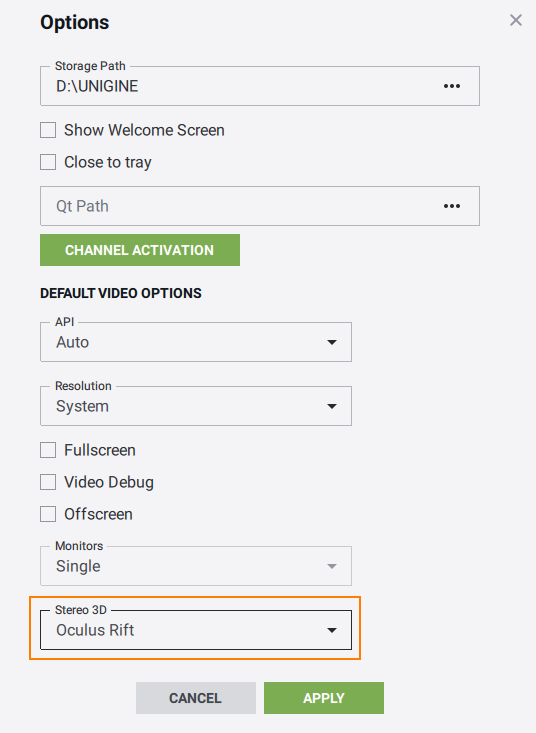
main_x64.exe -extern_plugin "UnigineOculus"If you run the application via UNIGINE SDK Browser, set the Stereo 3D option to Oculus Rift in the Options tab and click Apply: 如果通过UNIGINE SDK浏览器运行该应用程序,请在Options选项卡中将Oculus Rift in the Options tab and click Apply:
Head-tracking support is available by default.头部跟踪支持默认情况下可用。Oculus OptionsOculus选项#
The following CLI options can be specified on the application start-up:可以在应用程序启动时指定以下CLI选项:
- oculus_density - the render target pixel density. In other words, this is the ratio of the number of render target pixels to display pixels at the center of distortion.
The default value is 1.0 (the render target pixel density matches the display surface at the point on the display). oculus_density -渲染目标像素密度。换句话说,这是渲染目标像素数与失真中心处的显示像素的数量之比。
默认值为1.0(渲染目标像素密度与显示器表面上的显示点相匹配)。
- oculus_scale - the world scale. The default value is 1.0. oculus_scale -世界范围。默认值为1.0。
main_x64d -extern_plugin "UnigineOculus" -oculus_density 1.0 -oculus_scale 8.0Console Commands控制台命令#
The following console commands can be run for the Oculus plugin.可以为Oculus插件运行以下控制台命令。