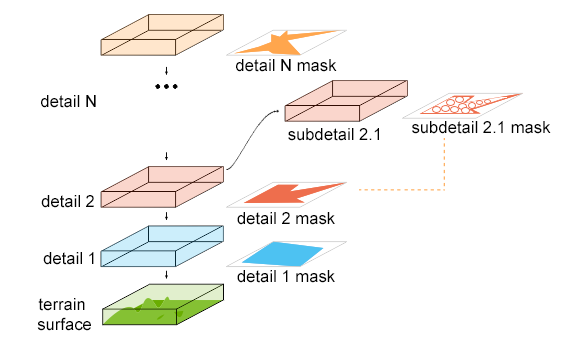
Terrain Global Details
You should upgrade to
Details serve to achieve realistic visual representation of the Global Terrain. Terrain Global has the following concepts:
- Base material — terrain_global_base is a basic material that is used to adjust various visualization and optimization parameters and control post processing effects for the whole global terrain. It's like a root layer, other layers will overlap (or overlay) the base material.
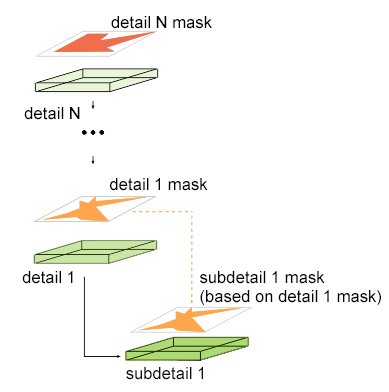
- Detail is a set of textures and parameters that is used for terrain visual representation. Details are organized in a hierarchy and use detail masks. The hierarchy determines the order in which they are stacked on the terrain surface (overlap or overlay)
- Subdetails have the same textures and parameters as details, but use the mask of their "parent" and can generate their own masks based on the parent's masks.
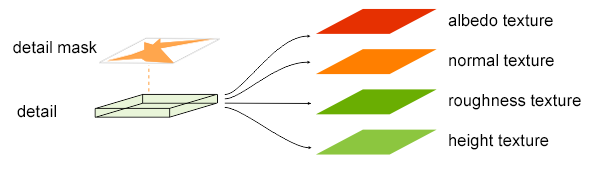
Detail is similar to the material; it is a set of textures and parameters that are used for the terrain visual representation: it adds details (rocks, grass, snow, etc.). Each detail has 4 textures:
- Albedo texture is used to specify the color information (how the detail looks like).
- Normal texture is used to specify the normals for light sources (how the detail is lit).
- Roughness texture is used to specify additional roughness effect of the detail.
- Height texture is used to specify the height of the detail (height of rocks, grass, etc.).
Detail Mask#
A mask specifies the areas where to show the detail. There are two parameters you can use to specify a mask for the detail:

-
Mask — here you can select a mask from the list of detail masks generated by the Sandworm Tool. A mask is a 1-channeled texture.
NoticeYou can use the same mask for different details. -
Mask by Albedo — here you can select a color of the imagery to be used as a mask. In this case, all areas on the terrain having selected color will be covered by the detail.
NoticeYou can click Pick Screen Color button and then click on any point on the terrain that has the desired color. Alpha value determines the color range to be selected.
Detail Textures#
To assign necessary textures to a detail, select it and adjust the required parameters:
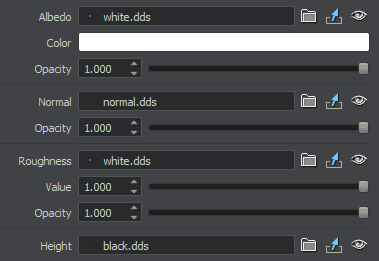
Albedo Texture#
Albedo texture is used to specify the color information of the detail: here you should assign snow texture for snow, grass texture for green grass, etc.
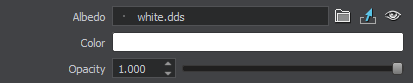
- Albedo — path to the albedo texture
- Color — albedo texture color multiplier
Opacity — opacity of the albedo texture
Notice
Normal Texture#
Normal texture is used to determine how the detail should be lit by light sources.

- Normal — path to the normal texture
- Opacity — opacity of the normal texture
Roughness Texture#
Roughness texture is used to add roughness for the detail.
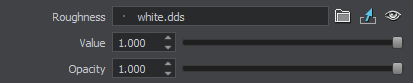
- Roughness — path to the roughness texture
- Value — roughness value multiplier
- Opacity — opacity of the roughness texture
Height Texture#
Height texture is used to specify a heightmap for the detail.
Based on the height texture, the terrain generates the material mask by using blending parameters: value, width and threshold.

Texture Arrays#
Albedo, normal, and height textures for all details are stored in separate texture arrays. For each of the arrays, you can specify texture size.
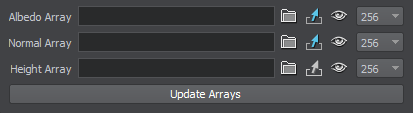
- Albedo Array — array of albedo textures of the detail
- Normal Array — array of normal textures of the detail
- Height Array — array of height textures of the detail
Detail Parameters#
You can specify the following parameters of the detail.
Common Parameters#
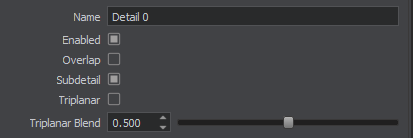
- Name — the name of the detail. When you change the name, it will be automatically changed in the hierarchy.
Enabled — enable or disable the detail.
NoticeDisabling a detail will automatically disable all its subdetails (if any).Overlap — enable overlap blending mode.
-
Overlap mode for details is used for drawing them atop of terrain (without blending). Unlike Overlay, this mode is used to render details without any color alteration, for example, flowers, stones, etc.
-
If this option is disabled, the material is blended in the overlay blending mode. When detail materials are rendered in the Overlay mode, the colors of the surface and detail material diffuse textures are blended.
-
Subdetail — use the mask of the parent detail.
Each detail uses a mask generated by the Sandworm Tool (or generates its own mask by using own height texture with blending parameters based on the selected mask). A subdetail uses the mask of its parent detail (or generates its own mask based on the parent's mask).
-
Triplanar — enable or disable triplanar texture mapping for the detail.
NoticeWhen triplanar texture mapping is disabled, planar UV mapping is used instead. On the left picture below, you can see that the texture gets stretched on steep faces.
 Triplanar texture mapping is off (planar UV is used instead).Triplanar texture mapping is on.
 - Triplanar Blend — this value adjusts blending between triplanar texture projections.
Visibility Parameters#
Visibility settings are used to improve performance and reduce tiling effect.
- Visibility Distance — this group of parameters can be used to set up LODs for details.
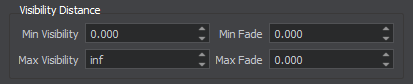
- Min Visibility — the distance from the camera starting from which the detail begins to fade in until it becomes completely visible. The default value is -inf.
- Max Visibility — the distance from the camera starting from which the detail begins to fade out until it becomes completely invisible. The default value is inf
- Min Fade — over this distance the detail will fade in until it is completely visible. The default value is 0.
- Max Fade — over this distance the detail will fade out until it is completely invisible. The default value is 0.
Visible Height — this group of parameters is used for mask modulation. For the areas specified by the mask, you can set up the range of heights, in which the detail is visible.
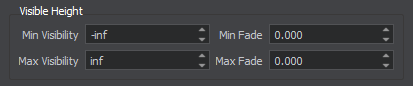
- Min Visibility — minimum height value starting from which the detail mask begins to fade in until it becomes completely visible. The default value is -inf.
- Max Visibility — maximum height value starting from which the detail mask begins to fade out until it becomes completely invisible. The default value is inf.
- Min Fade — over this height range below the minimum height value the detail mask will fade in until it is completely visible. The default value is 0.
- Max Fade — over this height range above the maximum height value the detail mask will fade out until it is completely invisible. The default value is 0.
Transformation Parameters#
You can specify the following transformation parameters of detail textures. These parameters can be used to reduce texture tiling effect.
![]()
- Size X — texture tile size along the X axis, in units. For example, after increasing the size from 10 to 100, each tile of the texture would cover 100 meters of the surface along the X axis instead of 10 (the number of tiles along the X axis would reduce 10 times).
- Size Y — texture tile size along the Y axis, in units.
|
|
|
|
Texture tile size is 100x100 units.
|
Texture tile size is 10x10 units.
|
- Offset X — texture tile offset along the X axis, UV coordinates. For example, by the offset of 0.5, the texture is rendered as if its left corner is in the middle of the texture.
- Offset Y — texture tile offset along the Y axis, UV coordinates.
![]()
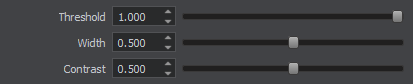
Blending Parameters#
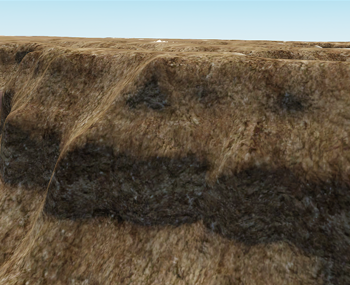
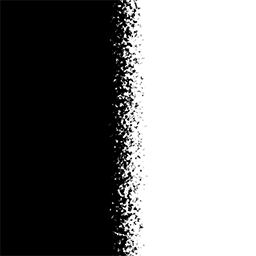
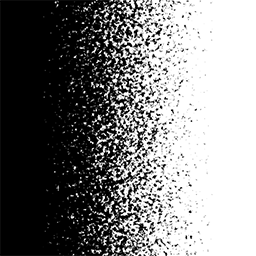
The Threshold, Width, and Contrast parameters allow you to control blending of the detail according to the mask.
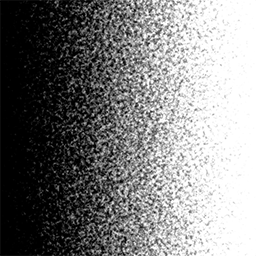
For example, we have the following mask and the following height texture of the material:

Detail's mask
|
Detail's height texture
|
The Threshold parameter controls the spread intensity of the layer. Lower values provide bigger spread.
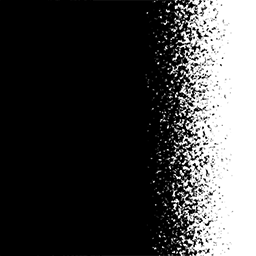
Low value
|

High value
|
The Width parameter controls the width of blending. Higher values provide wider areas.
Low value
|
High value
|
The Contrast parameter controls smoothness of blending. Lower values provide smoother results.
Low value
|
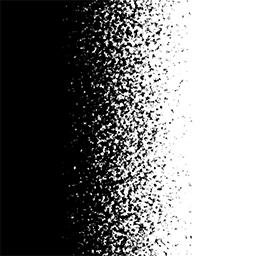
High value
|
Hierarchy of Details#
Details are stacked on the terrain in the order they appear in the hierarchy: the first detail in the hierarchy will be superimposed first on the terrain surface, the last detail in the hierarchy will be superimposed on the top of all others.
Adding a Detail#
To add a detail, click the Add button in the Details group.
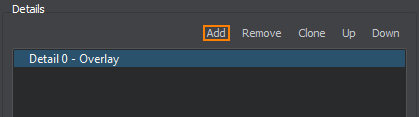
In the Details group, you can perform the following operations:
- Add — add a new detail.
- Remove — remove a selected detail from the list.
- Clone — clone the selected detail.
- Up — move the detail up in the hierarchy.
- Down — move the detail down in the hierarchy.