Adding Morph Targets(添加变形目标)
 This article describes how to work with the morph target animation also known as blend shapes in UNIGINE. Usually, morph targets are used to change facial expressions of characters.本文描述了如何使用 morph target(变形目标)动画,在UNIGINE中也称为blend shapes(混合形状)。通常,变形目标是用来改变人物的面部表情。
The article shows how to export the mesh with morph targets from Autodesk Maya and then add it to UNIGINE.这篇文章展示了如何从Autodesk Maya导出带有morph目标的网格,然后将其添加到UNIGINE。
The model used in this tutorial is Spot by Keenan Crane distributed under CC0 1.0 Universal.本教程中使用的模型是分布在CC0 1.0 Universal下的Spot 由 Keenan Crane。
Requirements需求#
- It is supposed that you already have a 3D model with blend shapes ready to be exported, and this model is within the limitations set in UNIGINE.假设您已经有一个混合形状的3D模型准备导出,并且该模型在UNIGINE设置的限制范围内。
- It is supposed that you already have a world created.假设您已经创造了一个世界。
See Also另请参阅#
- Description of the ObjectMeshSkinned class functionsObjectMeshSkinned类函数的描述
Step 1. Export a Mesh with Blend Shapes from Maya步骤1。从玛雅导出一个网格与混合形状#
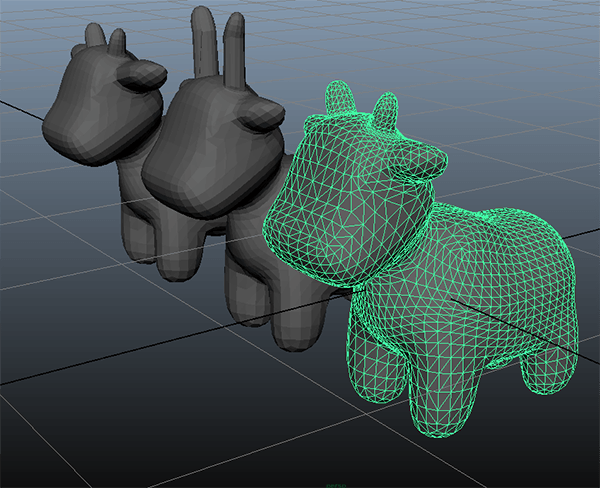
This section shows the way of exporting meshes with blend shapes in the FBX format from Autodesk Maya. It contains an example mesh of a calf, which has 2 blend shapes (morph targets).本节展示了从Autodesk Maya导出FBX格式的混合形状网格的方法。它包含一个小牛的示例网格,它有2个混合形状(变形目标)。
To export the mesh with blend shapes, do the following:要导出具有混合形状的网格,请执行以下操作:
-
In Autodesk Maya, select the mesh with blend shapes to be exported.在Autodesk Maya中,选择要导出的混合形状网格。
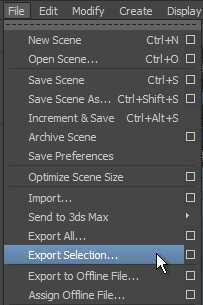
- In the main menu, click File -> Export Selection...在主菜单中,单击File -> Export Selection...
- In the Export Selection window, choose a folder to save the mesh and specify a name for the FBX file. In the Files of type drop-down list, choose FBX export.在Export Selection窗口中,选择一个文件夹来保存网格,并为FBX文件指定一个名称。在“Files of type”下拉列表中选择“FBX export”。
- In the File Type Specific Options tab with export options, specify parameters to export the mesh.在带有导出选项的File Type Specific Options选项卡中,指定参数以导出网格。
- In the Deformed Models tab, check the Blend Shapes checkbox to export blend shapes.在Deformed Models选项卡中,选中Blend Shapes复选框以导出混合形状。
- Click Export Selection.单击Export Selection。
Now you have the mesh in the FBX format that can be easily added to your project.现在您有了FBX格式的网格,可以很容易地添加到您的项目中。
Step 2. Add a Mesh into the World步骤2。在世界中添加网格#
This section shows how to add the exported mesh to the world and set up morph target animation.本节将展示如何添加导出的网格动画世界,建立变形目标。
To add the exported mesh to the world:将导出的网格添加到世界中:
-
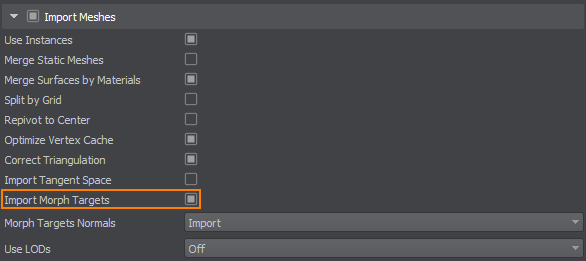
Import the .fbx file with the Import Morph Targets option enabled.启用 Import Morph Targets 选项并导入.fbx文件。
- Add the imported file to the scene.将导入的文件添加到场景中。
- Save the world.保存世界。
Each blend shape of the mesh is a target. You need to create morph targets for a surface of the mesh and set parameters to these targets to control the morph target animation. The following example shows how to create morph targets and set parameters via code:网格的每个混合形状都是一个目标。您需要为网格的表面创建变形目标,并为这些目标设置参数来控制变形目标动画。下面的例子展示了如何从代码中创建变形目标和设置参数:
AppWorldLogic.h:AppWorldLogic.h:
#ifndef __APP_WORLD_LOGIC_H__
#define __APP_WORLD_LOGIC_H__

#include <UnigineLogic.h>
#include <UnigineStreams.h>
#include <UnigineObjects.h>
#include <UnigineGame.h>
#include <UnigineMathLib.h>

using namespace Unigine;

class AppWorldLogic : public Unigine::WorldLogic
{

public:
	AppWorldLogic();
	~AppWorldLogic() override;

	int init() override;

	int update() override;
	int postUpdate() override;
	int updatePhysics() override;

	int shutdown() override;

	int save(const Unigine::StreamPtr &stream) override;
	int restore(const Unigine::StreamPtr &stream) override;

private:
	ObjectMeshSkinnedPtr mesh;
};

#endif // __APP_WORLD_LOGIC_H__AppWorldLogic.cpp:AppWorldLogic.cpp:
#include "AppWorldLogic.h"
#include <UnigineWorld.h>

int AppWorldLogic::init()
{
	// get the node that refers to the exported FBX file and cast it to a skinned mesh
	mesh = static_ptr_cast<ObjectMeshSkinned>(World::getNodeByName("spot_the_cow"));
	// set the number of morph targets
	mesh->setNumTargets(5, 0);

	return 1;
}

int AppWorldLogic::update()
{
	float time = Game::getTime() * 2.0f;
	// calculate weights of targets
	float k0 = sin(time * 3.0f) + 0.75f;
	float k1 = cos(time * 3.0f) + 0.75f;

	// set targets with parameters
	mesh->setTarget(0, 1, 0, 1.0f, 0);
	mesh->setTarget(1, 1, 0, -k0, 0);
	mesh->setTarget(2, 1, 0, -k1, 0);
	mesh->setTarget(3, 1, 1, k0, 0);
	mesh->setTarget(4, 1, 2, k1, 0);
	return 1;
}

int AppWorldLogic::shutdown()
{
	mesh.clear();

	return 1;
}
The code given above gets the node that refers to the FBX file and sets parameters to morph targets. Let's clarify the essential things:上面给出的代码获取引用FBX文件的节点,并设置参数以变形目标。让我们来澄清一些重要的事情:
- The exported mesh was obtained by casting the node that refers to the FBX asset to ObjectMeshSkinned. The node is obtained from the World by its name.导出的网格是通过将引用FBX资源的节点转换为ObjectMeshSkinned来获得的。节点是,通过其名称从World获得。
- The setNumTargets() function sets the number of targets for the surface of the mesh. The exported mesh in the example given above has 2 targets (blend shapes).setNumTargets()函数集的数量目标的表面网格。导出的网格在上面的例子中有2个目标(混合形状)。
-
By using the setTarget() function, all parameters for each created morph target are set in the update() function. Each target has its target weight. Weights have an influence on coordinates of the mesh: coordinates are multiplied by their weights. Thus, all enabled targets are multiplied by their weights and the new mesh is created:通过使用setTarget()函数,每个创建的变形目标的所有参数都在update()函数中设置。每个目标都有其目标权重。权重对网格的坐标有影响:坐标乘以它们的权重。因此,所有启用的目标都乘以它们的权重,并创建新的网格:final_xyz = target_0_xyz * weight_0 + target_1_xyz * weight_1 + ...
-
Since in the code given above, sin() and cos() functions are used for animation blending of different targets, five targets are created:因为在上面给出的代码sin()和cos()函数用于动画混合不同的目标,五创建目标:
-
源代码 (C++)
mesh->setTarget(0, 1, 0, 1.0f, 0);This target is for the bind pose without any interpolation.这个目标是没有任何插值的绑定姿势。 -
源代码 (C++)
mesh->setTarget(1, 1, 0, -k0, 0);
mesh->setTarget(2, 1, 0, -k1, 0);
These targets are used for interpolation of two animations blending.这些目标用于插值两种动画混合。 -
源代码 (C++)
mesh->setTarget(3, 1, 1, k0, 0);This target is used for the first animation blending, which uses the sin() function for interpolation.这个目标用于第一个动画混合,它使用sin()函数进行插值。 -
源代码 (C++)
mesh->setTarget(4, 1, 2, k1, 0);This target is used for the second animation blending, which uses the cos() function for interpolation.这个目标用于第二个动画混合,它使用cos()函数进行插值。
-
After assigning the material to the mesh, the result looks as follows:分配材质网后,结果如下: